Home of the $0 FREE Service Call Club | 0% Interest for 24 Months

Home of the $0 FREE Service Call Club | 0% Interest for 24 Months

Home of the $0 FREE Service Call Club | 0% Interest for 24 Months

A person wearing gray socks stands near an AC water problem, with a puddle forming under a leaking HVAC unit in a utility room. The unit’s panel is open and cleaning supplies are visible in the background.

Why Is My AC Leaking Water Inside My House?

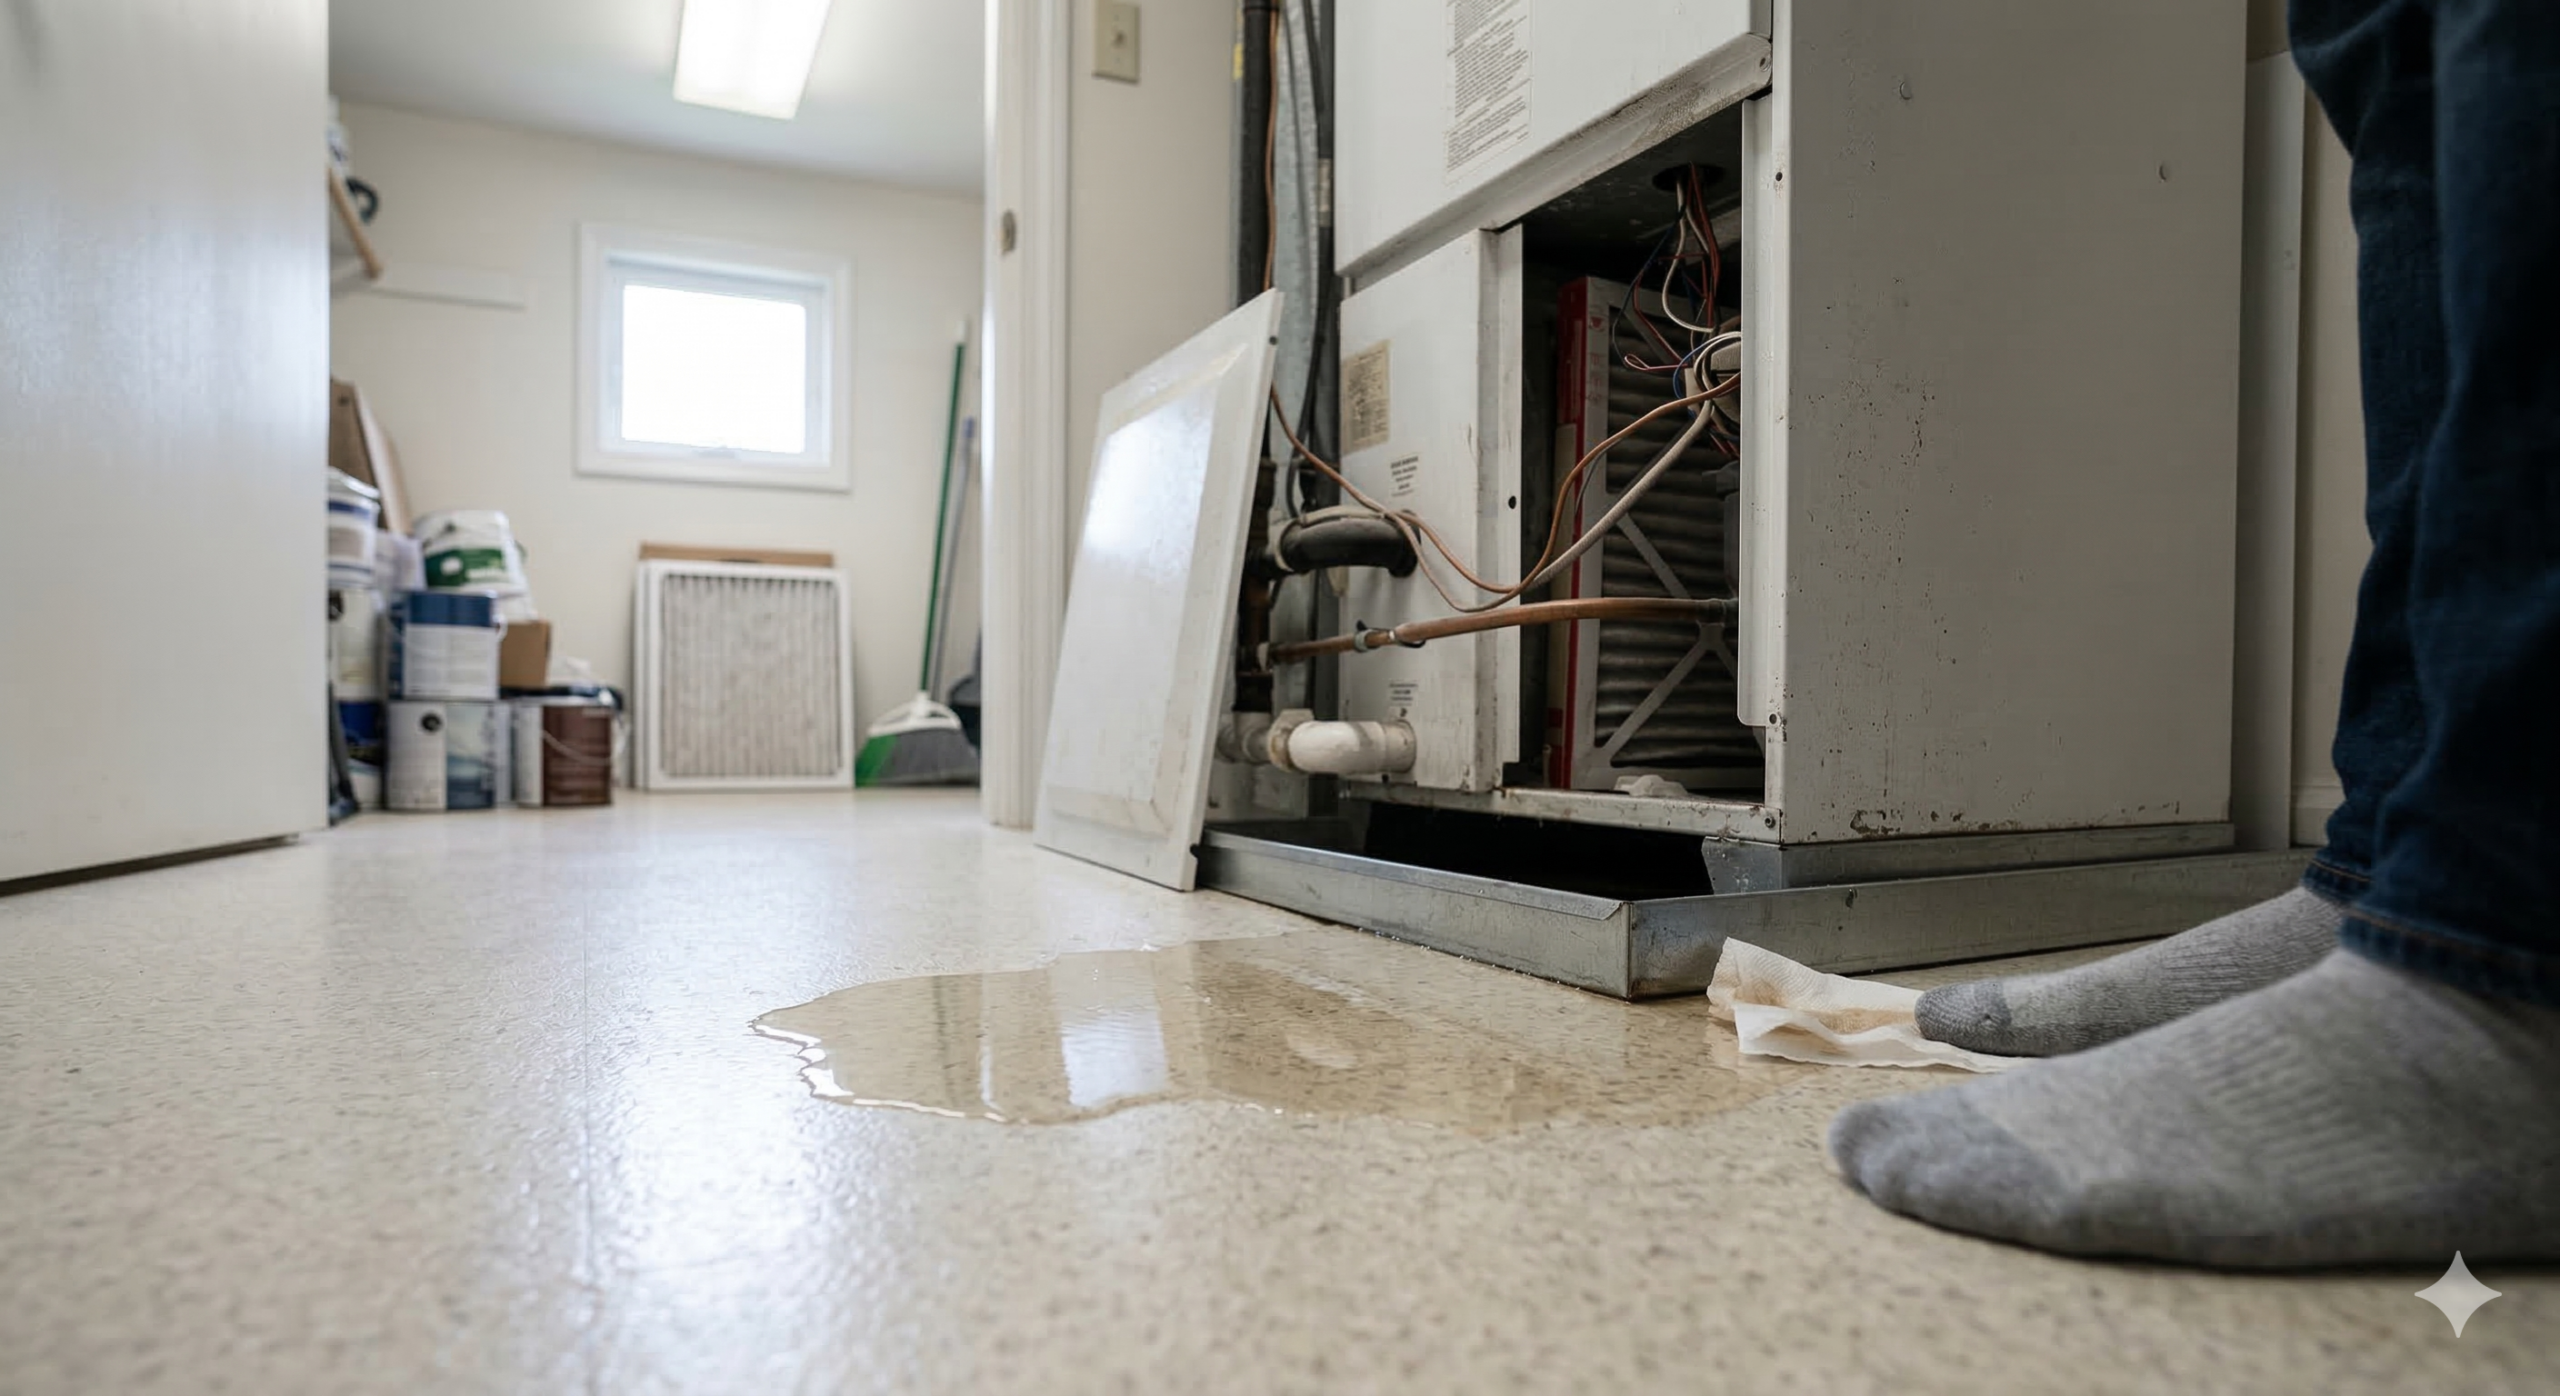
Water pooling around your indoor AC unit is almost always caused by a clogged condensate drain line, a cracked or overflowing drain pan, or a frozen evaporator coil that’s melting faster than the drainage system can handle. In South Carolina’s high-humidity climate, your AC removes significantly more moisture from the air than systems in drier regions — often producing 5–20 gallons of condensate per day during peak summer. That volume of water needs a clear path out of your home, and when anything blocks or breaks that path, the water ends up on your floors.

Coastal Carolina Comfort diagnoses and repairs AC water leaks across Summerville, Charleston, Columbia, and the entire South Carolina Lowcountry and Midlands. Most condensate-related repairs are completed in a single same-day visit. Call (843) 708-8735.


Why South Carolina Homes See More AC Water Leaks

Understanding why this problem is so common in our region starts with understanding how much moisture your AC handles.

A residential air conditioning system in South Carolina processes far more humidity than the same system would in Colorado, Arizona, or even the mid-Atlantic states. When warm, humid Lowcountry or Midlands air passes over the cold evaporator coil, moisture condenses on the coil’s surface — the same way water beads on a cold glass on a summer day. That condensation collects in a drain pan below the coil and flows through a drain line to the outside of your home.

During a typical South Carolina summer day with 80%+ relative humidity, your system may remove 5–20 gallons of water from your indoor air. That’s a tremendous amount of water flowing through a ¾-inch PVC pipe every day for six months. The warm, wet environment inside that drain line is ideal for algae, mold, and bacterial growth — which is exactly what clogs it.

This is why AC water leaks are one of the most common repair calls Coastal Carolina Comfort receives across the region, and why regular AC maintenance that includes drain line treatment is so important here.


The 5 Most Common Causes of AC Water Leaks

1. Clogged Condensate Drain Line

This is the cause in roughly 70% of AC water leak calls we respond to across South Carolina. The drain line — typically a ¾-inch PVC pipe running from the drain pan to an exterior exit point — becomes blocked by algae, mold, rust, or mineral deposits. Water backs up behind the clog, fills the drain pan, and overflows onto your floors.

South Carolina’s humidity makes drain clogs far more common than in drier climates because the warm, constantly wet interior of the drain line is a perfect incubator for biological growth. In the Lowcountry, we see drain lines that clog within 3–6 months of cleaning if no preventive treatment is applied.

The fix: A technician clears the clog using a wet/dry vacuum, nitrogen flush, or manual snake, then treats the line with an algaecide tablet or solution to inhibit regrowth. This is one of the most affordable AC repairs — typically $100–$200. The best prevention is flushing the drain line with vinegar monthly during cooling season and scheduling professional treatment during your annual maintenance visit.

2. Cracked or Rusted Drain Pan

The drain pan sits beneath the evaporator coil and catches condensation before it reaches the drain line. Over time — especially in the high-moisture environment inside a South Carolina air handler — metal drain pans rust through and plastic pans can crack.

When the pan is compromised, water bypasses the drain line entirely and drips directly onto the floor, into the ceiling, or into the crawl space below.

The fix: Drain pan replacement. Secondary drain pans (the backup pan beneath the air handler) are accessible and relatively inexpensive to replace. Primary drain pans (integrated into the coil assembly) are more involved and may require partial disassembly of the air handler. Costs typically range from $200–$600 depending on accessibility and pan type.

3. Frozen Evaporator Coil Melting

When the evaporator coil freezes — due to low refrigerant, restricted airflow, or a blower motor failure — the ice buildup can be substantial. When the system shuts off or the ice begins to melt, the volume of water released can overwhelm the drain pan and flood the area around the unit.

This is different from a normal condensate leak because the water volume is much larger and more sudden. If you see ice on the indoor unit or the copper refrigerant lines, you’re dealing with a coil freeze — not a simple drain clog. Read our complete guide on frozen evaporator coils in humid South Carolina weather.

The fix: Turn the system off to allow the coil to thaw completely (2–3 hours minimum). Place towels or a shallow pan to catch the meltwater. Then call for professional diagnosis to identify why the coil froze in the first place — the freeze is a symptom, not the root cause.

4. Disconnected or Damaged Drain Line

The PVC drain line can become disconnected from the drain pan fitting, cracked from physical impact, or separated at a joint due to poor installation or settling of the home. When this happens, condensate exits the system but misses the drain path — flowing instead into ceilings, walls, or onto floors at the point of disconnection.

This is more common in homes where the air handler is located in the attic — found frequently across Charleston, Summerville, and Columbia — because the drain line has a longer run and more joints that can separate over time.

The fix: Reattach, reseal, or replace the damaged drain line section. This is typically a straightforward repair costing $100–$300 depending on accessibility and the extent of the damage.

5. Condensate Pump Failure

Some AC installations — particularly where the air handler is in a basement, crawl space, or interior closet below the level of the exterior drain exit — use a condensate pump to move water uphill to an exit point. When the pump fails, water accumulates in the pump reservoir and eventually overflows.

Condensate pumps have a limited lifespan (typically 3–5 years) and contain a float switch that activates the pump when water reaches a certain level. Both the pump motor and the float switch can fail.

The fix: Condensate pump replacement, typically $200–$400 including parts and labor.


When an AC Water Leak Becomes an Emergency

A slow drip around the air handler is a repair-within-a-few-days situation. These conditions escalate it to an emergency.

Active flooding from the unit. If water is flowing — not just dripping — call for same-day service. Turn the system off at the thermostat to stop condensation production.

Water dripping through the ceiling. If your air handler is in the attic and water is coming through the ceiling into living spaces, the leak has overwhelmed the secondary drain pan. Turn the system off and call immediately — ceiling water damage worsens rapidly.

Water near electrical panels or outlets. Water and electricity create serious safety hazards. If the leak is near your breaker panel or any electrical outlet, turn off the AC at the breaker and call for emergency service.

For emergencies in the Columbia area, Coastal Carolina Comfort provides emergency AC repair in Columbia. Lowcountry homeowners can reach us for emergency AC repair across the region.


Preventing AC Water Leaks in South Carolina

Because condensate drain problems are so predictable in our climate, they’re also highly preventable.

Pour a cup of white vinegar down the drain line every 30 days during cooling season. The acidity inhibits algae and mold growth. Locate the drain line access point (usually a capped PVC T-fitting near the indoor unit) and pour the vinegar directly in.

Check the drain pan during filter changes. When you replace your air filter, glance at the drain pan. Standing water that doesn’t drain within a few minutes after the system cycles indicates a developing clog.

Keep the drain line exit clear. Outside your home, locate where the drain line exits (usually a PVC pipe dripping near the foundation). Make sure it’s not blocked by dirt, mulch, or landscaping.

Schedule professional maintenance twice per year. Coastal Carolina Comfort’s maintenance visits include drain line flushing, pan inspection, and algaecide treatment — the three steps that virtually eliminate condensate-related water leaks. Our Service Call Club members receive $0 service calls and priority scheduling.


Frequently Asked Questions

Q: Is water leaking from my AC dangerous?

The water itself isn’t harmful — it’s condensation from your indoor air. The danger is secondary: water damage to floors, walls, and ceilings; mold growth in damp areas (a particular concern in South Carolina’s humidity); and potential electrical hazards if water reaches wiring or outlets. Addressing the leak promptly prevents all of these.

Q: How much does it cost to fix an AC water leak?

Most AC water leak repairs are among the most affordable AC fixes. A clogged drain line clearing costs $100–$200. A drain pan replacement runs $200–$600. A condensate pump replacement is $200–$400. If the leak is caused by a frozen coil, the underlying repair (refrigerant leak, blower motor) determines the cost. See our complete AC repair cost guide for South Carolina.

Q: Can I unclog the AC drain line myself?

You can try a DIY approach: locate the drain line access point near the indoor unit, pour a cup of white vinegar in, and wait 30 minutes. If the clog is near the access point, this may clear it. For more stubborn clogs, a wet/dry vacuum attached to the exterior drain exit can pull the blockage out. If neither method works, the clog is deeper in the line or the problem isn’t the drain line at all — and you need professional service.

Q: Why does my AC leak water only when it’s really humid outside?

Higher outdoor humidity means your AC removes more moisture from the air, producing more condensate. A drain system that handles normal condensate loads may be overwhelmed during peak humidity days when the volume increases significantly. This often reveals a partially clogged drain line that was barely keeping up under normal conditions.

Q: Should I run my AC if it’s leaking water?

If the leak is a slow drip and you can contain it with towels, you can run the system while waiting for repair — especially if turning it off would leave your home dangerously hot. If water is actively flooding, dripping through a ceiling, or near electrical components, turn the system off at the thermostat immediately.


Related Reading


Water where it shouldn’t be? Coastal Carolina Comfort stops the leak and prevents the next one — same day, flat-rate pricing.

Call (843) 708-8735 for AC water leak repair across Summerville, Charleston, Columbia, and all of South Carolina.

Last Updated: March 2026

Share This Post

Get 10% Off Your First Service and a FREE Quote


More To Explore

A man in a polo shirt stands indoors, adjusting a switch on an open electrical panel while performing AC troubleshooting. The room features wooden floors and a hallway visible in the background.
Air Conditioning

My AC Won’t Turn On: Troubleshooting Before You Call a Technician

My AC Won’t Turn On: Troubleshooting Before You Call a Technician When your AC system won’t turn on at all — no fan, no compressor, no response to thermostat changes — the cause is either an interruption in the electrical supply reaching the system (tripped breaker, blown fuse, safety switch activation, thermostat failure) or a failure of a startup component within the system itself (dead capacitor, burned contactor, failed control board, or seized compressor). About 30% of “AC won’t start” calls that Coastal Carolina Comfort responds to across South Carolina are resolved by the homeowner checks described below. The remaining 70% require professional diagnosis and repair. Coastal Carolina Comfort provides same-day diagnostic service for systems that won’t start across Summerville, Charleston, Columbia, and the entire Lowcountry and Midlands. Our NATE-certified technicians carry the common startup components — capacitors, contactors, control boards — needed to restore your system in a single visit. Call (843) 708-8735. Homeowner Troubleshooting: 6 Checks Before You Call These checks are safe for any homeowner to perform and take less than 10 minutes total. Work through them in order. Check 1: Thermostat Power and Settings Start at the thermostat — it’s the most common cause of a system that appears dead. Verify it has power. If the display is blank, the thermostat has lost power. Check whether it uses batteries (replace them) or is wired to the system (a tripped breaker or blown fuse at the air handler may have cut power to the thermostat). Verify the settings. Ensure the system is set to “cool” (not “off,” “heat,” or “fan only”), the set temperature is at least 3–5°F below the current room temperature, and any scheduling or away modes aren’t overriding your settings. Try a hard reset. Turn the thermostat completely off, wait 30 seconds, then turn it back to cooling mode. For smart thermostats, a power cycle or factory reset can resolve software glitches that prevent the system from responding. If the thermostat appears to be working correctly — display is on, settings are correct, it shows “cooling” — but the system doesn’t respond, the issue is downstream. Check 2: Circuit Breakers Your AC system typically uses two circuit breakers in your main electrical panel: one for the indoor air handler and one for the outdoor condenser unit. Check both. Look for a tripped breaker. A tripped breaker sits in the middle position — not fully “on” and not fully “off.” Push it firmly to “off” first, then back to “on.” If the breaker holds and the system starts, monitor it. If the breaker trips again within minutes, do not reset it a third time — the system has an electrical fault that requires professional diagnosis. Check for a blown fuse at the air handler. Some air handlers have a small fuse (typically 3–5 amp) on the control board that protects the low-voltage circuit. If this fuse blows, the thermostat loses its ability to communicate with the system. This fuse is accessible inside the air handler’s front panel — but if you’re not comfortable opening the panel, skip this check and call for service. Check 3: Emergency Shutoff Switch Many AC installations include a wall-mounted emergency shutoff switch that looks like a standard light switch — typically located near the indoor air handler or in the utility closet. If someone accidentally flipped this switch off (during maintenance, painting, or cleaning), the entire system is disabled. Check for a switch near the air handler that might be in the “off” position. Flip it on and see if the system responds. Check 4: Condensate Drain Safety Switch Many South Carolina HVAC installations include a float switch on the condensate drain line that shuts the system down when the drain line clogs and water backs up. This is a safety feature designed to prevent water damage — but it also means a simple drain clog can make your entire AC system unresponsive. If your system has a visible float switch on the drain line (a small device with a float attached to the PVC pipe near the air handler), check whether standing water is visible in the drain pan. If the pan is full, the float switch has activated. Clearing the drain line may restore system operation. Our guide on AC leaking water inside your house covers drain line clearing in detail. Check 5: Outdoor Disconnect Box Near your outdoor condenser unit, there’s a disconnect box — a small metal box mounted on the wall within a few feet of the unit. This box contains either a pull-out fuse block or a breaker that supplies power specifically to the outdoor unit. Check that the disconnect is in the “on” position and that the fuses (if applicable) haven’t blown. A blown disconnect fuse is a common cause of a system where the indoor fan runs but the outdoor unit doesn’t respond at all. Check 6: Wait 5 Minutes After Any Reset Modern AC systems have built-in time delays that prevent the compressor from restarting too quickly after a shutdown — rapid cycling can damage the compressor. If you’ve reset a breaker, flipped a switch, or changed the thermostat, wait at least 5 minutes before concluding the system isn’t responding. The delay is protecting your equipment. If the Homeowner Checks Don’t Work: Common Professional Repairs When all homeowner-accessible checks fail to restore the system, one of these mechanical or electrical failures is typically the cause. Failed Capacitor The run capacitor provides the electrical boost the compressor and fan motors need to start. When it fails, the motors can’t overcome their starting inertia. You might hear a clicking sound from the outdoor unit as the contactor engages, followed by a hum and then silence — the system is trying to start but the capacitor can’t deliver. Capacitor failure is the single most common reason an AC system won’t start. It’s also one of the most affordable repairs: $150–$300 including parts and labor. In South Carolina’s long cooling season, capacitors endure more

A close-up view of an air conditioner evaporator coil covered with a thick layer of ice and frost, indicating a malfunction or freezing issue.
Air Conditioning

AC Frozen Evaporator Coil: Why Your Air Conditioner Ices Up in Humid SC Weather

AC Frozen Evaporator Coil: Why Your Air Conditioner Ices Up in Humid SC Weather A frozen evaporator coil occurs when the coil’s surface temperature drops below 32°F and moisture from your indoor air freezes on contact, building a layer of ice that blocks airflow and prevents heat absorption. The most common causes are restricted airflow from a clogged filter or dirty coil, low refrigerant charge from a leak, and blower motor failure that reduces air volume across the coil. In South Carolina’s high-humidity environment, frozen coils are both more common and more damaging than in drier climates — the heavy moisture content in Lowcountry and Midlands air means ice builds faster and produces more water when it melts. Coastal Carolina Comfort diagnoses and repairs frozen evaporator coils across Summerville, Charleston, Columbia, and all of South Carolina. Our NATE-certified technicians identify the root cause — not just thaw the ice — and provide upfront pricing before any repair begins. Call (843) 708-8735. How a Frozen Coil Damages Your AC System A frozen evaporator coil isn’t just a temporary inconvenience — it creates a cascade of problems that can damage multiple components if the system continues running. The compressor is at greatest risk. Under normal operation, liquid refrigerant enters the evaporator coil, absorbs heat, and exits as a gas before returning to the compressor. When the coil freezes, this heat exchange stops. Liquid refrigerant passes through the coil without vaporizing and reaches the compressor in liquid form. Compressors are designed to pump gas, not liquid. Liquid refrigerant entering the compressor — called liquid slugging — can crack valves, damage pistons, and cause catastrophic compressor failure. A compressor replacement typically costs $1,500–$3,000+. Water damage when the ice melts. A frozen coil accumulates a surprising amount of ice. When the system shuts off or the ice begins to melt, the resulting water can easily overwhelm the drain pan — especially if the drain line is also partially clogged (a common combination in South Carolina). Water overflows onto floors, into ceilings, or through walls. Read our guide on AC leaking water inside your house for immediate steps if you’re already dealing with water. Reduced system life. Repeated freeze-thaw cycles stress the coil fins, degrade the coil’s protective coating, and can eventually cause refrigerant leaks in the coil itself — one of the most expensive AC repairs. The 5 Causes of Frozen Evaporator Coils in South Carolina 1. Clogged Air Filter This is the most common cause — and the most preventable. A clogged filter restricts the volume of warm air passing over the evaporator coil. Without sufficient warm air, the coil’s temperature drops below the freezing point. Moisture in the air freezes on contact, and the ice layer further restricts airflow, accelerating the freeze. In South Carolina, where pet dander, pollen, dust, and high humidity all contribute to faster filter loading, a filter that might last 90 days in a drier climate may need replacement every 30 days during peak cooling season. The fix: Replace the filter, turn the system off for 2–3 hours to allow complete thawing, then restart. If the system runs normally and doesn’t refreeze, the filter was the sole cause. If ice returns within 24 hours, there’s an additional underlying issue. 2. Low Refrigerant From a Leak Low refrigerant charge causes the evaporator coil’s temperature to drop below normal operating range. When the coil is too cold, moisture freezes on its surface instead of condensing into liquid and draining away. The ice insulates the coil, making it even colder, and the freeze accelerates until the coil is completely encased. This is the most common mechanical cause of frozen coils, and it requires professional repair. A technician will thaw the coil, test for leaks, repair the leak source, and recharge the system to manufacturer specifications. Simply adding refrigerant without fixing the leak guarantees the problem will return. In South Carolina’s coastal environment, refrigerant line corrosion from salt air is a significant contributor to leaks — particularly on homes within a few miles of Charleston Harbor, James Island, or the Isle of Palms. 3. Dirty Evaporator Coil Even with regular filter changes, the evaporator coil accumulates dust, biological growth, and particulate matter over time — especially in South Carolina’s humid environment where mold and mildew thrive on the constantly damp coil surface. A dirty coil insulates itself from the warm air passing over it. The coil can’t absorb enough heat, its temperature drops, and the same freeze cycle begins. The difference is that a dirty-coil freeze develops more gradually than a low-refrigerant freeze — you might notice declining performance for weeks before ice becomes visible. The fix: Professional coil cleaning. This requires access to the indoor unit, coil-specific cleaning solution, and careful handling to avoid damaging the delicate aluminum fins. Coil cleaning is typically included in comprehensive maintenance visits that prevent frozen coils and costs $150–$300 as a standalone service. 4. Blower Motor Failure or Reduction The blower motor moves air across the evaporator coil. If it fails entirely, airflow stops completely and the coil freezes rapidly. A partially failing motor — running at reduced speed due to worn bearings, a failing capacitor, or a winding issue — moves insufficient air, causing a slower but equally damaging freeze. In multi-speed systems, a motor stuck on low speed may provide enough airflow for mild days but insufficient volume on high-demand days, creating intermittent freezing that’s harder to diagnose. 5. Collapsed or Blocked Return Ductwork If the return duct — the large duct that carries warm room air back to the air handler — is crushed, disconnected, or severely blocked, the volume of air reaching the evaporator coil drops below the minimum threshold. This can happen when stored items are placed on flex duct in an attic, when a duct joint separates due to age or poor installation, or when a return vent is blocked by furniture or closed. This cause is more common in homes with ductwork routed through attics — a standard

SCHEDULE A $0 FREE SERVICE CALL AND GET A FREE QUOTE


GET A FREE ESTIMATE and schedule service


GET A FREE ESTIMATE and schedule service