HVAC Repair vs. Replacement: A Summerville Homeowner’s Decision Guide
Deciding between HVAC repair and replacement comes down to four key factors: the cost of repair relative to replacement (use the 50% rule—if repairs exceed half the cost of a new system, replace), the age of your equipment (systems over 15 years old are usually better replaced), refrigerant type (R-22 systems should be replaced due to phase-out costs), and repair frequency (multiple repairs per year signal it’s time). Summerville homeowners should also factor in energy efficiency gains, available rebates, and the demanding Lowcountry climate that shortens system lifespans compared to national averages.
The Question Every Homeowner Dreads
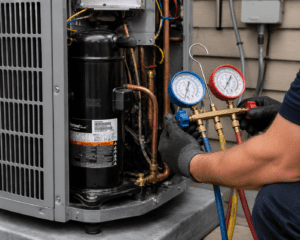
Your HVAC technician just delivered the news: your system needs a major repair. Maybe it’s a compressor. Maybe it’s a coil leak. Whatever it is, the number has four digits, and now you’re facing the question every Summerville homeowner eventually confronts.
Do I fix it, or do I replace the whole thing?
It’s not an easy decision. Repair feels like the cheaper option—until you’re repairing again six months later. Replacement feels like the responsible choice—until you see the price tag. And everyone from your neighbor to your brother-in-law has an opinion.
At Coastal Carolina Comfort, we’ve guided thousands of Lowcountry homeowners through this exact decision. We’ve seen people waste money repairing systems that should have been replaced years ago. We’ve also seen people replace perfectly good equipment because someone talked them into it.
This guide will give you the framework to make the right decision for your situation—not based on sales pressure, but on facts, math, and what actually makes sense for your home and budget.
The 50% Rule: Your Starting Point
The most reliable rule of thumb in the HVAC industry is simple:
If the repair costs more than 50% of what a new system would cost, replace instead of repair.
Here’s why this works:
The Math Behind the Rule
Let’s say a new HVAC system for your Summerville home costs $8,000 installed. Using the 50% rule:
- Repair cost under $4,000: Repair is likely the better value
- Repair cost over $4,000: Replacement makes more financial sense
But this isn’t just about today’s repair. It’s about what comes next.
A system that needs a $3,500 repair today is likely to need another significant repair within 1-2 years. That’s the nature of aging equipment—when major components fail, others are usually close behind.
So that $3,500 repair might actually cost you $3,500 + $1,200 + $800 over the next two years. Suddenly you’ve spent $5,500 and still have an old, inefficient system.
When to Adjust the Rule
The 50% rule is a starting point, not an absolute. Adjust based on:
System age: For systems under 8 years old, you might stretch to 60-70% before replacing—they likely have more good years ahead. For systems over 12 years old, consider replacing at 30-40% of replacement cost.
Repair history: If this is the first major repair on a well-maintained system, lean toward repair. If it’s the third repair this year, lean toward replacement regardless of cost.
Component involved: Some repairs (capacitor, contactor, fan motor) are normal wear items that don’t indicate broader system failure. Others (compressor, evaporator coil) often signal the beginning of the end.
The Age Factor: How Old Is Too Old?
System age is the second most important factor in your decision.
Average HVAC Lifespan
National average: 15-20 years with proper maintenance
Summerville reality: 12-16 years is more typical
Why the difference? Our systems work harder. A Summerville AC runs 8-9 months per year, often 12+ hours per day during summer. Compare that to a system in Minneapolis that might run 4 months per year. More operating hours means faster wear.
Age-Based Decision Framework
Under 8 years old: Almost always repair unless the cost exceeds 50% of replacement. These systems have significant life remaining.
8-12 years old: Evaluate carefully. Major repairs may be worthwhile, but start planning for eventual replacement. This is a good time to begin saving.
12-15 years old: Lean toward replacement for major repairs. The system is in its final years, and repair money is often better invested in new equipment.
Over 15 years old: Replace for any significant repair. Even if the repair is relatively affordable, you’re likely facing additional failures soon. The efficiency gains alone often justify replacement.
The Warranty Consideration
Most HVAC systems come with:
- 5-10 year compressor warranty
- 5-10 year parts warranty
- 1 year labor warranty (sometimes extended by the installer)
If your system is still under warranty, repair almost always makes sense—your out-of-pocket cost is limited to labor and any non-covered parts.
Check your paperwork or call your installer to verify warranty status before making any decisions.
The R-22 Refrigerant Problem
If your system uses R-22 refrigerant (also called Freon or HCFC-22), this single factor may make your decision for you.
What Happened to R-22
R-22 was the standard air conditioning refrigerant for decades. However, due to its ozone-depleting properties, the EPA phased it out:
- 2010: No new R-22 systems could be manufactured
- 2020: Production and import of R-22 banned entirely
This means all R-22 available today is either recycled or reclaimed from decommissioned systems. Supply is limited and shrinking every year.
The Cost Impact
R-22 prices have skyrocketed:
- 2010: Approximately $10-15 per pound
- 2020: Approximately $50-75 per pound
- 2026: $100-200+ per pound depending on availability
A typical residential AC system holds 6-12 pounds of refrigerant. If your R-22 system develops a leak, you’re looking at:
- Leak repair: $200-$1,000+ depending on location
- Refrigerant recharge: $600-$2,400+ for a full charge
- Total cost: Often $1,000-$3,000+ for a single repair
And here’s the kicker—if it leaks once, it will likely leak again. You could face these costs repeatedly.
How to Know If You Have R-22
Check the data plate on your outdoor unit. Look for:
- “R-22” or “HCFC-22” = R-22 system (consider replacement)
- “R-410A” or “Puron” = Modern refrigerant (repair may make sense)
If your system was installed before 2010, it almost certainly uses R-22. Systems installed 2010-2015 could be either. Systems installed after 2015 are virtually all R-410A.
Our Recommendation
If you have an R-22 system that needs any refrigerant-related repair, replace it. The ongoing costs of maintaining an R-22 system are simply not sustainable. Put that repair money toward a new, efficient system with readily available refrigerant.
Repair Frequency: The Pattern That Tells the Truth
Sometimes the decision isn’t about one big repair—it’s about the pattern of smaller ones.
Warning Signs in Your Repair History
Red flags that suggest replacement:
- Three or more repairs in the past two years
- Annual repair costs exceeding $500
- Same component failing repeatedly
- Different components failing in sequence
- Repairs becoming more frequent over time
Signs that repair is still reasonable:
- First significant repair on the system
- Repairs limited to normal wear items (capacitors, contactors, fan motors)
- Several years between repairs
- System otherwise performs well
The “Death by a Thousand Cuts” Trap
We see this constantly: a homeowner repairs their system for $300, then $450 six months later, then $275, then $600. Each repair seems reasonable in isolation. But add them up over two years and they’ve spent $1,625 on a system that’s still old and inefficient.
That money could have been a down payment on a new system with a warranty, better efficiency, and 15+ years of reliable service ahead.
Track your repairs. Keep receipts or a simple log. When you can see the pattern on paper, the decision often becomes obvious.
Energy Efficiency: The Hidden Cost of Old Equipment
When comparing repair vs. replacement costs, most homeowners forget to factor in efficiency.
Understanding SEER Ratings
SEER (Seasonal Energy Efficiency Ratio) measures how efficiently an AC converts electricity into cooling. Higher SEER = lower operating costs.
SEER standards over time:
- Pre-2006: No minimum standard (many systems were 8-10 SEER)
- 2006-2014: Minimum 13 SEER required
- 2015-2022: Minimum 14 SEER required
- 2023+: Minimum 15 SEER required in the Southeast (including South Carolina)
Modern high-efficiency systems range from 16-26 SEER.
Real Dollar Impact
Let’s compare a 10 SEER system (typical of pre-2006 installations) to a new 16 SEER system:
Assumptions:
- 2,000 square foot Summerville home
- Average summer electricity rate of $0.13/kWh
- 2,000 cooling hours per year (conservative for Lowcountry)
Annual cooling costs:
- 10 SEER system: Approximately $1,200-1,400/year
- 16 SEER system: Approximately $750-875/year
- Annual savings: $400-550
Over 15 years, that’s $6,000-$8,250 in energy savings—often enough to offset a significant portion of the new system cost.
The Efficiency Calculation
When evaluating repair vs. replacement, add projected energy savings to your analysis:
Example:
- New system cost: $8,000
- Repair cost: $2,500
- Annual energy savings with new system: $450
- 10-year energy savings: $4,500
True cost comparison:
- Repair: $2,500 (plus continued high energy bills)
- Replace: $8,000 – $4,500 energy savings = $3,500 effective cost
Suddenly replacement looks much more competitive—and you get a warranty, reliability, and better comfort.
Rebates and Incentives: Money You Might Be Leaving on the Table
Before finalizing your decision, research available rebates and incentives. These can significantly shift the math toward replacement.
Federal Tax Credits
The Inflation Reduction Act of 2022 established significant tax credits for high-efficiency HVAC equipment:
- Heat pumps: Up to $2,000 tax credit for qualifying systems
- Central air conditioners: Up to $600 tax credit for qualifying systems
- Requirements: Must meet specific efficiency standards (typically 16+ SEER2 for AC, varies for heat pumps)
These are tax credits, not deductions—they reduce your tax bill dollar-for-dollar.
Utility Rebates
Dominion Energy and other South Carolina utilities periodically offer rebates for high-efficiency equipment:
- Typical rebates: $200-$500 for qualifying systems
- Requirements: Vary by program and change frequently
- How to claim: Usually requires proof of purchase and installation by a licensed contractor
Check with your utility provider or ask your HVAC contractor about current programs.
Manufacturer Rebates
HVAC manufacturers frequently offer seasonal rebates:
- Typical savings: $100-$1,000 depending on equipment and timing
- Best timing: Spring and fall often have the best promotions
- How to access: Through participating dealers (like Coastal Carolina Comfort)
Financing Options
Many homeowners don’t realize that financing a new system can result in lower monthly costs than continuing to repair:
Example:
- Old system: $150/month energy bills + $100/month average repair costs = $250/month
- New system: $100/month energy bills + $120/month financing payment = $220/month
You’re paying less monthly AND building equity in new equipment.
Summerville-Specific Factors
National advice doesn’t always apply to the Lowcountry. Here are local factors to weigh:
Climate Demands
Summerville’s climate is brutal on HVAC equipment:
- Extended cooling season: 8-9 months of AC use
- High humidity: Systems work harder for dehumidification
- Salt air: Coastal proximity accelerates corrosion (especially in systems closer to Charleston)
- Intense summer heat: Systems run at maximum capacity for extended periods
These factors mean Summerville systems age faster than national averages suggest. A 12-year-old system here has seen more wear than a 15-year-old system in a milder climate.
Local Energy Costs
South Carolina electricity rates are moderate compared to national averages, but summer bills still climb significantly. The efficiency gains from a new system translate to real savings—typically $300-$600 annually for most Summerville homes.
Home Values and Buyer Expectations
If you’re considering selling your home in the next few years, HVAC age matters to buyers:
- New or recent HVAC: Selling point that can increase offers
- Aging HVAC: Buyers often negotiate price reductions or request replacement
- Failed inspection: An HVAC issue discovered during inspection can derail sales
Replacing an aging system before listing often returns more value than the cost of the equipment.
Humidity Control
Older systems, especially oversized ones, often struggle with humidity control. If your home feels clammy even when the AC runs, a new properly-sized system with modern humidity management can dramatically improve comfort.
Related: Learn how Summerville’s humidity affects your HVAC system
Component-by-Component: Repair or Replace?
Not all repairs are created equal. Here’s guidance on specific components:
Usually Worth Repairing
Capacitors ($150-$400): Normal wear item. Replace and move on unless the system is very old.
Contactors ($150-$350): Another wear item. Reasonable repair for any system under 15 years.
Fan motors ($300-$700): Common failure, straightforward repair. Worth fixing on systems under 12-15 years.
Refrigerant recharge—R-410A ($200-$500): If the leak is minor and repairable, this is reasonable for newer systems.
Thermostat ($150-$400): Not technically part of the HVAC system. Replace as needed regardless of system age.
Evaluate Carefully
Evaporator coil ($1,000-$2,500): Major repair. Worth it for systems under 10 years; questionable for older systems.
Condenser coil ($1,200-$2,800): Similar to evaporator coil. Age is the deciding factor.
Blower motor ($400-$900): Mid-range repair. Usually worth it unless the system has other issues.
Refrigerant leak repair ($300-$1,500): Depends on leak location and refrigerant type. R-22 leaks almost always mean replacement.
Usually Means Replacement
Compressor ($1,500-$3,000+): The heart of the system. At this cost, replacement usually makes more sense for any system over 8-10 years old.
Heat exchanger ($1,500-$3,500): Critical safety component in furnaces. Failure in older systems typically warrants replacement.
Multiple simultaneous failures: When two or more major components fail together, the system is telling you something.
R-22 refrigerant issues: Any significant repair on an R-22 system should trigger replacement consideration.
The Decision Framework: Putting It All Together
Here’s a step-by-step process to make your decision:
Step 1: Get the Facts
- Exact repair cost (in writing)
- System age
- Refrigerant type
- Repair history (past 2-3 years)
- Current system efficiency (SEER rating)
Step 2: Apply the 50% Rule
- Get a quote for replacement
- Compare repair cost to 50% of replacement cost
- Adjust threshold based on system age
Step 3: Factor in Hidden Costs
- Energy efficiency difference
- Likely future repairs
- R-22 refrigerant costs (if applicable)
- Comfort and reliability value
Step 4: Research Incentives
- Federal tax credits
- Utility rebates
- Manufacturer promotions
- Financing options
Step 5: Consider Your Timeline
- How long do you plan to stay in the home?
- Can you budget for replacement in 1-2 years if you repair now?
- Is this the right season for replacement (spring/fall often have better pricing and availability)?
Step 6: Get a Second Opinion
If you’re unsure, get another quote. A reputable company will give you an honest assessment—even if it means less money for them.
At Coastal Carolina Comfort, we’ll tell you when repair makes sense, even if replacement would be more profitable for us. Your trust matters more than one transaction.
Making the Call
There’s no universally “right” answer to the repair vs. replace question. But there is a right answer for your specific situation—based on your system’s condition, your budget, your plans, and your priorities.
Here’s what we know after thousands of these conversations:
Repair makes sense when:
- System is under 10 years old
- Repair cost is under 30-40% of replacement
- First major repair on the system
- R-410A refrigerant
- You plan to move within 2-3 years (and system will pass inspection)
Replacement makes sense when:
- System is over 12-15 years old
- Repair cost exceeds 50% of replacement
- Multiple repairs in recent years
- R-22 refrigerant
- Compressor or other major component failure
- Efficiency is significantly below modern standards
- Comfort issues persist despite repairs
When you’re genuinely on the fence:
- Get multiple opinions
- Factor in peace of mind and reliability
- Consider financing that makes monthly costs comparable
- Trust your gut—if you’re dreading another repair call, that matters
We’re Here to Help You Decide
At Coastal Carolina Comfort, we don’t push replacement when repair makes sense. We also won’t let you throw money at a system that’s past its prime.
When you call us for a repair estimate, we’ll give you:
- Honest diagnosis: What’s actually wrong and what it costs to fix
- Context: How this repair fits into your system’s overall condition and history
- Options: Repair cost, replacement cost, and our professional recommendation
- No pressure: The decision is yours, and we’ll support whatever you choose
Whether you need a repair to get through another few years or you’re ready to invest in new equipment, we’ll make sure you’re making an informed decision.
Schedule your assessment today or call us at 843-. We’ll help you figure out the right path forward—no sales pitch, just straight talk.
Frequently Asked Questions
How much does a new HVAC system cost in Summerville?
A complete HVAC system replacement in Summerville typically ranges from $6,000-$15,000+ depending on system size, efficiency rating, brand, and installation complexity. A standard 3-ton, 16 SEER system for an average home runs $7,000-$10,000 installed. High-efficiency systems and heat pumps cost more upfront but offer greater long-term savings.
Should I repair my AC if I’m selling my house soon?
It depends on the repair and your timeline. Minor repairs that ensure the system passes inspection are usually worthwhile. Major repairs on old systems may not return their value—buyers often prefer a credit toward replacement or a price reduction. If your system is over 12-15 years old and needs significant work, replacing before listing often yields better results.
Can I replace just the outdoor unit or just the indoor unit?
Technically yes, but it’s rarely recommended. Mismatched components reduce efficiency, may void warranties, and often cause premature failure. The EPA also requires that replacement components use the same refrigerant—you can’t mix R-22 and R-410A equipment. In most cases, replacing the complete system is the better investment.
How long does HVAC replacement take?
A standard replacement takes 4-8 hours for most Summerville homes. Complex installations, ductwork modifications, or system relocations may require additional time. Most replacements are completed in a single day, and you’ll have heating or cooling by evening.
Is it better to replace HVAC in summer or winter?
Spring and fall typically offer the best combination of pricing, availability, and comfort. You’re not desperate (so no emergency pricing), contractors aren’t slammed (so better scheduling), and you can survive a day without heating or cooling if needed. That said, if your system fails in July, waiting until October isn’t practical—we’re here year-round when you need us.