
 Heating Maintenance Guide: How to Keep Your Summerville Home Warm and Your System Running Smoothly
Annual professional heating maintenance extends your system’s lifespan by 5+ years, reduces repair costs by up to 40%, and keeps your energy bills in check. For Summerville homeowners, the best time to schedule maintenance is early fall—September or October—before you need your heating system regularly. Professional maintenance includes inspection of safety controls, cleaning of critical components, testing of electrical connections, and verification of proper operation. Between professional visits, homeowners should change air filters monthly, keep vents clear, and address unusual noises or performance changes promptly. This combination of professional and DIY maintenance keeps your heating system reliable for years.
Why Heating Maintenance Matters
Your heating system is one of the most expensive and essential components of your home. Yet many homeowners ignore it until something breaks.
Think of maintenance like oil changes for your car. You could skip them and your car would run—for a while. But eventually, the lack of maintenance catches up with you in the form of expensive repairs or premature engine failure.
Heating systems work the same way. Regular maintenance:
Extends Equipment Lifespan
Well-maintained systems last significantly longer:
| System Type | Without Maintenance | With Annual Maintenance |
|---|---|---|
| Gas furnace | 12–15 years | 18–22 years |
| Heat pump | 8–12 years | 12–16 years |
| Electric furnace | 15–20 years | 22–28 years |
That’s 4–6 extra years of service from equipment costing $5,000–$15,000 to replace.
Reduces Repair Costs
Small problems caught during maintenance cost far less to fix than emergency repairs:
- A dirty flame sensor cleaned during a tune-up: $0 (included in maintenance)
- Same flame sensor causing repeated ignition failures: $150–250 service call
- Worn belt identified and replaced during maintenance: $50–100
- Same belt breaking and damaging blower motor: $400–700
Studies show maintained systems require 40% fewer repairs than neglected ones.
Maintains Efficiency
Heating systems lose efficiency as components get dirty and wear:
- Dirty burners don’t burn fuel completely
- Clogged filters restrict airflow
- Dirty coils transfer heat poorly
- Worn parts create friction and resistance
A system that was 95% efficient when new might operate at 80% efficiency after years of neglect. That 15% difference shows up directly in your energy bills.
Ensures Safety
Heating systems—especially gas furnaces—can develop dangerous conditions:
- Cracked heat exchangers leak carbon monoxide
- Faulty gas valves create leak risks
- Electrical problems cause fire hazards
- Failed safety controls don’t protect you
Professional maintenance includes safety checks that protect your family.
Preserves Warranty Coverage
Most manufacturer warranties require annual professional maintenance. Skip it, and you may void your warranty—leaving you responsible for repairs that would otherwise be covered.
Check your warranty documentation. Many require:
- Annual professional inspection
- Documentation of service performed
- Use of licensed contractors
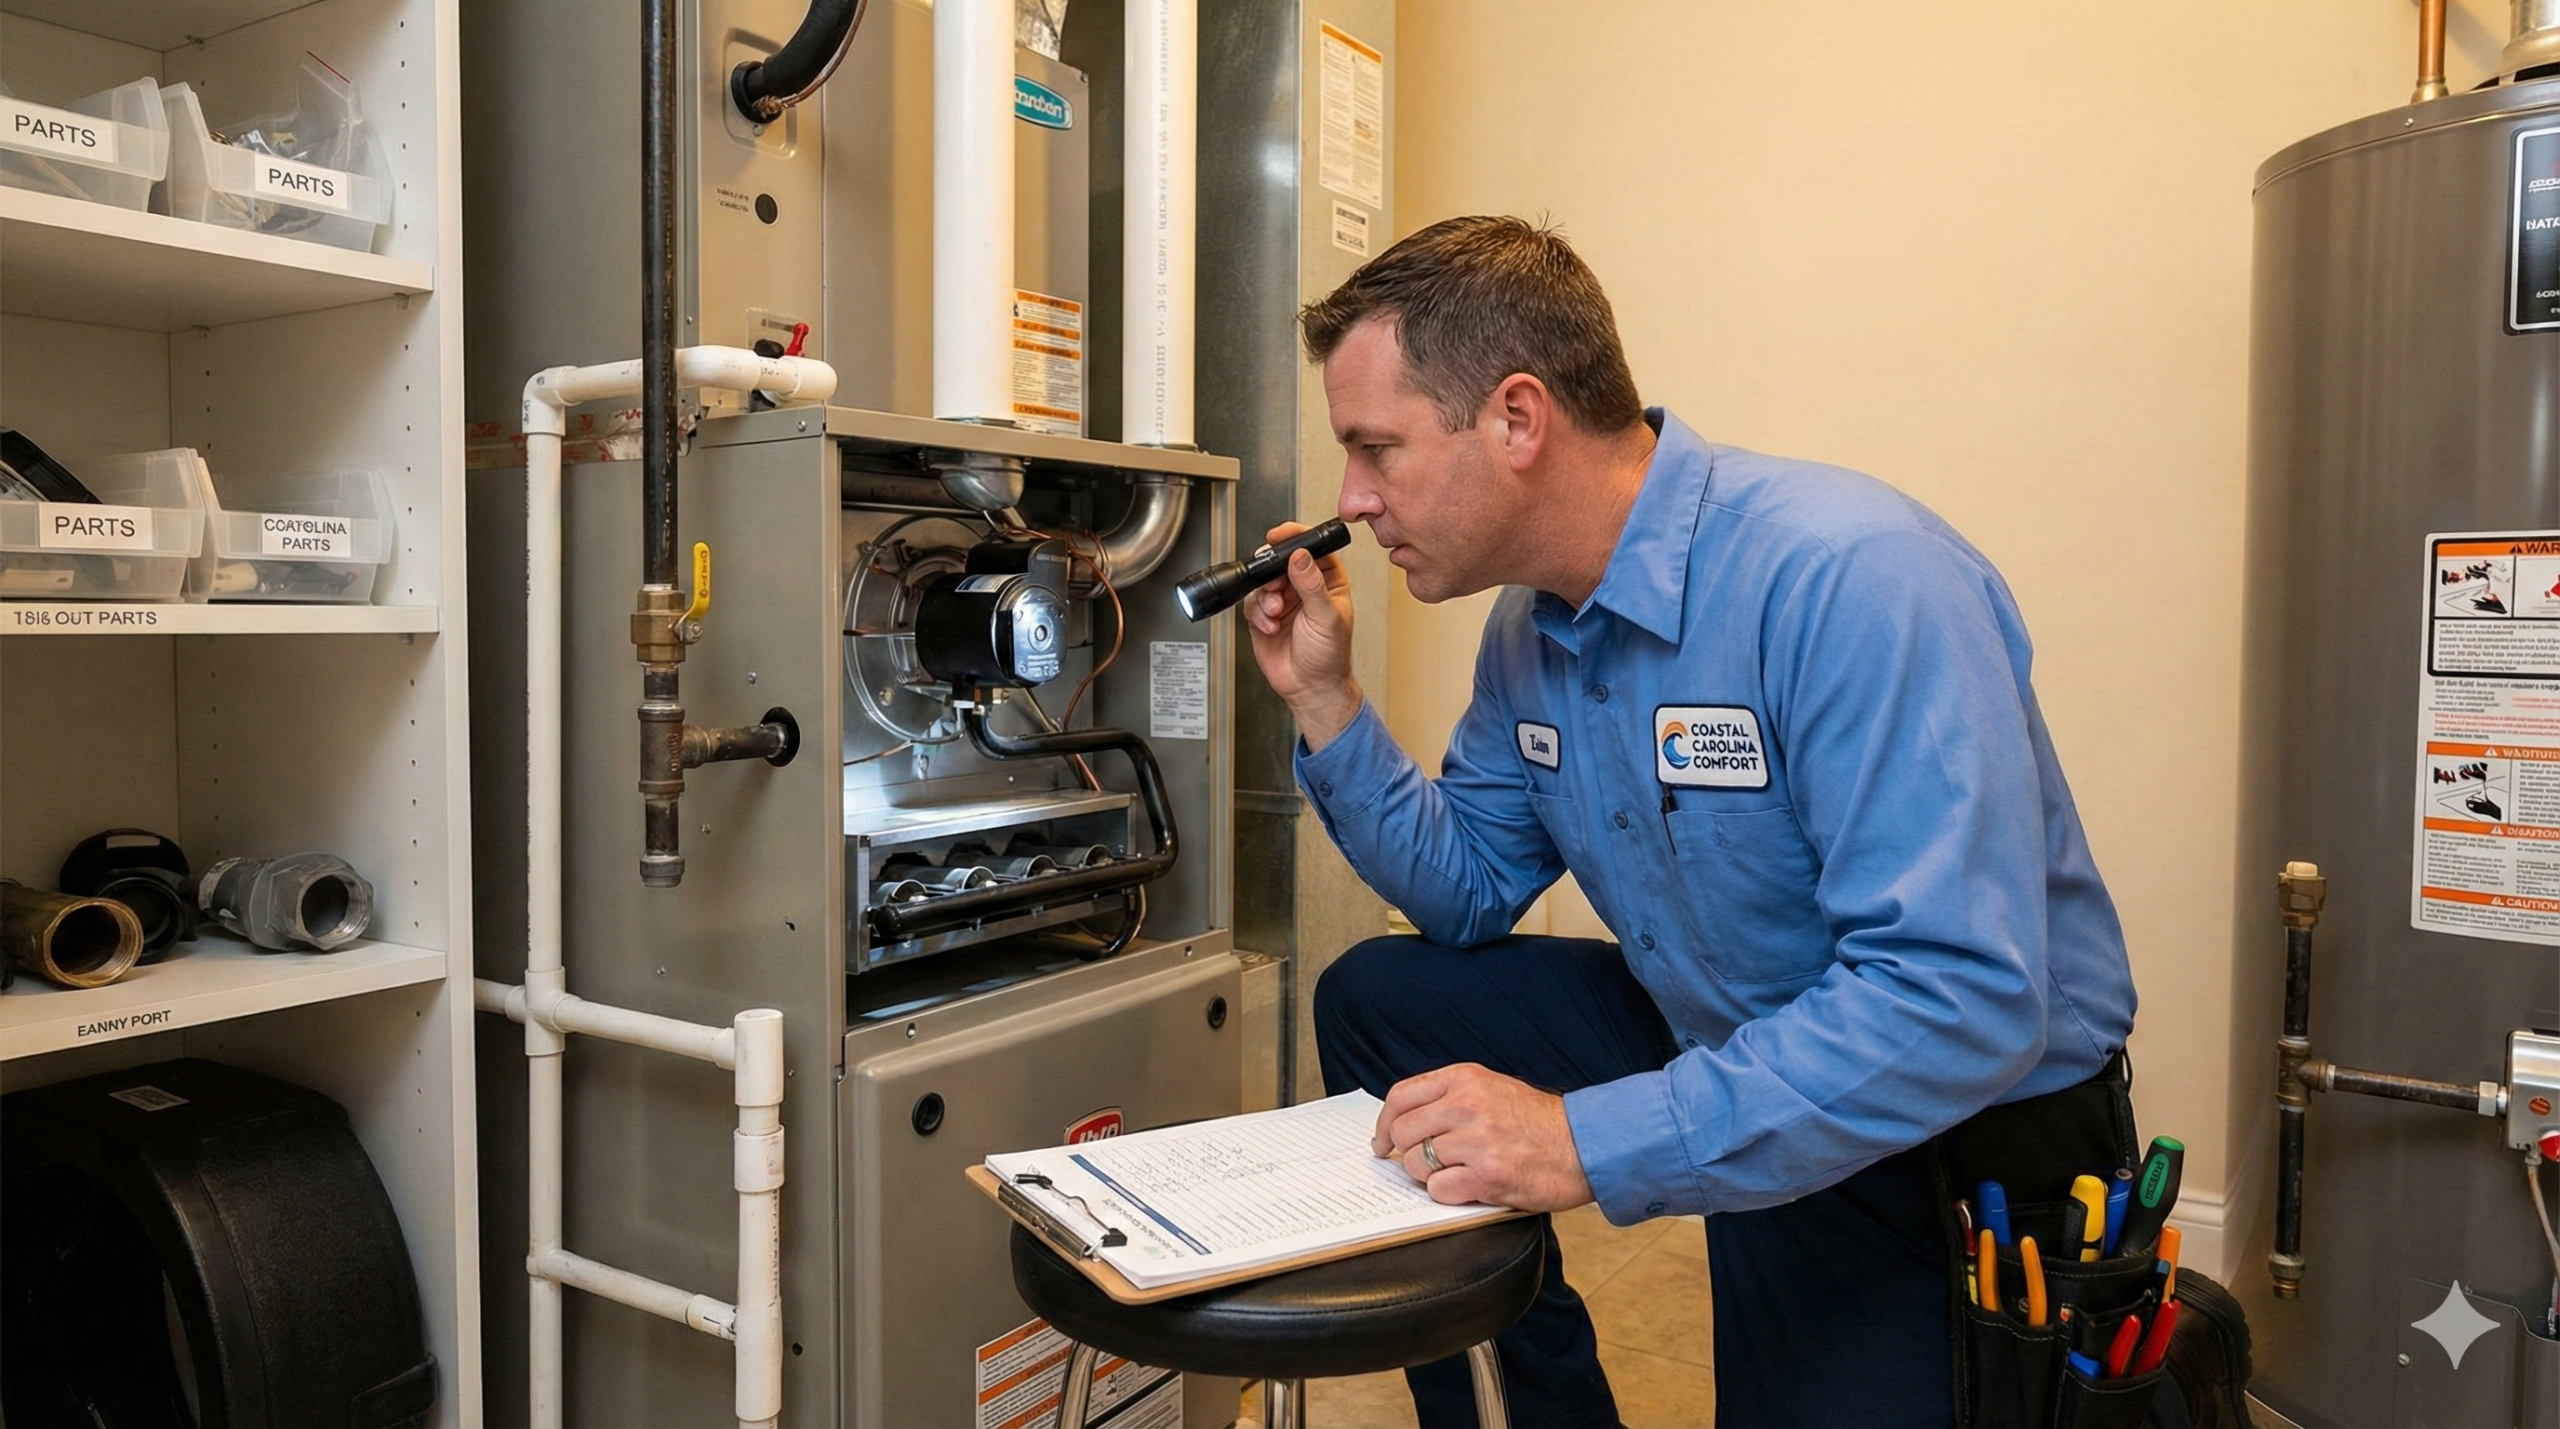
What Professional Heating Maintenance Includes
A thorough professional tune-up covers far more than most homeowners realize. Here’s what should happen during a maintenance visit:
Safety Inspection
For all systems:
- Carbon monoxide testing in the equipment area and living spaces
- Inspection of flue pipe and venting (gas systems)
- Verification of safety control operation
- Electrical connection inspection for damage or overheating
- Gas leak check (gas systems)
Why it matters: Safety issues often develop gradually and aren’t obvious until they become dangerous. Professional inspection catches them early.
Thermostat Evaluation
- Verify accurate temperature reading
- Test heating cycle initiation and termination
- Check programming and settings
- Calibrate if necessary
- Test battery backup (if applicable)
Why it matters: A thermostat that’s off by even a few degrees affects comfort and efficiency.
Air Filter Assessment
- Inspect current filter condition
- Verify correct filter size and type
- Replace if needed
- Discuss optimal replacement schedule for your home
Why it matters: The filter affects everything—airflow, efficiency, equipment wear, and air quality.
Electrical System Inspection
- Test voltage and amperage
- Inspect wiring for damage, corrosion, or loose connections
- Test capacitors
- Check contactor condition
- Verify proper grounding
Why it matters: Electrical problems cause component failures and create fire hazards.
Gas Furnace-Specific Checks
Burner inspection and cleaning:
- Remove and inspect burners
- Clean burner ports
- Check for rust, cracks, or damage
- Verify proper flame pattern and color
Heat exchanger inspection:
- Visual inspection for cracks, rust, or separation
- Check for carbon monoxide leakage
- Assess overall condition and remaining life
Ignition system:
- Clean flame sensor
- Test ignitor operation
- Verify proper ignition sequence
- Check pilot assembly (older systems)
Gas valve and supply:
- Test gas pressure
- Check valve operation
- Inspect gas line connections
- Verify proper combustion air supply
Venting system:
- Inspect flue pipe for damage, corrosion, or blockage
- Verify proper draft
- Check connections and seals
- Ensure proper termination outside
Heat Pump-Specific Checks
Outdoor unit inspection:
- Clean condenser coil
- Inspect fan blade and motor
- Check for debris accumulation
- Verify proper clearance around unit
- Inspect for physical damage or corrosion
Refrigerant system:
- Check refrigerant charge
- Inspect for leaks
- Test pressures
- Verify proper superheat and subcooling
Defrost system:
- Test defrost cycle initiation
- Verify proper defrost operation
- Check defrost timer or control board
Reversing valve:
- Test operation in both heating and cooling modes
- Listen for proper switching
- Check for refrigerant bypass
Auxiliary heat:
- Test electric heat strips
- Verify proper staging
- Check sequencer operation
Blower and Air Handler
For all systems:
- Inspect blower wheel for dirt and damage
- Check blower motor operation and amperage
- Lubricate motor bearings (if applicable)
- Test airflow
- Inspect belt condition and tension (belt-drive systems)
- Clean evaporator coil (if accessible)
- Check condensate drain and pan
Why it matters: The blower moves all the air through your system. Problems here affect heating, cooling, and air quality.
System Operation Test
After completing all inspections and adjustments:
- Run complete heating cycle
- Verify proper temperature rise
- Check for unusual noises or vibrations
- Confirm thermostat satisfaction
- Test safety shutdown sequences
DIY Maintenance: What Homeowners Can Do
Between professional visits, these tasks keep your system running well:
Monthly: Air Filter Check
This is the single most important thing you can do for your heating system.
How to check:
- Locate your filter (return vent, air handler, or furnace)
- Remove the filter
- Hold it up to light
- If you can’t see light through it, replace it
How often to replace:
- Basic fiberglass filters: Every 30 days
- Pleated filters: Every 60–90 days
- High-efficiency filters: Every 90 days (check monthly)
- Homes with pets: More frequently
Pro tip: Buy filters in bulk and keep spares on hand. Set a phone reminder to check monthly.
Monthly: Vent Inspection
Walk through your home and check all supply and return vents:
- Are they open and unobstructed?
- Is furniture blocking airflow?
- Are rugs covering floor vents?
- Is dust buildup restricting airflow?
Vacuum vent covers when dusty. Keep at least 6 inches of clearance around all vents.
Seasonally: Outdoor Unit Care (Heat Pumps)
Before heating season:
- Remove any debris accumulated during summer
- Trim vegetation to maintain 2-foot clearance
- Rinse coils with garden hose (gentle pressure)
- Verify unit is level
During heating season:
- Clear snow and ice accumulation
- Remove leaves and debris after storms
- Check that the unit is running when heat is called for
Seasonally: Thermostat Check
Before heating season:
- Replace batteries (if applicable)
- Test heating mode operation
- Review and update programming
- Clean dust from vents and sensors
As Needed: Listen and Observe
Pay attention to your system’s operation:
Normal sounds:
- Soft whoosh of air through vents
- Click when system starts
- Gentle hum of blower motor
Sounds to investigate:
- Banging or popping
- Squealing or screeching
- Grinding or scraping
- Rattling or vibrating
- Constant clicking
Visual checks:
- Is the outdoor unit (heat pump) running when it should be?
- Is air flowing from vents when the system runs?
- Are there any new stains, rust, or damage on equipment?
- Is the area around the furnace clear of storage and debris?
Report any changes to your HVAC technician.
When to Schedule Professional Maintenance
Timing matters for heating maintenance:
The Ideal Window: Early Fall
September through early October is optimal because:
- Weather is mild (you won’t need heat during the visit)
- HVAC companies aren’t yet in emergency-call season
- Problems can be fixed before you need the system
- Parts are readily available
- Scheduling is easier
Acceptable Alternatives
Late summer (August): Fine if you’re organized. System may not have run recently, so some issues might not be apparent.
Late fall (November): Still worthwhile but riskier. If problems are found, repairs compete with emergency calls for scheduling priority.
Winter: Better late than never, but you may face longer wait times and the inconvenience of being without heat during repairs.
Twice-Yearly for Heat Pumps
Heat pumps work year-round, so they benefit from maintenance before each season:
- Fall: Prepare for heating season
- Spring: Prepare for cooling season
This catches wear from the previous season and optimizes performance for the upcoming one.
Maintenance Agreements: Are They Worth It?
Many HVAC companies offer maintenance agreements (also called service plans or maintenance contracts). Here’s how to evaluate them:
What’s Typically Included
Basic plans ($150–250/year):
- One or two maintenance visits per year
- Priority scheduling
- Discount on repairs (typically 10–15%)
Premium plans ($250–400/year):
- Everything in basic plans
- Additional discounts on repairs
- No overtime charges for emergency calls
- Some parts coverage
- Extended labor warranties
The Math
Without a plan:
- Fall maintenance visit: $150–200
- Spring maintenance visit (heat pump): $150–200
- Emergency service premium: $75–150
- Full-price repairs
With a basic plan ($200/year):
- Two maintenance visits included
- 10% repair discount
- Priority scheduling (faster response)
Break-even analysis: If you’d schedule maintenance anyway, a basic plan often pays for itself through the repair discount alone—assuming you need any repairs during the year.
When Plans Make Sense
Good candidates for maintenance plans:
- Homeowners who would otherwise forget to schedule maintenance
- Older systems likely to need repairs
- Heat pump owners (two visits per year)
- Those who value priority scheduling and peace of mind
May not be worthwhile for:
- Brand-new systems under full warranty
- Homeowners disciplined about scheduling maintenance independently
- Those comfortable shopping around for repairs
Questions to Ask Before Signing
- What exactly is included in each visit?
- Are there any exclusions or limitations?
- What’s the repair discount, and does it apply to parts, labor, or both?
- Is the plan transferable if I sell my home?
- Can I cancel, and is there a refund?
- Does this satisfy my equipment warranty requirements?
Maintenance for Different System Types
While the principles are similar, different systems have specific maintenance needs:
Gas Furnace Maintenance Priorities
Critical items:
- Heat exchanger inspection (safety)
- Burner cleaning and adjustment
- Flame sensor cleaning
- Carbon monoxide testing
- Flue inspection
Common issues caught during maintenance:
- Dirty flame sensors (causes ignition failures)
- Cracked heat exchangers (carbon monoxide risk)
- Worn ignitors (impending failure)
- Gas pressure problems (efficiency and safety)
Heat Pump Maintenance Priorities
Critical items:
- Refrigerant charge verification
- Coil cleaning (indoor and outdoor)
- Defrost system testing
- Reversing valve operation
- Auxiliary heat testing
Common issues caught during maintenance:
- Low refrigerant (reduced capacity, compressor damage)
- Dirty coils (efficiency loss, freezing)
- Defrost problems (ice buildup)
- Capacitor weakness (impending failure)
Electric Furnace Maintenance Priorities
Critical items:
- Heating element inspection
- Sequencer testing
- Electrical connection inspection
- Airflow verification
- Safety control testing
Common issues caught during maintenance:
- Failed heating elements (reduced capacity)
- Worn sequencers (staging problems)
- Loose electrical connections (fire hazard)
Dual Fuel System Maintenance
Dual fuel systems need attention to both components:
- Heat pump maintenance (as above)
- Gas furnace maintenance (as above)
- Switchover point verification
- Control board operation testing
Because dual fuel systems are more complex, thorough maintenance is especially important.
The Connection Between Maintenance and Air Quality
Heating maintenance affects more than just heating—it impacts the air your family breathes:
Filter Effectiveness
A clean, properly fitted filter captures:
- Dust and dust mites
- Pollen and plant spores
- Pet dander
- Some bacteria and mold spores
A dirty or bypassed filter lets these circulate freely.
Ductwork Inspection
During maintenance, technicians may observe ductwork conditions:
- Visible contamination
- Disconnected sections
- Damaged insulation
- Signs of moisture
While duct cleaning is a separate service, maintenance can identify when it’s needed.
Humidity Control
Properly maintained systems control humidity better:
- Correct airflow prevents moisture problems
- Clean coils drain properly
- Proper refrigerant charge ensures adequate dehumidification
Combustion Byproducts
Gas furnace maintenance ensures combustion gases vent properly:
- Intact heat exchangers contain combustion
- Clear flue pipes allow proper exhaust
- Correct gas pressure ensures complete combustion
Signs You’ve Been Skipping Maintenance
If you’ve neglected maintenance, watch for these warning signs:
Declining Performance
- System takes longer to reach set temperature
- Some rooms are harder to heat than others
- System runs more frequently or for longer cycles
- Comfort has gradually decreased over time
Rising Costs
- Energy bills increasing year over year (beyond rate increases)
- More frequent repair calls
- Repairs becoming more expensive
Physical Signs
- Dust buildup on vents and registers
- Unusual odors when system runs
- Visible dirt on outdoor unit coils
- Yellow or flickering burner flames (gas furnace)
Operational Issues
- Strange noises that have developed gradually
- System short-cycling (turning on and off frequently)
- Inconsistent temperatures
- Thermostat struggles to maintain set point
If you recognize these signs, schedule maintenance soon—and be prepared for the technician to find deferred issues that need attention.
Getting Back on Track
Haven’t maintained your system in years? Here’s how to catch up:
Schedule a Comprehensive Inspection
Tell the technician your system hasn’t been maintained recently. They’ll perform a more thorough evaluation, looking for:
- Accumulated wear and damage
- Safety issues that may have developed
- Components nearing failure
- Efficiency losses
Expect Some Repairs
Deferred maintenance often means deferred repairs. Be prepared for recommendations to address:
- Worn components that should be replaced proactively
- Safety issues requiring immediate attention
- Efficiency improvements worth considering
Don’t Panic
Finding problems during a catch-up maintenance visit is normal—and better than finding them during a breakdown. Address safety issues immediately, prioritize other repairs based on urgency and budget, and commit to regular maintenance going forward.
Establish a Schedule
Once you’re caught up:
- Schedule next year’s maintenance before leaving
- Set calendar reminders
- Consider a maintenance agreement for accountability
How Coastal Carolina Comfort Approaches Maintenance
Our maintenance philosophy is simple: thorough inspection, honest assessment, and no unnecessary upselling.
What we do:
- Complete system inspection following manufacturer guidelines
- All safety checks and testing
- Cleaning and adjustment of accessible components
- Clear documentation of findings
- Honest recommendations prioritized by urgency
What we don’t do:
- Invent problems to sell repairs
- Pressure you into unnecessary services
- Rush through inspections to fit more appointments
- Skip steps because “it’s probably fine”
We’ve maintained heating systems throughout Summerville since 2005—from historic homes downtown to new construction in Nexton and Cane Bay. We know Lowcountry conditions and how they affect your equipment.
Ready to get your system maintained? Schedule your heating maintenance and start the season with confidence.
Frequently Asked Questions
How much does heating maintenance cost? Professional heating maintenance typically costs $150–200 for a single visit. Heat pump maintenance (recommended twice yearly) runs $150–200 per visit. Maintenance agreements that include visits plus additional benefits typically cost $200–400 annually. These costs are far less than the repairs, efficiency losses, and shortened lifespan that result from skipped maintenance.
Can I do heating maintenance myself? You can handle some tasks: changing filters, keeping vents clear, maintaining clearance around outdoor units, and observing system operation. However, professional maintenance includes safety testing, combustion analysis, refrigerant checks, and electrical testing that require specialized tools and training. DIY maintenance complements but doesn’t replace professional service.
What if my system is brand new—does it still need maintenance? Yes. Even new systems benefit from maintenance, and most warranties require it. First-year maintenance verifies proper installation, catches any early issues, and establishes a baseline for future comparison. Some installers include first-year maintenance; check your documentation.
How do I know if my technician did a thorough job? A thorough maintenance visit takes 45–90 minutes depending on system type and condition. The technician should be able to explain what they checked, show you the filter condition, and provide documentation of the visit. If someone is in and out in 20 minutes, they likely skipped steps.
My system seems fine—do I really need maintenance? Systems often seem fine until they fail. Maintenance catches developing problems before they cause breakdowns, maintains efficiency you can’t perceive directly, and verifies safety systems you can’t test yourself. The cost of maintenance is insurance against much larger costs later.

