Home of the $0 FREE Service Call Club | 0% Interest for 24 Months

Home of the $0 FREE Service Call Club | 0% Interest for 24 Months

Home of the $0 FREE Service Call Club | 0% Interest for 24 Months

Living in Charleston during the summer means relying on your air conditioner almost daily. Between the heat and high humidity, it can quickly become uncomfortable indoors if your AC isn’t working right. While most people focus on things like cooling strength and air filters, what often gets overlooked is something much smaller but just as important—your AC’s ability to drain out moisture properly.

When the drainage system fails, it doesn’t always stop your unit from running, but it can cause a lot of trouble behind the scenes. We’ve seen water pooling around equipment, musty smells inside homes, mold in hard-to-reach places, and even damage to ceilings or floors. These are all signs that something’s wrong with the way your system is removing excess water, which can sneak up on you fast. Let’s break down what’s really going on and how to spot the problem early.

Understanding AC Drainage Problems

Every air conditioning system is built to manage moisture. As your AC cools warm air, it draws humidity from inside your home. That moisture turns into condensation, which needs to flow out of the system through a dedicated drain line.

If anything disrupts this process, things can back up. That backup can lead to water damage around your unit or walls, as well as mold and a spike in that damp, musty smell we all try to avoid. In some serious cases we’ve come across, the drain isn’t just clogged—it’s completely blocked for weeks without anyone noticing. By the time the issue is found, drywall and flooring have already started showing water stains.

Here are a few signs that your AC may be having trouble draining moisture properly:

– Water pooling around or beneath the indoor part of the unit

– A strong musty or moldy odor near vents

– Unusual dripping sounds or trickling water inside the unit

– AC shutting down or not turning on due to a triggered safety mechanism

– Increased indoor humidity even while the AC is running

These problems usually don’t disappear on their own. In fact, if left untreated, a small clog or leak can quickly snowball into something much worse. Spotting the symptoms early helps save time and money, and helps your AC last longer.

Common Causes of AC Drainage Issues

When AC drainage problems show up, there’s usually a root cause behind them. Understanding what’s going wrong can help you stay one step ahead. Let’s break down the most common reasons things start to fail.

1. Clogged Drain Line

The drain line carries water outside the home. Over time, dirt, dust, algae, or even insect nests can build up in the line, slowly blocking the flow. When this happens, condensation that should be heading out ends up sitting inside the unit, or worse, dripping down into floors or walls.

2. Improper Installation

If the unit or drain line was installed at the wrong angle, or if the materials weren’t properly secured, water may not drain out at all. Gravity plays a big role in guiding the moisture out, and it only works if the layout was done right. This type of issue isn’t usually visible to the naked eye, which is why installation problems can go unnoticed for a long time.

3. Damaged or Broken Parts

Just like any other part of your AC, the drainage system has components that can wear out. If the drain pan is cracked, or if a float switch fails, water won’t be managed safely. Over time, even corrosion inside the lines can cause leaks or breaks that are hard to detect without a closer look.

These issues can develop slowly, or they can show up without warning—especially during Charleston’s humid summer months when your AC is running most of the day. Knowing where the problem is coming from makes fixing it easier and helps prevent more damage.

Steps to Address and Prevent AC Drainage Problems

Addressing AC drainage issues early can save you a lot of trouble down the line. Here are a few effective steps to take:

– Regular Maintenance

Your AC system needs regular check-ups to make sure everything is working the way it should. Plan to have your unit inspected at least once a year, ideally before the summer heat kicks in. A professional can look at the entire system, clear the drain lines, and catch any problems early.

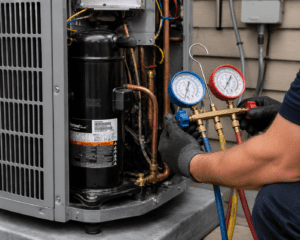
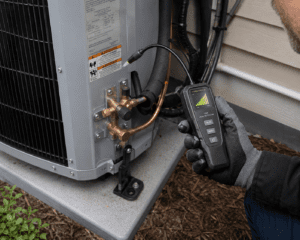
– Professional Inspection

While it might be tempting to try and fix a small problem yourself, experienced HVAC technicians can solve issues faster and more thoroughly. If your drain system is backing up or something looks off, it’s best to call a trusted emergency HVAC contractor in Charleston who knows how to fix it right the first time. This helps you avoid bigger messes that might be hiding behind walls or ceiling panels.

– DIY Prevention Tips

You don’t have to be a pro to help your system stay in good shape between visits. These simple steps can reduce the risk of clogs:

– Take a quick look at the drain line every couple of months to check for buildup

– Pour a small amount of vinegar into the drain tube to flush out gunk

– Use a wet/dry vacuum to pull water out of the pipe if you notice slow drainage

Keeping an eye on drainage keeps your unit from working extra hard and saves you money in the long run.

Avoid Future AC Drainage Issues with Professional Help

Working with HVAC professionals in Charleston gives you peace of mind. They understand how the hot, damp climate affects your system and know what to look for before it becomes a problem.

One of the biggest advantages of hiring a skilled HVAC contractor is how they spot early warning signs. What might look like a simple stain around the AC can mean bigger trouble in the drain pan or lines. Professionals can stop the damage before your drywall or flooring takes a hit.

They’ll make sure the drain line is positioned right, the float switch works, and the pan is clear. These things don’t take long to check, but they make a big difference—especially when your AC is working hard through Charleston’s hot stretch of the year.

Keeping Charleston Homes Cool and Comfortable

When your AC’s drainage system is working the way it should, your whole home benefits. The air feels drier, there’s no odd mildew smell, and you won’t have to worry about surprise water stains.

Fixing a small drainage problem now avoids bigger, costlier ones later. Getting help from a trusted emergency HVAC contractor in Charleston means your air conditioner will be ready to beat the heat all season long.

Staying on top of this part of your AC system keeps your home more comfortable and your repair bills lower. A well-maintained unit doesn’t just cool better—it lasts longer and gives you fewer headaches.

Whether you’ve had recent drainage problems or just want to prevent them, professional AC care is a smart move for families in Charleston.

Make sure your AC is always running smoothly, especially during Charleston’s hot and humid summers. When unexpected issues come up, count on an experienced emergency HVAC contractor to respond quickly and get things back to normal. Coastal Carolina Comfort is committed to keeping your home cool and worry-free all season long.

Share This Post

Get 10% Off Your First Service and a FREE Quote


More To Explore

A man in a polo shirt stands indoors, adjusting a switch on an open electrical panel while performing AC troubleshooting. The room features wooden floors and a hallway visible in the background.
Air Conditioning

My AC Won’t Turn On: Troubleshooting Before You Call a Technician

My AC Won’t Turn On: Troubleshooting Before You Call a Technician When your AC system won’t turn on at all — no fan, no compressor, no response to thermostat changes — the cause is either an interruption in the electrical supply reaching the system (tripped breaker, blown fuse, safety switch activation, thermostat failure) or a failure of a startup component within the system itself (dead capacitor, burned contactor, failed control board, or seized compressor). About 30% of “AC won’t start” calls that Coastal Carolina Comfort responds to across South Carolina are resolved by the homeowner checks described below. The remaining 70% require professional diagnosis and repair. Coastal Carolina Comfort provides same-day diagnostic service for systems that won’t start across Summerville, Charleston, Columbia, and the entire Lowcountry and Midlands. Our NATE-certified technicians carry the common startup components — capacitors, contactors, control boards — needed to restore your system in a single visit. Call (843) 708-8735. Homeowner Troubleshooting: 6 Checks Before You Call These checks are safe for any homeowner to perform and take less than 10 minutes total. Work through them in order. Check 1: Thermostat Power and Settings Start at the thermostat — it’s the most common cause of a system that appears dead. Verify it has power. If the display is blank, the thermostat has lost power. Check whether it uses batteries (replace them) or is wired to the system (a tripped breaker or blown fuse at the air handler may have cut power to the thermostat). Verify the settings. Ensure the system is set to “cool” (not “off,” “heat,” or “fan only”), the set temperature is at least 3–5°F below the current room temperature, and any scheduling or away modes aren’t overriding your settings. Try a hard reset. Turn the thermostat completely off, wait 30 seconds, then turn it back to cooling mode. For smart thermostats, a power cycle or factory reset can resolve software glitches that prevent the system from responding. If the thermostat appears to be working correctly — display is on, settings are correct, it shows “cooling” — but the system doesn’t respond, the issue is downstream. Check 2: Circuit Breakers Your AC system typically uses two circuit breakers in your main electrical panel: one for the indoor air handler and one for the outdoor condenser unit. Check both. Look for a tripped breaker. A tripped breaker sits in the middle position — not fully “on” and not fully “off.” Push it firmly to “off” first, then back to “on.” If the breaker holds and the system starts, monitor it. If the breaker trips again within minutes, do not reset it a third time — the system has an electrical fault that requires professional diagnosis. Check for a blown fuse at the air handler. Some air handlers have a small fuse (typically 3–5 amp) on the control board that protects the low-voltage circuit. If this fuse blows, the thermostat loses its ability to communicate with the system. This fuse is accessible inside the air handler’s front panel — but if you’re not comfortable opening the panel, skip this check and call for service. Check 3: Emergency Shutoff Switch Many AC installations include a wall-mounted emergency shutoff switch that looks like a standard light switch — typically located near the indoor air handler or in the utility closet. If someone accidentally flipped this switch off (during maintenance, painting, or cleaning), the entire system is disabled. Check for a switch near the air handler that might be in the “off” position. Flip it on and see if the system responds. Check 4: Condensate Drain Safety Switch Many South Carolina HVAC installations include a float switch on the condensate drain line that shuts the system down when the drain line clogs and water backs up. This is a safety feature designed to prevent water damage — but it also means a simple drain clog can make your entire AC system unresponsive. If your system has a visible float switch on the drain line (a small device with a float attached to the PVC pipe near the air handler), check whether standing water is visible in the drain pan. If the pan is full, the float switch has activated. Clearing the drain line may restore system operation. Our guide on AC leaking water inside your house covers drain line clearing in detail. Check 5: Outdoor Disconnect Box Near your outdoor condenser unit, there’s a disconnect box — a small metal box mounted on the wall within a few feet of the unit. This box contains either a pull-out fuse block or a breaker that supplies power specifically to the outdoor unit. Check that the disconnect is in the “on” position and that the fuses (if applicable) haven’t blown. A blown disconnect fuse is a common cause of a system where the indoor fan runs but the outdoor unit doesn’t respond at all. Check 6: Wait 5 Minutes After Any Reset Modern AC systems have built-in time delays that prevent the compressor from restarting too quickly after a shutdown — rapid cycling can damage the compressor. If you’ve reset a breaker, flipped a switch, or changed the thermostat, wait at least 5 minutes before concluding the system isn’t responding. The delay is protecting your equipment. If the Homeowner Checks Don’t Work: Common Professional Repairs When all homeowner-accessible checks fail to restore the system, one of these mechanical or electrical failures is typically the cause. Failed Capacitor The run capacitor provides the electrical boost the compressor and fan motors need to start. When it fails, the motors can’t overcome their starting inertia. You might hear a clicking sound from the outdoor unit as the contactor engages, followed by a hum and then silence — the system is trying to start but the capacitor can’t deliver. Capacitor failure is the single most common reason an AC system won’t start. It’s also one of the most affordable repairs: $150–$300 including parts and labor. In South Carolina’s long cooling season, capacitors endure more

A close-up view of an air conditioner evaporator coil covered with a thick layer of ice and frost, indicating a malfunction or freezing issue.
Air Conditioning

AC Frozen Evaporator Coil: Why Your Air Conditioner Ices Up in Humid SC Weather

AC Frozen Evaporator Coil: Why Your Air Conditioner Ices Up in Humid SC Weather A frozen evaporator coil occurs when the coil’s surface temperature drops below 32°F and moisture from your indoor air freezes on contact, building a layer of ice that blocks airflow and prevents heat absorption. The most common causes are restricted airflow from a clogged filter or dirty coil, low refrigerant charge from a leak, and blower motor failure that reduces air volume across the coil. In South Carolina’s high-humidity environment, frozen coils are both more common and more damaging than in drier climates — the heavy moisture content in Lowcountry and Midlands air means ice builds faster and produces more water when it melts. Coastal Carolina Comfort diagnoses and repairs frozen evaporator coils across Summerville, Charleston, Columbia, and all of South Carolina. Our NATE-certified technicians identify the root cause — not just thaw the ice — and provide upfront pricing before any repair begins. Call (843) 708-8735. How a Frozen Coil Damages Your AC System A frozen evaporator coil isn’t just a temporary inconvenience — it creates a cascade of problems that can damage multiple components if the system continues running. The compressor is at greatest risk. Under normal operation, liquid refrigerant enters the evaporator coil, absorbs heat, and exits as a gas before returning to the compressor. When the coil freezes, this heat exchange stops. Liquid refrigerant passes through the coil without vaporizing and reaches the compressor in liquid form. Compressors are designed to pump gas, not liquid. Liquid refrigerant entering the compressor — called liquid slugging — can crack valves, damage pistons, and cause catastrophic compressor failure. A compressor replacement typically costs $1,500–$3,000+. Water damage when the ice melts. A frozen coil accumulates a surprising amount of ice. When the system shuts off or the ice begins to melt, the resulting water can easily overwhelm the drain pan — especially if the drain line is also partially clogged (a common combination in South Carolina). Water overflows onto floors, into ceilings, or through walls. Read our guide on AC leaking water inside your house for immediate steps if you’re already dealing with water. Reduced system life. Repeated freeze-thaw cycles stress the coil fins, degrade the coil’s protective coating, and can eventually cause refrigerant leaks in the coil itself — one of the most expensive AC repairs. The 5 Causes of Frozen Evaporator Coils in South Carolina 1. Clogged Air Filter This is the most common cause — and the most preventable. A clogged filter restricts the volume of warm air passing over the evaporator coil. Without sufficient warm air, the coil’s temperature drops below the freezing point. Moisture in the air freezes on contact, and the ice layer further restricts airflow, accelerating the freeze. In South Carolina, where pet dander, pollen, dust, and high humidity all contribute to faster filter loading, a filter that might last 90 days in a drier climate may need replacement every 30 days during peak cooling season. The fix: Replace the filter, turn the system off for 2–3 hours to allow complete thawing, then restart. If the system runs normally and doesn’t refreeze, the filter was the sole cause. If ice returns within 24 hours, there’s an additional underlying issue. 2. Low Refrigerant From a Leak Low refrigerant charge causes the evaporator coil’s temperature to drop below normal operating range. When the coil is too cold, moisture freezes on its surface instead of condensing into liquid and draining away. The ice insulates the coil, making it even colder, and the freeze accelerates until the coil is completely encased. This is the most common mechanical cause of frozen coils, and it requires professional repair. A technician will thaw the coil, test for leaks, repair the leak source, and recharge the system to manufacturer specifications. Simply adding refrigerant without fixing the leak guarantees the problem will return. In South Carolina’s coastal environment, refrigerant line corrosion from salt air is a significant contributor to leaks — particularly on homes within a few miles of Charleston Harbor, James Island, or the Isle of Palms. 3. Dirty Evaporator Coil Even with regular filter changes, the evaporator coil accumulates dust, biological growth, and particulate matter over time — especially in South Carolina’s humid environment where mold and mildew thrive on the constantly damp coil surface. A dirty coil insulates itself from the warm air passing over it. The coil can’t absorb enough heat, its temperature drops, and the same freeze cycle begins. The difference is that a dirty-coil freeze develops more gradually than a low-refrigerant freeze — you might notice declining performance for weeks before ice becomes visible. The fix: Professional coil cleaning. This requires access to the indoor unit, coil-specific cleaning solution, and careful handling to avoid damaging the delicate aluminum fins. Coil cleaning is typically included in comprehensive maintenance visits that prevent frozen coils and costs $150–$300 as a standalone service. 4. Blower Motor Failure or Reduction The blower motor moves air across the evaporator coil. If it fails entirely, airflow stops completely and the coil freezes rapidly. A partially failing motor — running at reduced speed due to worn bearings, a failing capacitor, or a winding issue — moves insufficient air, causing a slower but equally damaging freeze. In multi-speed systems, a motor stuck on low speed may provide enough airflow for mild days but insufficient volume on high-demand days, creating intermittent freezing that’s harder to diagnose. 5. Collapsed or Blocked Return Ductwork If the return duct — the large duct that carries warm room air back to the air handler — is crushed, disconnected, or severely blocked, the volume of air reaching the evaporator coil drops below the minimum threshold. This can happen when stored items are placed on flex duct in an attic, when a duct joint separates due to age or poor installation, or when a return vent is blocked by furniture or closed. This cause is more common in homes with ductwork routed through attics — a standard

SCHEDULE A $0 FREE SERVICE CALL AND GET A FREE QUOTE


GET A FREE ESTIMATE and schedule service


GET A FREE ESTIMATE and schedule service