
Heating Repair Scams: How Summerville Homeowners Can Protect Themselves from Dishonest Contractors

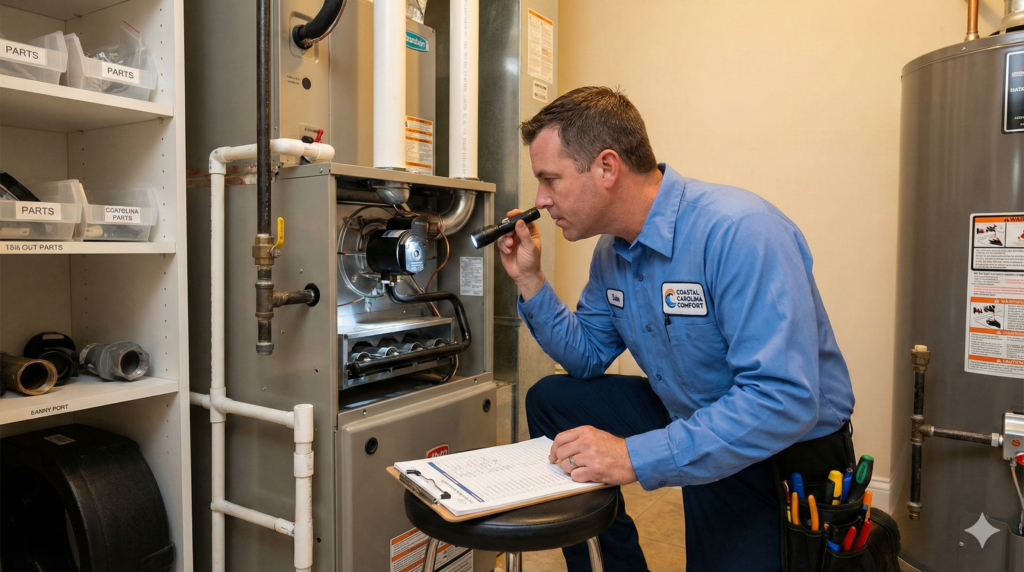
Heating Repair Scams: How Summerville Homeowners Can Protect Themselves from Dishonest Contractors Heating repair scams typically involve fake diagnoses (especially the “cracked heat exchanger” scare), bait-and-switch pricing, unnecessary repairs, and high-pressure sales tactics designed to rush you into expensive decisions. Protect yourself by getting second opinions on major repairs, verifying contractor licensing through South Carolina’s LLR website, checking reviews and BBB ratings, and never authorizing work without a written estimate. Legitimate heating repair companies explain problems clearly, provide documentation, and give you time to decide. If a technician pressures you to replace your entire system immediately or demands cash payment, those are major red flags requiring a second opinion. Why Heating Repair Scams Are So Effective Scammers exploit a perfect storm of circumstances: You’re vulnerable. When your heat fails in January, you’re cold, stressed, and desperate for a solution. Rational decision-making suffers. You lack expertise. Most homeowners can’t evaluate whether a diagnosis is legitimate. You’re trusting someone you just met to tell you the truth about complex equipment. The stakes feel high. Heating problems can involve safety concerns (carbon monoxide, gas leaks) that make you afraid to question recommendations. Time pressure is real. You need heat now, not next week. This urgency makes you susceptible to pressure tactics. Dishonest contractors know all of this—and they use it against you. Understanding common scams helps you recognize them before you become a victim. The “Cracked Heat Exchanger” Scam This is the most common and most lucrative heating repair scam. Here’s how it works: The Setup A technician arrives for routine maintenance, a minor repair, or a “free inspection” offer. During the visit, they examine your furnace and deliver alarming news: “I found a crack in your heat exchanger. This is very dangerous—carbon monoxide could be leaking into your home right now. You need to stop using this furnace immediately.” The Fear Factor Heat exchanger cracks are a legitimate safety concern. A cracked heat exchanger can leak carbon monoxide—an odorless, colorless gas that kills hundreds of Americans annually. The technician is counting on you knowing this. They may show you: Photos (possibly from another furnace or the internet) A video scope image (often misrepresented or from another job) “Evidence” of carbon monoxide (using a detector held near the furnace) The Pressure With fear established, the pressure begins: “I can’t in good conscience leave this running. Your family is at risk. We need to shut this down today.” “The heat exchanger can’t be repaired—you need a new furnace. Fortunately, I can get a crew here tomorrow.” “If you sign today, I can give you a discount. Otherwise, the price goes up.” The Reality Heat exchanger cracks do occur—but they’re far less common than scammers claim. Many “cracks” are actually: Normal seams or welds in the metal Surface discoloration or rust Expansion joints designed into the exchanger Completely fabricated Legitimate diagnosis requires: Visual inspection with proper lighting Sometimes specialized cameras or dye testing Combustion analysis measuring actual CO levels Documentation you can verify How to Protect Yourself Don’t panic. A cracked heat exchanger is serious but rarely an immediate emergency. You have time to verify the diagnosis. Ask for documentation. Request photos or video of the actual crack on your actual furnace. Ask where specifically the crack is located. Get a second opinion. Before authorizing replacement, have another company inspect the furnace. A legitimate crack will be found by both technicians. Check CO levels yourself. If you have carbon monoxide detectors (you should), check their readings. Plug-in detectors with digital displays show current levels. Verify the company. Is this a reputable local company or someone who showed up offering a “free inspection”? The Bait-and-Switch Pricing Scam This scam lures you with low prices, then inflates costs once work begins. How It Works The bait: You see an advertisement or receive a quote for an attractively low price: “$49 furnace tune-up!” “Heating repair starting at $249!” “Free diagnostic with any repair!” The switch: Once the technician arrives and begins work, the price escalates: “The $49 tune-up doesn’t include the combustion analysis—that’s another $150.” “I found several problems. The $249 was just for the service call. The actual repairs will be $800.” “The diagnostic is free, but the part you need costs $400, and labor is $300.” Red Flags Prices dramatically lower than competitors Vague descriptions of what’s included “Starting at” pricing without clear parameters Refusal to provide written estimates before work begins Costs that escalate significantly once technician is on-site How to Protect Yourself Get detailed written estimates before any work begins. The estimate should specify: Diagnostic/service call fee Specific repairs recommended Parts costs Labor costs Total price Ask “what’s included” when scheduling. If the answer is vague, that’s a warning sign. Compare multiple quotes. If one quote is dramatically lower than others, ask why. Legitimate companies have similar cost structures. Don’t feel obligated. A technician in your home doesn’t mean you must authorize their repairs. You can pay the diagnostic fee and get a second opinion. The Unnecessary Repair Scam Some technicians recommend repairs you don’t actually need. Common Unnecessary Repair Claims “Your capacitor is weak.” Capacitors do fail, but “weak” is subjective. Some technicians replace functional capacitors as a revenue generator. “You need a new thermostat.” Thermostats rarely fail completely. Many “thermostat problems” are actually wiring issues, dead batteries, or user error. “Your refrigerant is low.” (Heat pumps) Refrigerant doesn’t deplete naturally—low levels indicate a leak. Adding refrigerant without fixing the leak is a temporary (and expensive) bandage. “All these parts are worn and should be replaced.” Preventive replacement has some merit, but replacing multiple functional parts is often unnecessary. How to Protect Yourself Ask questions: What specifically is wrong with this part? What happens if I don’t replace it? How urgent is this repair? Can you show me the problem? Understand the diagnosis. A legitimate technician can explain the problem in terms you understand. Vague explanations or technical jargon designed to confuse you are red flags. Get a second opinion on expensive repairs. If the diagnosis is legitimate, another technician will confirm it. Request the old parts. For replaced components, ask to see (or keep) the
Heating Maintenance Guide: How to Keep Your Summerville Home Warm and Your System Running Smoothly
Heating Maintenance Guide: How to Keep Your Summerville Home Warm and Your System Running Smoothly Annual professional heating maintenance extends your system’s lifespan by 5+ years, reduces repair costs by up to 40%, and keeps your energy bills in check. For Summerville homeowners, the best time to schedule maintenance is early fall—September or October—before you need your heating system regularly. Professional maintenance includes inspection of safety controls, cleaning of critical components, testing of electrical connections, and verification of proper operation. Between professional visits, homeowners should change air filters monthly, keep vents clear, and address unusual noises or performance changes promptly. This combination of professional and DIY maintenance keeps your heating system reliable for years. Why Heating Maintenance Matters Your heating system is one of the most expensive and essential components of your home. Yet many homeowners ignore it until something breaks. Think of maintenance like oil changes for your car. You could skip them and your car would run—for a while. But eventually, the lack of maintenance catches up with you in the form of expensive repairs or premature engine failure. Heating systems work the same way. Regular maintenance: Extends Equipment Lifespan Well-maintained systems last significantly longer: System Type Without Maintenance With Annual Maintenance Gas furnace 12–15 years 18–22 years Heat pump 8–12 years 12–16 years Electric furnace 15–20 years 22–28 years That’s 4–6 extra years of service from equipment costing $5,000–$15,000 to replace. Reduces Repair Costs Small problems caught during maintenance cost far less to fix than emergency repairs: A dirty flame sensor cleaned during a tune-up: $0 (included in maintenance) Same flame sensor causing repeated ignition failures: $150–250 service call Worn belt identified and replaced during maintenance: $50–100 Same belt breaking and damaging blower motor: $400–700 Studies show maintained systems require 40% fewer repairs than neglected ones. Maintains Efficiency Heating systems lose efficiency as components get dirty and wear: Dirty burners don’t burn fuel completely Clogged filters restrict airflow Dirty coils transfer heat poorly Worn parts create friction and resistance A system that was 95% efficient when new might operate at 80% efficiency after years of neglect. That 15% difference shows up directly in your energy bills. Ensures Safety Heating systems—especially gas furnaces—can develop dangerous conditions: Cracked heat exchangers leak carbon monoxide Faulty gas valves create leak risks Electrical problems cause fire hazards Failed safety controls don’t protect you Professional maintenance includes safety checks that protect your family. Preserves Warranty Coverage Most manufacturer warranties require annual professional maintenance. Skip it, and you may void your warranty—leaving you responsible for repairs that would otherwise be covered. Check your warranty documentation. Many require: Annual professional inspection Documentation of service performed Use of licensed contractors What Professional Heating Maintenance Includes A thorough professional tune-up covers far more than most homeowners realize. Here’s what should happen during a maintenance visit: Safety Inspection For all systems: Carbon monoxide testing in the equipment area and living spaces Inspection of flue pipe and venting (gas systems) Verification of safety control operation Electrical connection inspection for damage or overheating Gas leak check (gas systems) Why it matters: Safety issues often develop gradually and aren’t obvious until they become dangerous. Professional inspection catches them early. Thermostat Evaluation Verify accurate temperature reading Test heating cycle initiation and termination Check programming and settings Calibrate if necessary Test battery backup (if applicable) Why it matters: A thermostat that’s off by even a few degrees affects comfort and efficiency. Air Filter Assessment Inspect current filter condition Verify correct filter size and type Replace if needed Discuss optimal replacement schedule for your home Why it matters: The filter affects everything—airflow, efficiency, equipment wear, and air quality. Electrical System Inspection Test voltage and amperage Inspect wiring for damage, corrosion, or loose connections Test capacitors Check contactor condition Verify proper grounding Why it matters: Electrical problems cause component failures and create fire hazards. Gas Furnace-Specific Checks Burner inspection and cleaning: Remove and inspect burners Clean burner ports Check for rust, cracks, or damage Verify proper flame pattern and color Heat exchanger inspection: Visual inspection for cracks, rust, or separation Check for carbon monoxide leakage Assess overall condition and remaining life Ignition system: Clean flame sensor Test ignitor operation Verify proper ignition sequence Check pilot assembly (older systems) Gas valve and supply: Test gas pressure Check valve operation Inspect gas line connections Verify proper combustion air supply Venting system: Inspect flue pipe for damage, corrosion, or blockage Verify proper draft Check connections and seals Ensure proper termination outside Heat Pump-Specific Checks Outdoor unit inspection: Clean condenser coil Inspect fan blade and motor Check for debris accumulation Verify proper clearance around unit Inspect for physical damage or corrosion Refrigerant system: Check refrigerant charge Inspect for leaks Test pressures Verify proper superheat and subcooling Defrost system: Test defrost cycle initiation Verify proper defrost operation Check defrost timer or control board Reversing valve: Test operation in both heating and cooling modes Listen for proper switching Check for refrigerant bypass Auxiliary heat: Test electric heat strips Verify proper staging Check sequencer operation Blower and Air Handler For all systems: Inspect blower wheel for dirt and damage Check blower motor operation and amperage Lubricate motor bearings (if applicable) Test airflow Inspect belt condition and tension (belt-drive systems) Clean evaporator coil (if accessible) Check condensate drain and pan Why it matters: The blower moves all the air through your system. Problems here affect heating, cooling, and air quality. System Operation Test After completing all inspections and adjustments: Run complete heating cycle Verify proper temperature rise Check for unusual noises or vibrations Confirm thermostat satisfaction Test safety shutdown sequences DIY Maintenance: What Homeowners Can Do Between professional visits, these tasks keep your system running well: Monthly: Air Filter Check This is the single most important thing you can do for your heating system. How to check: Locate your filter (return vent, air handler, or furnace) Remove the filter Hold it up to light If you can’t see light through it, replace it How often to replace: Basic fiberglass filters: Every 30 days Pleated filters: Every 60–90 days High-efficiency
Emergency Heating Repair: What Summerville Homeowners Need to Know When the Heat Goes Out

Emergency Heating Repair: What Summerville Homeowners Need to Know When the Heat Goes Out When your heating fails during cold weather, the first priority is safety—check for gas leaks and carbon monoxide, then focus on keeping your family warm while arranging repairs. True heating emergencies include complete heating failure when temperatures drop below 40°F, gas odors or carbon monoxide detector alarms, and situations where vulnerable family members (infants, elderly, or those with health conditions) are at risk. For emergency heating repair in Summerville, expect to pay a premium for after-hours service, but don’t let cost concerns delay action when safety is at stake. Preparation before emergencies occur makes handling them far less stressful. What Qualifies as a Heating Emergency? Not every heating problem is an emergency. Understanding the difference helps you respond appropriately—and avoid paying emergency rates for situations that can wait. True Emergencies: Act Immediately Gas smell or suspected gas leak If you smell rotten eggs or sulfur (the odorant added to natural gas): Don’t operate any electrical switches, lights, or appliances Don’t use your phone inside the house Don’t start your car in an attached garage Get everyone out of the house immediately Call your gas company’s emergency line from outside or a neighbor’s home Don’t return until the gas company clears your home Gas leaks can cause explosions and are life-threatening. This is a 911-level emergency. Carbon monoxide detector alarm If your CO detector alarms: Get everyone out immediately—including pets Call 911 from outside Don’t re-enter until emergency responders clear the home Seek medical attention if anyone has symptoms (headache, dizziness, nausea, confusion) Carbon monoxide is odorless and colorless. Trust your detector—it exists to save your life. Complete heating failure in freezing temperatures When temperatures drop below 32°F and your heating system fails completely: Pipes can freeze within hours, leading to burst pipes and water damage Vulnerable family members face hypothermia risk The situation worsens the longer it continues This warrants emergency service, even at premium rates. Vulnerable household members at risk Even in moderately cold weather (40s–50s), heating failure becomes urgent when your household includes: Infants or young children Elderly family members Anyone with respiratory conditions, heart disease, or compromised immunity Anyone recovering from illness or surgery Pets that can’t regulate body temperature well Urgent But Not Emergency: Schedule Promptly These situations need attention soon but don’t require middle-of-the-night service: Heating working intermittently System runs sometimes but not consistently. Uncomfortable but not dangerous in moderate weather. Schedule service for the next available appointment. Reduced heating capacity System runs but can’t maintain set temperature. Layer up and schedule service within a day or two. Unusual noises or smells (not gas) Burning dust smell when first turning on heat for the season is normal. Persistent burning odors, grinding, or banging sounds warrant prompt service but aren’t emergencies unless accompanied by other warning signs. One zone not heating If part of your home isn’t heating but other areas are fine, you can manage temporarily. Schedule service soon but don’t pay emergency rates. Can Wait: Schedule Regular Service Minor temperature inconsistencies Some rooms slightly warmer or cooler than others. Address during regular maintenance. System running more than usual May indicate efficiency issues. Worth investigating but not urgent. Thermostat quirks Programmable thermostat acting up, display issues, or minor calibration problems. Schedule convenient service. Immediate Steps When Your Heat Fails When you realize your heating system isn’t working, follow this sequence: Step 1: Check for Safety Issues Before anything else, verify there’s no immediate danger: Gas odor? → Evacuate and call gas company (see emergency protocol above) CO detector alarming? → Evacuate and call 911 Burning smell or visible smoke? → Turn off system, evacuate if smoke is significant, call fire department if needed Electrical burning smell or sparks? → Turn off system at breaker, don’t attempt to restart If none of these apply, proceed to troubleshooting. Step 2: Try Basic Troubleshooting Many heating failures have simple causes. Check these before calling for service: Thermostat settings: Is it set to “Heat” mode? Is the set temperature higher than current room temperature? Is the fan set to “Auto” rather than “On”? Are batteries fresh (if applicable)? Air filter: When did you last change it? A severely clogged filter can cause system shutdown Replace if dirty and wait 5 minutes before restarting system Circuit breakers: Check your electrical panel for tripped breakers HVAC systems often have multiple breakers (indoor unit, outdoor unit, emergency shutoff) Reset any tripped breakers once—if they trip again, don’t keep resetting Gas supply (gas furnaces): Is the gas valve near the furnace in the “on” position? Are other gas appliances working (stove, water heater)? Outdoor unit (heat pumps): Is it running? Is it covered in ice? (Some frost is normal; heavy ice is not) Is airflow blocked by debris, snow, or ice? If basic troubleshooting doesn’t restore heat, you need professional help. Step 3: Assess the Urgency Consider: Current temperature: How cold is it outside? How cold is your house? Forecast: Is it getting colder or warming up? Household members: Anyone vulnerable to cold? Time of day: Is it 2 PM or 2 AM? Alternative heat sources: Do you have safe backup options? This assessment helps you decide between emergency service (now, at premium rates) or next-day service (more affordable). Step 4: Keep Your Family Warm While waiting for repairs, take steps to maintain warmth: Safe supplemental heating: Electric space heaters (keep 3 feet from flammables, never leave unattended) Fireplace or wood stove (if you have one and it’s properly maintained) Electric blankets and heating pads Unsafe heating methods to avoid: Gas ovens or stovetops (carbon monoxide risk) Outdoor grills or camp stoves indoors (carbon monoxide and fire risk) Generators indoors or in attached garages (carbon monoxide risk) Unvented gas heaters not designed for indoor use Heat retention strategies: Close doors to unused rooms to concentrate heat Hang blankets over windows for extra insulation Use draft stoppers under exterior doors Gather family in one room to share body heat Layer clothing and use blankets liberally Step 5: Protect Your
How Long Do Heating Systems Last? A Lifespan Guide for Summerville Homeowners
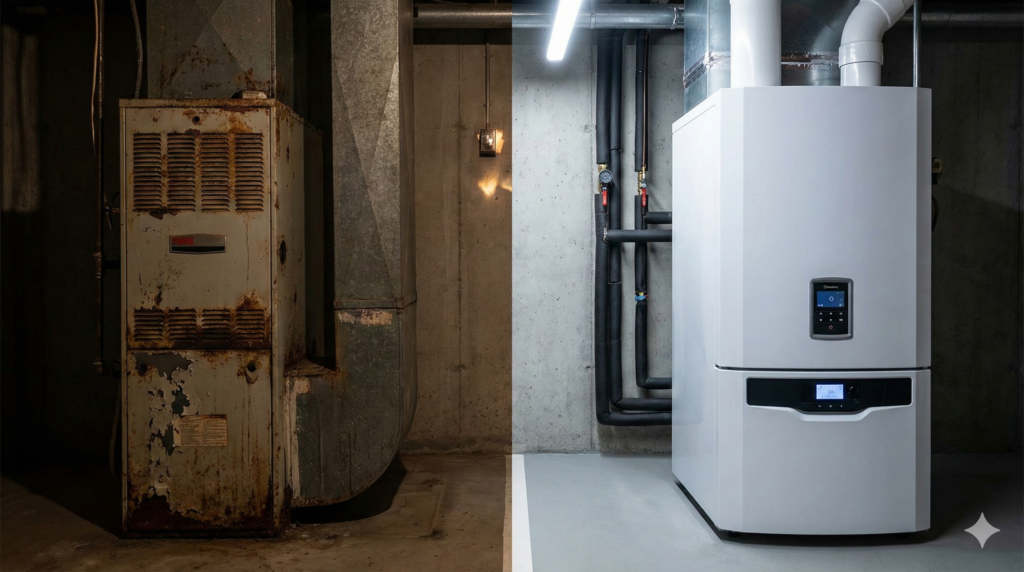
How Long Do Heating Systems Last? A Lifespan Guide for Summerville Homeowners Gas furnaces typically last 15–20 years, heat pumps last 10–15 years, and electric furnaces can last 20–30 years with proper maintenance. However, Lowcountry conditions—salt air, high humidity, and long cooling seasons—can shorten these lifespans by several years if equipment isn’t properly maintained. The key factors affecting longevity include installation quality, maintenance frequency, system sizing, and environmental exposure. Knowing your system’s age and condition helps you plan for replacement before emergency failure, budget appropriately, and make informed decisions about whether to repair or replace when problems arise. For heating repair decisions, understanding expected lifespan is essential context. Why Lifespan Matters for Homeowners Your heating system won’t last forever. Understanding its expected lifespan helps you: Plan financially: Replacement costs $5,000–$15,000. Knowing when to expect this expense prevents budget surprises. Make repair decisions: A $500 repair makes sense on a 10-year-old system. On a 20-year-old system? Maybe not. Avoid emergency replacement: Systems that fail in January leave you scrambling. Planning ahead means choosing equipment on your timeline, not under pressure. Maximize efficiency: Older systems cost more to operate. Knowing when efficiency losses justify replacement saves money long-term. The question isn’t just “how long will my system last?” but “how long should I keep it?” Average Lifespan by System Type Different heating systems have different life expectancies: Gas Furnaces: 15–20 Years Gas furnaces are workhorses. With proper maintenance, many exceed 20 years of service. The limiting factors are usually: Heat exchanger: This critical component can crack with age, creating carbon monoxide risks. Replacement often costs more than a new furnace. Electronic controls: Circuit boards and ignition systems fail over time. Efficiency degradation: Older furnaces lose efficiency as components wear. What determines where in the range your furnace falls: Factor Shorter Lifespan (15 years) Longer Lifespan (20+ years) Maintenance Irregular or skipped Annual professional service Filter changes Infrequent Monthly checks, regular replacement Sizing Oversized (short cycling) Properly sized for home Installation Budget installation Quality installation with proper airflow Usage Heavy use, extreme temperatures Moderate use, mild climate Heat Pumps: 10–15 Years Heat pumps have shorter lifespans than furnaces because they work year-round—heating in winter and cooling in summer. That’s twice the operational hours of a furnace. Components that typically limit heat pump life: Compressor: The heart of the system. Compressor failure often means replacement time. Outdoor coil: Exposed to weather, debris, and in coastal areas, salt air. Reversing valve: Switches between heating and cooling modes. Failure affects system function. Refrigerant system: Leaks develop over time, and older refrigerants become unavailable. Lowcountry-specific factors affecting heat pump lifespan: Our climate is simultaneously ideal for heat pump operation and hard on heat pump equipment: Long cooling seasons: Heat pumps run 6–7 months for cooling alone, accumulating wear. High humidity: Moisture accelerates electrical component degradation. Salt air: Coastal and near-coastal areas experience accelerated corrosion. Mild winters: Less heating stress, but year-round operation means no “off season” for recovery. Electric Furnaces: 20–30 Years Electric furnaces have the longest potential lifespan because they’re mechanically simple: No combustion (no heat exchanger to crack) No gas valves or ignition systems Fewer moving parts than heat pumps Heating elements are relatively inexpensive to replace The catch: Electric furnaces are expensive to operate. Many homeowners replace them with heat pumps before they fail, simply to reduce energy costs. Dual Fuel Systems: Mixed Lifespan Dual fuel systems combine a heat pump with a gas furnace. Each component ages according to its type: Heat pump portion: 10–15 years Furnace portion: 15–20 years When the heat pump fails, you can often replace just that component while keeping the furnace. This extends the overall system investment. How Lowcountry Conditions Affect Equipment Longevity Summerville’s climate creates specific challenges for HVAC equipment: Salt Air Corrosion Even 20+ miles from the coast, salt particles in the air accelerate metal corrosion. Effects include: Outdoor unit degradation: Coils, fan blades, and cabinet panels corrode faster Electrical connection corrosion: Creates resistance, heat, and eventual failure Refrigerant line deterioration: Copper lines develop pinhole leaks Mitigation: Coastal-rated equipment with corrosion-resistant coatings lasts longer. Regular cleaning removes salt deposits before they cause damage. High Humidity Our 70–90% average humidity affects equipment in several ways: Electrical component stress: Moisture accelerates circuit board and relay degradation Condensation issues: Improper drainage leads to water damage and biological growth Ductwork concerns: Humidity can affect duct integrity and insulation Mitigation: Proper system sizing ensures adequate dehumidification. Regular maintenance catches moisture-related issues early. Extended Cooling Seasons Summerville’s cooling season runs April through October—sometimes longer. This means: More compressor cycles: Heat pump compressors accumulate wear faster than in northern climates Longer annual runtime: More total operating hours per year Less recovery time: Systems run nearly year-round with minimal downtime Mitigation: Twice-yearly maintenance (spring and fall) addresses wear from both seasons. Mild Winters (The Good News) Our relatively mild winters are easier on heating equipment: Less extreme temperature stress: Systems rarely operate at maximum capacity Fewer freeze/thaw cycles: Less thermal expansion stress on components Heat pumps stay efficient: Temperatures rarely drop below heat pump effective range This partially offsets the challenges of our long cooling seasons. Signs Your System Is Nearing End of Life Age alone doesn’t determine when to replace. Watch for these warning signs: Increasing Repair Frequency The pattern to watch: Year 1–10: Occasional minor repairs (normal) Year 10–15: Repairs becoming more frequent Year 15+: Multiple repairs per year, major component failures The rule of thumb: If you’re calling for repairs more than twice per heating season, your system is telling you something. Rising Energy Bills Older systems lose efficiency as components wear: Dirty or degraded heat exchangers transfer heat less effectively Worn blower motors work harder to move air Refrigerant leaks reduce heat pump capacity Duct leaks worsen as connections age How to spot the trend: Compare your heating costs year-over-year, adjusting for weather differences. A 15–20% increase without explanation suggests efficiency loss. Uneven Heating If some rooms are comfortable while others are too cold or too hot: Blower motor may be weakening Ductwork may have developed leaks or disconnections System may no longer be sized appropriately (after home additions or insulation changes) While ductwork issues can be addressed separately, uneven heating from an
Heat Pump vs. Furnace: Which Is Right for Summerville Homes?
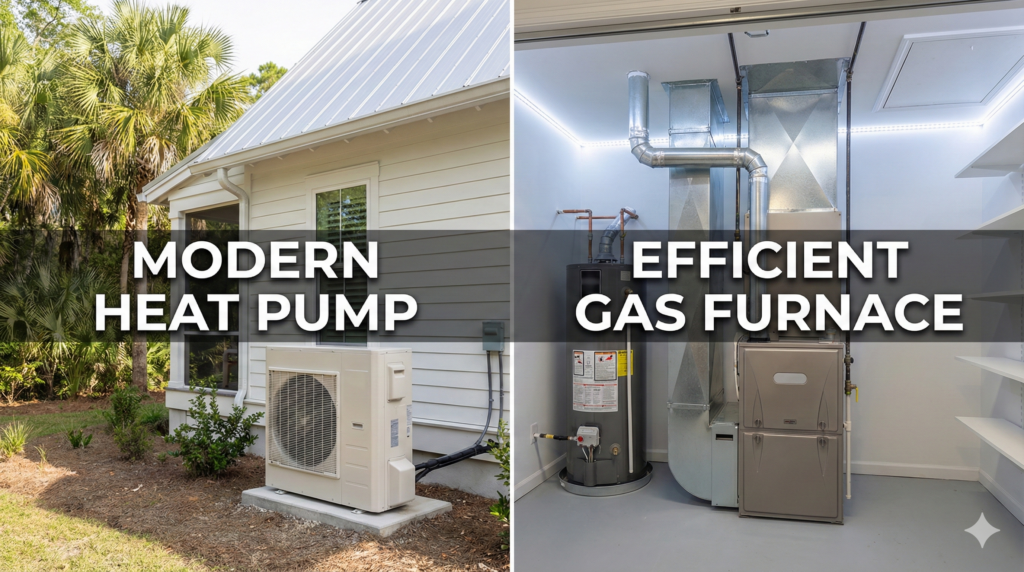
Heat Pump vs. Furnace: Which Is Right for Summerville Homes? For most Summerville homes, heat pumps are the better choice—they provide both heating and cooling, operate more efficiently in our mild Lowcountry climate, and cost less to run than furnaces for the majority of the year. Furnaces make sense primarily for homes with existing natural gas infrastructure or for homeowners who prefer the warmer air output furnaces provide. Many Lowcountry homes use dual fuel systems that combine a heat pump with a gas furnace backup for optimal efficiency across all temperatures. Understanding how each system works helps you make informed decisions about heating repair, replacement, and ongoing maintenance. Why This Comparison Matters in the Lowcountry If you live in Minnesota, the heat pump vs. furnace debate has a clear answer: you need a furnace. Winters are too cold for standard heat pumps to operate efficiently. But Summerville isn’t Minnesota. Our mild winters—with average lows in the mid-30s to low-40s and only occasional dips below freezing—create ideal conditions for heat pump operation. This changes the calculus entirely. Understanding the differences between these systems helps you: Make smarter decisions when your current system needs replacement Know what to expect from your existing equipment Communicate effectively with HVAC technicians Optimize your energy costs year-round Whether you’re troubleshooting a problem, planning a replacement, or just curious about what’s heating your home, this guide breaks down everything Summerville homeowners need to know. How Furnaces Work A furnace generates heat by burning fuel or using electric resistance, then distributes that heat through your ductwork. Gas Furnaces Gas furnaces burn natural gas or propane to create heat: The thermostat calls for heat The gas valve opens and burners ignite Flames heat a metal heat exchanger The blower fan pushes air across the hot heat exchanger Heated air (typically 120–140°F) flows through ducts to your rooms Combustion gases exhaust through a flue pipe to the outside Pros: Produces very warm air quickly Works effectively regardless of outdoor temperature Lower operating costs than electric furnaces (where gas is available) Long lifespan (15–20 years with proper maintenance) Cons: Requires natural gas or propane infrastructure Combustion creates carbon monoxide risk (requires proper venting and detectors) Only provides heating—separate AC system needed for cooling Less efficient than heat pumps in mild climates Electric Furnaces Electric furnaces use resistance heating elements—essentially large versions of the coils in a toaster: The thermostat calls for heat Electric heating elements energize and get hot The blower fan pushes air across the hot elements Heated air flows through ducts to your rooms Pros: No combustion, no carbon monoxide risk Lower installation cost than gas furnaces No gas line required Simple, reliable operation Cons: Expensive to operate (electricity costs more than gas per BTU) Only provides heating—separate AC needed Less efficient than heat pumps Can strain electrical systems during peak demand How Heat Pumps Work Heat pumps don’t generate heat—they move it. Using refrigerant and a compression cycle, they extract heat from outdoor air and transfer it inside. Yes, even cold air contains heat energy that can be extracted. The Heating Cycle The thermostat calls for heat Liquid refrigerant in the outdoor coil absorbs heat from outside air The compressor pressurizes the refrigerant, raising its temperature Hot refrigerant flows to the indoor coil The blower fan pushes air across the warm indoor coil Heated air (typically 90–100°F) flows through ducts to your rooms Refrigerant returns outside to repeat the cycle The Cooling Cycle In summer, the process reverses: The reversing valve switches refrigerant flow direction The indoor coil absorbs heat from inside air The outdoor coil releases that heat outside Your home cools down This dual functionality is a heat pump’s biggest advantage—one system handles both heating and cooling. Auxiliary and Emergency Heat Heat pumps include backup electric heating elements (similar to an electric furnace) that activate when: Outdoor temperatures drop below the heat pump’s efficient operating range The heat pump can’t keep up with heating demand The system runs a defrost cycle You manually select “Emergency Heat” mode Important distinction: Auxiliary heat: Supplements the heat pump automatically when needed Emergency heat: Bypasses the heat pump entirely, using only electric resistance heat Emergency heat should only be used when the heat pump itself has failed. It’s expensive to operate and isn’t meant for regular use. Head-to-Head Comparison Efficiency Ratings Explained Different systems use different efficiency metrics: System Type Efficiency Metric What It Measures Gas Furnace AFUE (Annual Fuel Utilization Efficiency) Percentage of fuel converted to heat Heat Pump (Heating) HSPF (Heating Seasonal Performance Factor) BTUs of heat per watt-hour of electricity Heat Pump (Cooling) SEER (Seasonal Energy Efficiency Ratio) BTUs of cooling per watt-hour of electricity Typical ratings: Standard gas furnace: 80% AFUE High-efficiency gas furnace: 90–98% AFUE Standard heat pump: 8–9 HSPF High-efficiency heat pump: 10+ HSPF What the numbers mean: An 80% AFUE furnace converts 80% of gas energy to heat (20% goes up the flue) A heat pump with 10 HSPF produces 10 BTUs of heat for every watt-hour of electricity Here’s where it gets interesting: heat pumps can exceed 100% efficiency in mild weather because they’re moving heat rather than creating it. A heat pump might deliver 3–4 units of heat energy for every unit of electrical energy consumed. Operating Costs in Summerville Operating costs depend on local energy prices and weather patterns. In the Summerville area: Current approximate energy costs: Electricity: ~$0.12–0.14 per kWh (Dominion Energy) Natural gas: ~$1.20–1.50 per therm Cost comparison for a typical 2,000 sq ft home: System Estimated Annual Heating Cost Heat pump (primary) $400–600 Gas furnace (90% AFUE) $500–700 Electric furnace $900–1,200 Costs vary based on home efficiency, thermostat settings, and weather patterns. Heat pumps typically win on operating costs in the Lowcountry because: Our mild winters keep heat pumps in their efficient operating range most of the time Heat pumps provide cooling too, eliminating the need for a separate AC system Electricity prices in South Carolina are relatively moderate Comfort Differences The systems feel different in operation: Furnace-heated air:
Furnace Not Blowing Hot Air? Here’s What Summerville Homeowners Should Check
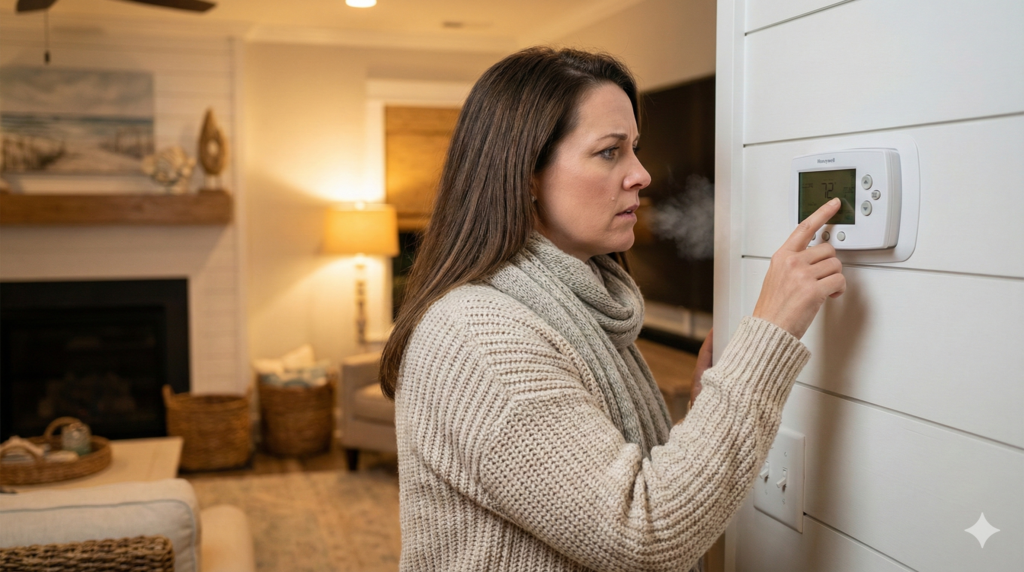
Furnace Not Blowing Hot Air? Here’s What Summerville Homeowners Should Check When your furnace runs but doesn’t blow hot air, the most common causes are thermostat issues, a clogged air filter, pilot light or ignitor failure, or a tripped safety switch. Start by checking your thermostat settings and replacing your air filter—these simple fixes resolve many heating problems without a service call. If those don’t work, the issue likely involves your ignition system, gas supply, blower motor, or heat exchanger, which require professional diagnosis. For Summerville homeowners, understanding what’s safe to troubleshoot yourself versus when to call for professional heating repair can save time, money, and frustration on cold Lowcountry nights. When Your Heater Runs But the Air Stays Cold Few things are more frustrating than hearing your heating system running while cold air blows from your vents. The system sounds like it’s working. The thermostat says it should be heating. But your house keeps getting colder. This disconnect between “running” and “heating” is actually helpful for diagnosis. It tells you the electrical components are functioning—the thermostat is communicating, the blower motor is operating. The problem lies somewhere in the heating process itself. Before you call for service, there are several things you can safely check yourself. Some fixes take less than five minutes. Others require professional attention. This guide helps you identify which situation you’re facing. Start Here: The Simple Fixes Before assuming the worst, check these common culprits that homeowners can address themselves: Check Your Thermostat Settings It sounds obvious, but thermostat issues cause a surprising number of “no heat” calls. Verify: Mode setting: Is the thermostat set to “Heat” rather than “Cool” or “Off”? In homes with heat pumps, an accidental switch to cooling mode means the system runs but produces cold air. Fan setting: If the fan is set to “On” rather than “Auto,” the blower runs continuously—even when the heating cycle isn’t active. This circulates unheated air between heating cycles, making it feel like the system isn’t working. Temperature setting: Is the set temperature actually higher than the current room temperature? The system won’t call for heat if it thinks the target temperature is already reached. Battery status: Many thermostats use batteries. Low batteries can cause erratic behavior or prevent the thermostat from communicating with your system. Replace batteries if your thermostat display is dim or blank. Programming check: If you have a programmable or smart thermostat, verify the schedule. Someone may have adjusted settings, or a software update may have reset your preferences. Replace Your Air Filter A clogged air filter is the single most common cause of heating problems—and the easiest to fix. When your filter is clogged: Airflow becomes restricted The system overheats trying to push air through Safety switches trip to prevent damage The furnace shuts down the heating cycle while the blower continues running How to check: Locate your filter (usually in the return air vent or at the furnace itself). Remove it and hold it up to light. If you can’t see light through it, it’s too dirty. The fix: Replace the filter with a new one of the same size. For most homes, filters should be replaced every one to three months—more frequently if you have pets or allergies. Important: If your system shut down due to overheating, it may need a few minutes to reset after you replace the filter. Turn the system off, wait five minutes, then turn it back on. Check Your Circuit Breakers Heating systems typically have multiple electrical connections: A breaker for the air handler/blower A separate breaker for the furnace or heat pump outdoor unit Sometimes a dedicated breaker for the ignition system If one breaker trips while others remain on, your blower might run while the heating components don’t. Check your electrical panel for any tripped breakers related to your HVAC system. The fix: Reset any tripped breakers by switching them fully off, then back on. If a breaker trips again immediately, don’t keep resetting it—this indicates an electrical problem requiring professional attention. Inspect Your Vents and Registers Blocked or closed vents can create pressure imbalances that affect system performance: Make sure all supply vents are open and unobstructed Check that return vents aren’t blocked by furniture or rugs Verify that no one has closed vents in unused rooms (this can cause system-wide problems) While blocked vents usually cause uneven heating rather than complete heating failure, checking them takes only a minute and rules out an easy fix. Furnace-Specific Troubleshooting If the simple fixes didn’t solve your problem and you have a gas or electric furnace, these issues may be the cause: Pilot Light Problems (Older Gas Furnaces) If your furnace is more than 15–20 years old, it may use a standing pilot light—a small flame that burns continuously and ignites the main burners when heat is needed. Signs of pilot light issues: No heat at all from the furnace You can hear the furnace trying to start but it doesn’t ignite Visible pilot light area shows no flame What you can check: Many furnaces have a small window that lets you see the pilot light. If it’s out, you may be able to relight it following the instructions on the furnace’s label. Caution: If you smell gas, don’t attempt to relight the pilot. Leave your home immediately and call your gas company. Gas leaks are emergencies. When to call a professional: If the pilot won’t stay lit after relighting, the thermocouple (a safety device that detects the pilot flame) likely needs replacement. This is a professional repair. Ignitor Failure (Modern Furnaces) Most furnaces manufactured in the last 20 years use electronic ignition rather than a standing pilot light. Common types include: Hot surface ignitors: A ceramic element that glows red-hot to ignite gas Intermittent pilot: An electronic spark that lights a small pilot, which then ignites the main burners Signs of ignitor failure: Furnace attempts to start (you hear clicking or see the inducer fan run) but doesn’t ignite System tries multiple times then shuts down Error codes on the furnace control board (if equipped)
Duct Cleaning After Home Renovation: Why It’s Essential for Your Health and HVAC System
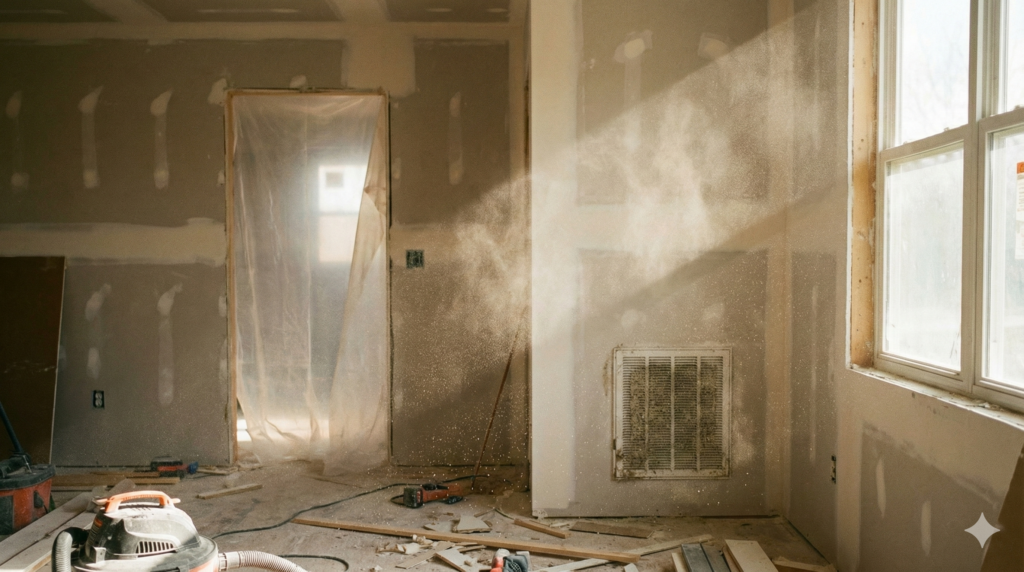
Duct Cleaning After Home Renovation: Why It’s Essential for Your Health and HVAC System Duct cleaning after a home renovation is essential—not optional. Construction projects generate massive amounts of dust, drywall particles, sawdust, and debris that infiltrate your HVAC system regardless of protective measures. This material settles throughout your ductwork and recirculates every time your system runs, degrading indoor air quality and straining your HVAC equipment. Post-renovation duct cleaning removes construction contaminants before they cause respiratory irritation, trigger allergies, or damage your heating and cooling system. For Summerville homeowners who’ve completed any significant remodeling project, scheduling duct cleaning immediately after construction ends protects both your family’s health and your HVAC investment. The Hidden Cost of Home Renovations You’ve survived weeks or months of construction chaos. The contractors are gone, the final punch list is complete, and your newly renovated space looks beautiful. But there’s something you can’t see: your ductwork is full of construction debris. Even the most careful contractors can’t prevent fine particles from becoming airborne during renovation work. Cutting, sanding, drilling, and demolition all generate dust that travels throughout your home—including into your HVAC system. Once there, it doesn’t just disappear. It waits for your system to turn on, then distributes throughout every room in your house. That “new construction smell” everyone talks about? Part of it is construction dust circulating through your air. What Renovation Projects Leave Behind Different types of projects generate different contaminants. Here’s what accumulates in your ducts based on common renovation work: Drywall Installation and Repair Drywall work is one of the worst offenders for duct contamination. The process generates: Drywall dust: Extremely fine particles that become airborne easily and travel far from the work area Joint compound dust: Created during sanding of seams and patches Gypsum particles: The calcium sulfate that makes up drywall’s core Drywall dust is particularly problematic because of its fine particle size. It passes through standard air filters, settles deep in ductwork, and can take weeks to fully clear from indoor air without intervention. Flooring Projects Flooring installation and refinishing introduce various contaminants: Flooring Type Contaminants Generated Hardwood sanding/refinishing Wood dust, finish fumes, polyurethane VOCs Tile installation Thinset dust, grout particles, tile cutting debris Carpet removal Old carpet fibers, dust, adhesive residue, trapped allergens Laminate/vinyl installation Cutting dust, adhesive fumes Hardwood floor sanding is especially concerning. The fine wood dust travels throughout the home, and the finishing products release volatile organic compounds (VOCs) that can linger for weeks. Kitchen and Bathroom Remodels These comprehensive projects combine multiple contamination sources: Demolition debris from removing old fixtures, cabinets, and surfaces Drywall dust from wall modifications Tile and grout dust from backsplash or floor work Plumbing modifications that may disturb existing dust in wall cavities Paint fumes and primer off-gassing Room Additions and Major Structural Work Large-scale projects introduce the full spectrum of construction contaminants: Concrete and masite dust from foundation work Framing sawdust from lumber cutting Insulation fibers (fiberglass or cellulose) Roofing material particles Exterior debris tracked through the home Painting Projects Even “simple” painting projects affect air quality: Paint fumes and VOCs during application Sanding dust from surface preparation Primer off-gassing Caulk and sealant fumes Why Protective Measures Aren’t Enough Good contractors take precautions during renovation work. They may: Seal off work areas with plastic sheeting Cover supply and return vents Use negative air pressure machines Clean up debris daily These measures help—but they don’t eliminate the problem. The Limitations of Containment Plastic barriers leak. Even carefully taped plastic sheeting has gaps at seams, floors, and ceilings. Fine dust particles find their way through. Vent covers aren’t airtight. Covering vents with plastic or tape reduces debris entry but doesn’t stop it completely. Pressure differentials in your home still draw air—and particles—toward return vents. Dust travels through unexpected paths. Construction dust migrates through electrical outlets, gaps around pipes, and other penetrations in walls and ceilings. It doesn’t respect containment barriers. HVAC systems run during construction. Unless you completely shut down your heating and cooling for the duration of the project (impractical for most renovations), your system circulates air—and whatever’s in it. The Cumulative Effect A single day of drywall sanding can introduce pounds of fine dust into your home’s air. Multiply that by weeks or months of construction activity, and the accumulation in your ductwork becomes significant. Even if 90% of construction debris is contained or cleaned up, the remaining 10% ends up somewhere—and much of it ends up in your ducts. Health Concerns from Post-Renovation Air Quality Construction dust isn’t just unpleasant—it can affect your health. Respiratory Irritation Fine particles from drywall, wood, and other construction materials irritate the respiratory system. Symptoms include: Coughing and throat irritation Nasal congestion and runny nose Shortness of breath Chest tightness Aggravated asthma symptoms These symptoms often persist for weeks after renovation completion if ductwork isn’t cleaned. Silica Exposure Many construction materials contain crystalline silica, including: Concrete and morite Drywall joint compound Tile and grout Some paints and coatings Inhaling silica dust can cause serious respiratory issues. While brief exposure during home renovation isn’t equivalent to occupational exposure, minimizing inhalation is prudent—especially for children, elderly family members, or anyone with respiratory conditions. VOC Exposure Volatile organic compounds off-gas from: Paints and stains Adhesives and sealants Flooring materials Cabinetry and countertops (especially engineered products) VOCs can cause headaches, dizziness, eye and throat irritation, and in some cases, more serious health effects. While duct cleaning doesn’t remove VOCs directly, removing dust that has absorbed these compounds reduces one exposure pathway. Allergen Redistribution Renovation work disturbs settled dust throughout your home—including allergens that had been dormant. Old carpet removal, wall demolition, and attic work can release years of accumulated: Dust mites and their waste Pet dander from previous occupants Pollen trapped in building materials Other allergenic particles If you or family members have allergies, post-renovation air quality can trigger significant symptoms until these redistributed allergens are removed. Impact on Your HVAC System Construction debris doesn’t just affect air quality—it threatens your HVAC equipment. Clogged Air Filters Your air filter is the first
Best Time to Clean Ducts in the Lowcountry: A Seasonal Guide for Summerville Homeowners

Best Time to Clean Ducts in the Lowcountry: A Seasonal Guide for Summerville Homeowners The best time to clean air ducts in the Lowcountry is late winter (February–March) before spring pollen season or early fall (September–October) before you seal up the house for cooler weather. These windows let you remove accumulated contaminants before your HVAC system runs heavily and before seasonal allergens peak. However, the “right” time also depends on your specific situation—after renovations, when moving into a new home, or whenever you notice warning signs like excessive dust or musty odors. For most Summerville homes without specific concerns, scheduling duct cleaning every three to five years during these seasonal windows provides optimal results. Why Timing Matters for Duct Cleaning Duct cleaning isn’t an emergency service for most homeowners. Unlike a broken air conditioner in July, you have flexibility in when to schedule it. That flexibility is actually an advantage—it lets you choose timing that maximizes the benefits. The Lowcountry’s climate creates specific considerations that don’t apply everywhere. Our long, humid summers, intense pollen seasons, and mild winters all influence when duct cleaning delivers the most value. Strategic timing helps you: Remove allergens before peak allergy seasons Start heavy HVAC usage with a clean system Avoid scheduling conflicts during busy seasons Potentially save money during slower periods The Lowcountry Climate Factor Summerville’s subtropical climate affects your ductwork differently than homes in drier or colder regions. Humidity and Moisture Our average humidity hovers between 70% and 90% for much of the year. This moisture can: Cause dust and debris to clump and adhere to duct surfaces Create conditions where biological growth may occur Make accumulated contaminants harder to remove the longer they sit Cleaning ducts before the most humid months (June–August) removes debris before moisture makes it more stubborn. Extended Cooling Season Lowcountry homeowners run air conditioning from April through October—sometimes longer. That’s six to seven months of continuous HVAC operation, circulating air through your ducts daily. Compare that to northern climates where AC might run three to four months. More runtime means more opportunities for dust, pollen, and other particles to accumulate. It also means your system works harder, making efficiency gains from clean ducts more impactful. Intense Pollen Seasons Summerville experiences two significant pollen seasons: Season Peak Months Primary Culprits Spring March–May Oak, pine, birch, grass Fall August–October Ragweed, goldenrod, grass Pollen enters your home and gets pulled into your HVAC system, where it settles in ductwork. Cleaning before these seasons removes last year’s accumulated pollen and reduces your baseline allergen exposure. Mild Winters Our relatively mild winters mean we use heating less intensively than northern regions. However, when temperatures drop, homes get sealed up tight—windows closed, doors shut. Any contaminants in your ducts recirculate continuously with no fresh air dilution. Cleaning ducts before winter ensures you’re not trapped inside with a season’s worth of accumulated dust and allergens. Best Seasonal Windows for Duct Cleaning Based on Lowcountry climate patterns, two windows stand out as optimal: Late Winter: February–March Why it works: Before spring pollen: Oak and pine pollen explode in March and April. Cleaning in February removes last year’s pollen before the new wave arrives. Before heavy AC usage: Your system has been relatively idle during winter. Clean it before it starts running 12+ hours daily. Slower season for HVAC companies: Easier scheduling and potentially better availability. Post-holiday timing: The busy holiday season is over, making it easier to schedule home services. Ideal for: Allergy sufferers preparing for spring Homeowners who want a fresh start for the cooling season Anyone who hasn’t had ducts cleaned in several years Early Fall: September–October Why it works: Before sealing up for winter: Remove summer’s accumulation before you close windows and rely entirely on recirculated air. After summer humidity: The worst humidity is behind you, and debris that accumulated during summer can be removed. Before fall allergens peak: Ragweed season runs August through November. Early fall cleaning reduces exposure during the back half. Before holiday guests: Get your home’s air quality in shape before hosting family and friends. Ideal for: Homeowners preparing for holiday gatherings Those who ran AC heavily all summer Allergy sufferers sensitive to fall allergens When to Clean Regardless of Season Some situations call for duct cleaning regardless of the calendar: After Home Renovations Construction projects generate enormous amounts of dust, drywall particles, sawdust, and debris. Even with protective measures, this material finds its way into ductwork. Clean ducts immediately after: Kitchen or bathroom remodels Room additions Drywall installation or repair Flooring replacement (especially sanding hardwood) Any project involving cutting, sanding, or demolition Don’t wait for the “optimal” season—renovation debris should be removed as soon as the project is complete. When Moving Into a New Home Whether your new home is newly constructed or previously owned, duct cleaning makes sense: New construction: Despite builders’ best efforts, construction debris accumulates in ductwork during the building process. Many new homes have never had their ducts cleaned. Previously owned homes: You inherit the previous occupants’ dust, pet dander, and whatever else accumulated during their tenure. Starting fresh with clean ducts eliminates that history. Schedule duct cleaning during the transition period—after closing but before or shortly after moving in. After Water Damage or Flooding If your home has experienced water intrusion—whether from flooding, roof leaks, or plumbing failures—your ductwork may have been affected. Important: If you suspect moisture has entered your duct system, have a certified professional assess for potential mold before scheduling standard duct cleaning. Mold remediation requires specialized expertise beyond duct cleaning. At Coastal Carolina Comfort, we don’t perform mold testing or remediation—if we observe potential concerns, we’ll recommend you consult a certified mold professional first. When Warning Signs Appear Don’t wait for the optimal season if you notice: Visible dust blowing from vents when the system runs Musty or stale odors when HVAC operates Unexplained increase in allergy or respiratory symptoms Excessive dust accumulation despite regular cleaning Visible debris or discoloration in or around vents Pest activity in or around your HVAC system These signs indicate your ducts need attention
Duct Cleaning Scams: How to Spot Them Before You Get Burned

Duct Cleaning Scams: How to Spot Them Before You Get Burned Duct cleaning scams typically start with an unbelievably low price—often $49 to $249 for “whole-house” cleaning—then escalate through high-pressure upselling, fake mold discoveries, or bait-and-switch tactics. Legitimate duct cleaning for a standard home costs $300–$500, reflecting the specialized equipment and time required. Red flags include unsolicited phone calls or door-to-door sales, quotes given without inspection, pressure to decide immediately, and technicians who “discover” urgent problems requiring expensive repairs. Protect yourself by verifying NADCA certification, checking Better Business Bureau ratings, getting written estimates, and never paying the full amount upfront. The $249 Duct Cleaning Trap You’ve seen the ads. Maybe a postcard in your mailbox, a Facebook ad, or a door-hanger on your front porch: “Whole-House Duct Cleaning – Only $249!” “Air Duct Special – $49 for Unlimited Vents!” It sounds like a great deal. Your ducts probably need cleaning, and who wouldn’t want to save a few hundred dollars? Here’s the problem: legitimate duct cleaning can’t be done for $249. The equipment alone—truck-mounted vacuums, HEPA filtration systems, rotary brushes—costs tens of thousands of dollars to purchase and maintain. A thorough cleaning of an average home takes two to four hours of skilled labor. At $249, the math doesn’t work. So how do these companies make money? By not delivering what they promise—and by pressuring you into services you don’t need. How Duct Cleaning Scams Work Scam operators follow predictable patterns. Understanding their tactics helps you recognize them before you become a victim. The Bait and Switch This is the most common scam. Here’s how it unfolds: The bait: You schedule service based on an advertised low price ($49–$249) The arrival: Technicians show up and begin a cursory inspection The switch: They inform you the advertised price covers only a few vents, or only “basic” cleaning. The “real” cleaning costs $300, $500, or more The pressure: They emphasize that since they’re already there, you might as well pay for the full service You’re now in an uncomfortable position. You’ve taken time off work, the technicians are in your home, and you feel obligated. Many people pay just to end the awkward situation. The Fake Mold Discovery This scam exploits homeowners’ legitimate concerns about mold: The setup: Technicians arrive for routine duct cleaning The “discovery”: They show you photos or video of “mold” in your ducts—often using images from other homes or misidentifying ordinary dust and debris The fear: They warn about health dangers, structural damage, or liability issues The upsell: They offer mold remediation services for $500–$2,000 or more Important context: Legitimate mold assessment requires certified professionals and laboratory testing. A duct cleaning technician cannot definitively identify mold species or determine whether remediation is necessary. If someone claims to find mold during a duct cleaning, get a second opinion from a certified mold assessment professional before authorizing any work. The Unnecessary Repair Scam Similar to the fake mold discovery, this scam manufactures problems: The inspection: Technicians examine your HVAC system The diagnosis: They claim your ducts are damaged, your system is failing, or components need immediate replacement The urgency: They warn that continued use is dangerous or will cause expensive damage The solution: They offer to fix the problem right now—for a significant fee Legitimate HVAC issues exist, but scammers exploit homeowners’ lack of technical knowledge. They may show you “damaged” components that are actually normal, or exaggerate minor issues into emergencies. The Incomplete Service Some scam operators simply don’t do the work: The arrival: Technicians show up with minimal equipment The “cleaning”: They vacuum visible dust from vent covers and perhaps the first few inches of ductwork The departure: They collect payment and leave within 30–45 minutes A thorough duct cleaning takes two to four hours and requires specialized equipment to reach deep into the duct system. If technicians are in and out quickly with basic tools, you haven’t received legitimate service. The Unsolicited Contact Scam Reputable companies don’t cold-call or go door-to-door offering duct cleaning: The contact: You receive an unsolicited phone call, or someone knocks on your door offering duct cleaning services The pitch: They claim to be “in the neighborhood,” offer a “one-time special,” or say they’re conducting “free inspections” The goal: Get inside your home to execute one of the scams above Legitimate HVAC companies have enough business from referrals, repeat customers, and people who seek them out. Aggressive cold-calling is a hallmark of scam operations. Red Flags: Warning Signs of a Duct Cleaning Scam Watch for these indicators that a company may not be legitimate: Pricing Red Flags Red Flag Why It’s Suspicious Prices under $150 for whole-house cleaning Below the cost of doing the job properly “Per vent” pricing that seems too low Often excludes the main duct runs No price given until technicians arrive Sets up bait-and-switch scenario Dramatically lower than competitors Legitimate companies have similar cost structures Special “today only” pricing Pressure tactic to prevent comparison shopping Communication Red Flags Red Flag Why It’s Suspicious Unsolicited phone calls or door-to-door sales Reputable companies don’t operate this way Quotes given without seeing your home Impossible to price accurately without inspection Pressure to schedule immediately Prevents you from researching the company Vague answers about methods or equipment May indicate lack of proper tools or training No physical address or only a P.O. box Difficult to hold accountable if problems arise On-Site Red Flags Red Flag Why It’s Suspicious Technicians arrive in unmarked vehicles Legitimate companies display their branding Minimal or consumer-grade equipment Professional cleaning requires specialized tools Service completed in under an hour Thorough cleaning takes 2–4 hours minimum “Discoveries” requiring immediate expensive repairs Classic upselling tactic Refusal to provide written documentation No accountability for work performed Demand for cash payment Avoids paper trail and consumer protections How to Protect Yourself Follow these steps to avoid duct cleaning scams and find legitimate service: Research Before You Need Service Don’t wait until you’re desperate. Research duct cleaning companies in advance so you have trusted options when you need them. Verify Credentials NADCA Certification: The National Air Duct Cleaners Association certifies companies that meet
Dryer Vent Cleaning: Why It Matters for Summerville Homeowners
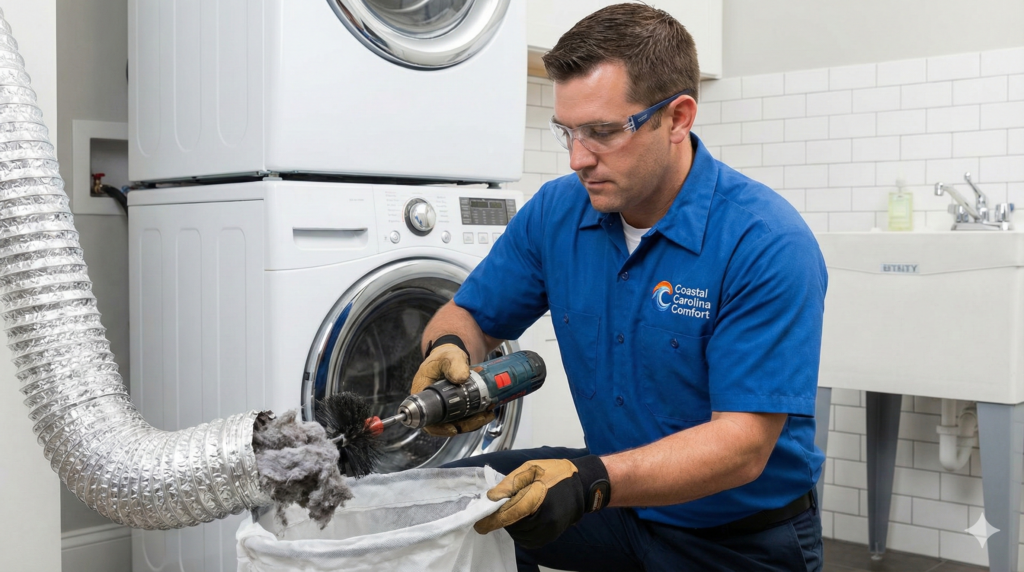
Dryer Vent Cleaning: Why It Matters for Summerville Homeowners Dryer vent cleaning prevents house fires, reduces energy costs, and extends your dryer’s lifespan. According to the U.S. Fire Administration, clothes dryers cause approximately 2,900 home fires each year, and lint buildup is the leading cause. When your dryer vent becomes clogged, hot air can’t escape properly—creating a fire hazard and forcing your dryer to work harder. Professional dryer vent cleaning removes accumulated lint from the entire exhaust system, not just the lint trap. For Summerville homeowners, annual cleaning is recommended, especially if your dryer takes longer than usual to dry clothes or feels excessively hot. The Hidden Danger in Your Laundry Room You clean the lint trap after every load. That’s enough, right? Unfortunately, no. The lint trap catches only about 75% of the lint your dryer produces. The rest travels into the dryer vent—the duct that carries hot, moist air from your dryer to the outside of your home. Over time, lint accumulates along the entire length of this vent, creating a serious fire hazard. Lint is highly flammable. Combine it with the heat your dryer generates, and you have the ingredients for a house fire. The U.S. Fire Administration reports that failure to clean dryer vents is the leading cause of dryer fires, ahead of mechanical failure and electrical issues. This isn’t a scare tactic—it’s physics. And it’s preventable. Warning Signs Your Dryer Vent Needs Cleaning Your dryer will tell you when the vent is clogged. Watch for these signs: Clothes Take Longer to Dry This is the most common symptom. If loads that used to dry in 45 minutes now take 60, 75, or even 90 minutes, restricted airflow is likely the cause. Your dryer can’t expel moist air efficiently, so clothes stay damp longer. Dryer Feels Excessively Hot Touch the top of your dryer during a cycle. Warm is normal. Hot enough to be uncomfortable? That’s a warning sign. When the vent is clogged, heat builds up inside the dryer instead of exhausting outside. Clothes Are Unusually Hot After a Cycle Similarly, if your clothes come out of the dryer extremely hot—almost too hot to handle—the dryer is working overtime to compensate for poor airflow. Burning Smell If you notice a burning odor when your dryer runs, stop using it immediately. This could indicate lint is overheating or has ignited. Unplug the dryer and have the vent inspected before using it again. Visible Lint Around the Outside Vent Check the exterior vent where your dryer exhausts. If you see lint accumulation around the opening or the flap doesn’t open properly when the dryer runs, the vent needs cleaning. Laundry Room Feels Humid or Hot A properly functioning dryer vent expels hot, moist air outside. If your laundry room feels humid or warmer than usual during drying cycles, that air may be backing up into your home. It’s Been More Than a Year Even without obvious symptoms, annual dryer vent cleaning is recommended. Lint accumulates gradually, and problems may not become apparent until the vent is significantly clogged. The Real Cost of a Clogged Dryer Vent Beyond the fire risk, a clogged dryer vent costs you money and shortens your appliance’s life. Higher Energy Bills When your dryer can’t exhaust air efficiently, it runs longer to dry each load. That extended run time adds up. According to Energy Star, a clogged dryer vent can increase energy consumption by 30% or more. For a household that does five loads per week, that’s a noticeable increase in your electric bill. Premature Dryer Failure Dryers aren’t designed to run for extended periods or operate at excessive temperatures. When a clogged vent forces your dryer to work harder, components wear out faster. The heating element, thermostat, and motor all suffer from the added strain. A dryer that should last 10–13 years may fail in seven or eight. Clothing Damage Excessive heat damages fabrics. Clothes dried in an overheating dryer wear out faster, shrink more, and fade sooner. Delicate items are especially vulnerable. Carbon Monoxide Risk (Gas Dryers) If you have a gas dryer, a clogged vent creates an additional hazard. Gas dryers produce carbon monoxide as a byproduct of combustion. Normally, this exhausts safely outside through the vent. When the vent is blocked, carbon monoxide can back up into your home—an invisible, odorless danger. Why the Lint Trap Isn’t Enough Many homeowners assume that cleaning the lint trap handles the lint problem. Here’s why it doesn’t: The Lint Trap’s Limitations The lint trap sits between the dryer drum and the exhaust system. It catches lint before it enters the vent—but not all of it. Fine lint particles pass through the screen, and lint that accumulates on the trap’s housing can bypass it entirely. The Journey Through the Vent Your dryer vent may run 10, 20, or even 30 feet from the dryer to the exterior wall. Along that path, lint settles on the duct walls, accumulates at bends and joints, and builds up near the exterior vent cap. None of this is addressed by cleaning the lint trap. Vent Configuration Matters Longer vents, vents with multiple turns, and vents that run vertically accumulate lint faster than short, straight runs. Many Summerville homes—especially two-story construction in neighborhoods like Cane Bay and Nexton—have dryers located far from exterior walls, requiring longer vent runs that need more frequent attention. What Professional Dryer Vent Cleaning Includes Professional cleaning addresses the entire exhaust system, not just the accessible parts. Here’s what to expect: Inspection Technicians inspect the vent system from both ends—at the dryer connection and at the exterior vent cap. They assess the vent’s length, configuration, and condition, and identify any damage or code violations. Lint Removal Using specialized rotating brushes and high-powered vacuums, technicians dislodge and extract lint from the entire length of the vent. This includes: The transition duct (flexible connector between dryer and wall) The rigid ductwork running through walls, floors, or ceilings Elbows and joints where lint accumulates The exterior