How to Choose an AC Repair Company in the Lowcountry

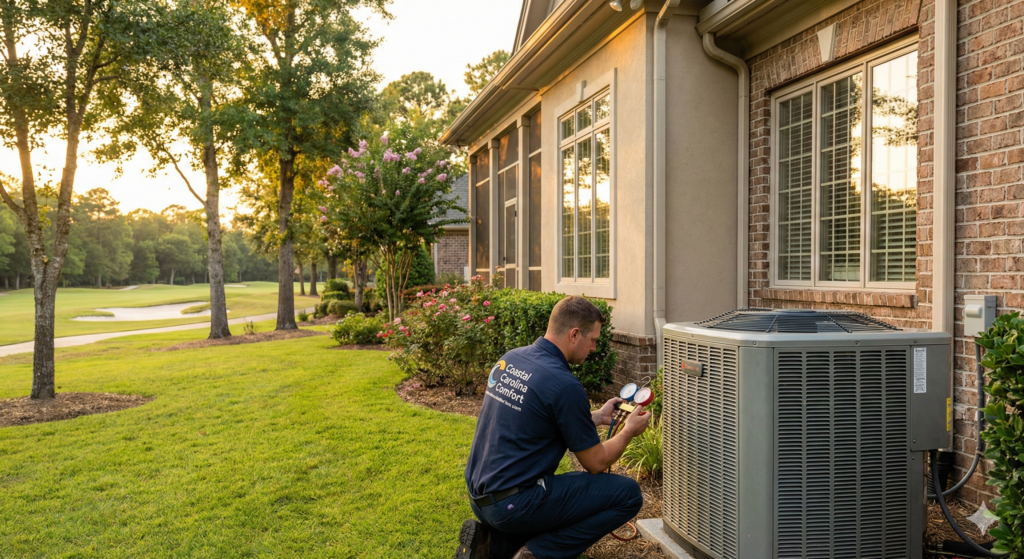
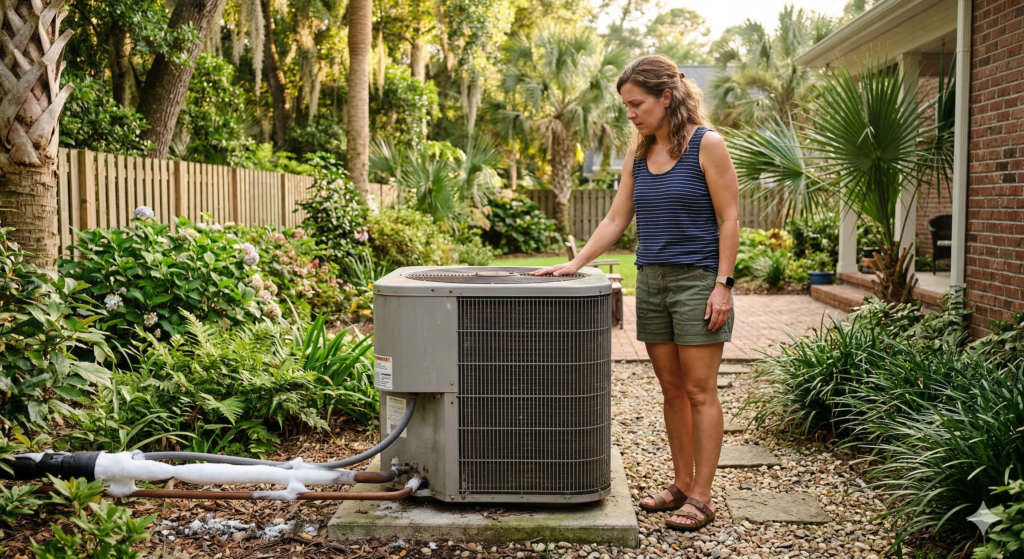
How to Choose an AC Repair Company in the Lowcountry Choosing the right AC repair company is a decision that affects your comfort, your safety, and your wallet. In the Lowcountry — where summers are long, humidity is relentless, and your cooling system is the most critical mechanical system in your home — the contractor you call matters as much as the repair itself. A qualified technician using the right parts with transparent pricing will fix the problem once. An unqualified or dishonest contractor can misdiagnose the issue, install inferior parts, void your warranty, or recommend unnecessary work that costs you thousands. Coastal Carolina Comfort has been serving Summerville, Charleston, and the surrounding communities since 2019, and we’ve built our reputation on the kind of honest, competent service that we’d want for our own families. Here are the seven criteria we believe every Lowcountry homeowner should evaluate before hiring an AC repair company. 1. Verify South Carolina Contractor Licensing This is the non-negotiable starting point. South Carolina requires HVAC contractors to hold a mechanical contractor license issued by the SC Department of Labor, Licensing, and Regulation (LLR). This license verifies that the contractor has met minimum competency standards, carries required insurance, and operates as a legitimate business. Operating without a license is illegal, and hiring an unlicensed contractor creates real risks for you. Work performed by an unlicensed contractor can void your manufacturer’s equipment warranty. If something goes wrong — property damage, personal injury, or faulty work — you may have no legal recourse. An unlicensed contractor is also unlikely to carry adequate insurance, which means any damage to your home or injury on your property could become your financial responsibility. You can verify a contractor’s license status through the SC LLR’s online verification tool. If a company can’t or won’t provide their license number when asked, that’s all the information you need — move on. 2. Look for NATE Certification NATE (North American Technician Excellence) certification is the most widely recognized industry credential for HVAC technicians. It indicates that a technician has passed rigorous, third-party testing on installation and service practices for specific equipment types. NATE certification isn’t required by law, which is exactly why it’s valuable as a differentiator. Companies that invest in NATE certification for their technicians are demonstrating a commitment to professional competency that goes beyond the minimum legal requirements. At Coastal Carolina Comfort, our technicians are NATE-certified. We believe this matters because the Lowcountry’s climate creates unique HVAC challenges — humidity management, salt air corrosion, extended system runtime — that require technician-level expertise to diagnose and resolve correctly. 3. Read Google Reviews — But Read Them Critically Online reviews are a valuable resource, but they require thoughtful interpretation. Here’s how to use them effectively. Volume matters. A company with 200 reviews averaging 4.8 stars tells a more reliable story than a company with 12 reviews averaging 5.0 stars. A larger sample size smooths out outliers and gives you a more accurate picture of consistent performance. Read the negative reviews. Every company has some. What matters is the nature of the complaints and how the company responded. Communication issues, scheduling delays, and billing confusion are common complaints in any service business and are often resolved. Complaints about misdiagnosis, incomplete repairs, damage to property, or refusal to honor warranties are more serious and suggest systemic problems. Look for specifics. Reviews that mention specific technician names, describe the problem and solution, or reference transparency in pricing are generally more credible than generic five-star reviews that say “Great service!” Detail indicates a real experience. Check the BBB. The Better Business Bureau tracks complaint patterns and resolution rates. A company’s BBB rating and complaint history can reveal issues that don’t always surface in Google reviews. 4. Demand Transparent, Upfront Pricing The most common source of frustration in HVAC service is pricing surprises — getting a bill that’s significantly higher than expected because the scope of work changed, additional issues were “discovered,” or the initial estimate was intentionally low to get in the door. A reputable AC repair company will provide a clear, upfront price for the repair after completing the diagnosis and before performing any work. This price should include the diagnostic fee, parts, and labor. If additional issues are discovered during the repair, the company should inform you and get authorization before proceeding with additional work. Questions to ask about pricing before hiring: Do you charge a diagnostic or service call fee? Is that fee waived if I proceed with the repair? Will I receive a written estimate before any work begins? Does the estimate include parts, labor, and any applicable warranties? Are there any circumstances where the final price could exceed the estimate? At Coastal Carolina Comfort, we believe transparent pricing is foundational to trust. Our technicians explain what they find, provide the price upfront, and get your approval before touching a wrench. For a detailed breakdown of typical repair costs, read our guide on AC repair costs in South Carolina. 5. Evaluate Warranty Terms on Repairs A repair is only as good as the warranty behind it. Ask about both the parts warranty and the labor warranty before authorizing work. Parts warranty covers the replacement component itself. Quality contractors use OEM (original equipment manufacturer) parts or equivalent-quality components that carry manufacturer warranties. Ask what happens if the same part fails again within the warranty period — will you pay for a new part, or is it covered? Labor warranty covers the workmanship — the installation of the part. If the part is fine but the installation was faulty and causes a problem, the labor warranty ensures you’re not paying again for someone else’s mistake. The specifics matter. A 90-day labor warranty is industry minimum. A one-year labor warranty demonstrates greater confidence in the quality of work. Some companies offer extended warranties or maintenance agreements that include warranty coverage. 6. Assess Response Time and Availability In the Lowcountry, an AC failure during July or August is a
Why Regular AC Maintenance Prevents Costly Repairs
Why Regular AC Maintenance Prevents Costly Repairs Professional AC maintenance is the single most effective way to prevent unexpected breakdowns, extend your system’s lifespan, and keep repair costs low over time. A comprehensive tune-up performed once or twice per year allows a trained technician to identify and address failing components — worn capacitors, low refrigerant levels, dirty coils, corroded electrical connections — before they cascade into expensive emergency repairs. In the Lowcountry, where AC systems run six to seven months per year and endure extreme humidity, salt air exposure, and sustained high temperatures, maintenance isn’t optional if you want your system to reach its full lifespan. Coastal Carolina Comfort’s preventive maintenance program covers every critical component, and the homeowners who follow a regular maintenance schedule consistently experience fewer breakdowns, lower energy bills, and longer system life. Here’s what professional AC maintenance actually involves, how it prevents the most common and costly repairs, and why it matters more in South Carolina than almost anywhere else. What Professional AC Maintenance Includes A proper AC tune-up is not a quick visual inspection and a filter change. It’s a systematic evaluation of every component that can fail, degrade, or lose performance over time. At Coastal Carolina Comfort, our NATE-certified technicians follow a comprehensive checklist during every maintenance visit. Electrical Component Testing Your technician tests the run capacitor and start capacitor with a multimeter to measure microfarad readings. A capacitor that’s weakened but still functional today may fail within weeks under peak summer load — identifying this during a maintenance visit means a $200 scheduled replacement instead of a $400+ emergency call. We also inspect contactors for pitting and carbon buildup, check wiring connections for corrosion or looseness, and verify that safety controls and disconnect switches are functioning properly. Refrigerant Level Verification Using pressure gauges connected to the system’s service ports, your technician checks that the refrigerant charge matches the manufacturer’s specifications. Low refrigerant means a leak exists somewhere in the system — and identifying a slow leak during a maintenance visit prevents the scenario where your system gradually loses cooling capacity, works harder, consumes more electricity, and eventually shuts down entirely. Coil Inspection and Cleaning Both the evaporator coil (indoor) and condenser coil (outdoor) are checked for dirt, debris, and biological buildup. In the Lowcountry, the evaporator coil is particularly susceptible to mold and biofilm growth because it operates in a perpetually moist environment. A dirty evaporator coil restricts airflow, reduces heat absorption, and can cause the coil to freeze — all problems that lead to repair calls. The condenser coil accumulates dirt, pollen, grass clippings, and — in coastal areas — salt residue that corrodes the aluminum fins. Condensate Drain Line Inspection and Treatment The condensate drain line is one of the most common sources of AC service calls in our market. Our technicians flush the drain line, check the drain pan for cracks or corrosion, and treat the line to prevent algae and biofilm buildup. A $20 preventive treatment during a maintenance visit prevents a $200+ emergency drain clearing call — or worse, water damage to your ceiling or flooring. Thermostat Calibration and Operation We verify that your thermostat is reading temperatures accurately, communicating properly with the system, and cycling the equipment at appropriate intervals. A miscalibrated thermostat can cause short cycling, excessive runtime, or temperature inconsistencies that you might attribute to a system problem when the real issue is a $15 calibration fix. Air Filter Assessment We check and replace the air filter if needed, and we discuss the right filter type and replacement frequency for your specific system and home. In the Lowcountry’s high-pollen environment, homeowners often benefit from changing filters every 30 days during peak season rather than the standard 60-90 day recommendation you’ll find in most owner’s manuals. Airflow and Ductwork Inspection Your technician checks supply and return airflow at the registers, looks for obvious ductwork issues like disconnected sections or crushed flex duct (extremely common in South Carolina attic spaces), and verifies that the blower motor is operating within normal parameters. How Maintenance Prevents the Five Most Costly AC Repairs Each of the repairs below is one that maintenance directly prevents or mitigates. Repair 1: Compressor Failure ($1,500–$3,500) The compressor is the most expensive component in your AC system, and it rarely fails without a contributing cause. Low refrigerant forces the compressor to work under abnormal pressures. Dirty coils restrict heat transfer and cause the compressor to overheat. Electrical issues like failing capacitors put additional stress on the compressor motor. Regular maintenance addresses all three contributing factors, dramatically reducing the risk of catastrophic compressor failure. Repair 2: Evaporator Coil Replacement ($1,000–$2,500) Evaporator coils can develop refrigerant leaks over time, particularly in the Lowcountry where the coil’s perpetually moist operating environment accelerates corrosion. Maintenance catches early signs of coil degradation — unusual temperature differentials across the coil, minor pressure drops, or visible corrosion — allowing for planned repair or replacement rather than an emergency situation. Repair 3: Blower Motor Failure ($400–$900) Blower motors fail when they’re overworked. The most common overwork scenario is restricted airflow — typically from dirty filters, dirty evaporator coils, or ductwork issues. Every one of those root causes is addressed during a standard maintenance visit. A clean system with good airflow means your blower motor operates within its designed parameters instead of straining to push air through restrictions. Repair 4: Frozen Evaporator Coil (Variable — $200–$800+) A frozen coil is almost always a symptom of another problem: low refrigerant, restricted airflow, or a dirty coil. Maintenance catches all three root causes. Left unaddressed, a repeatedly freezing coil can damage the compressor — turning a $200 root-cause repair into a $3,000+ compressor replacement. Repair 5: Condensate Drain Backup ($100–$250 + potential water damage) This is the single most preventable AC service call in the Lowcountry. Our systems pull massive amounts of moisture from the air during the cooling season, and that moisture must drain properly. Algae, mold, and biofilm will inevitably build up in
AC Repair vs. AC Replacement: How Lowcountry Homeowners Should Decide
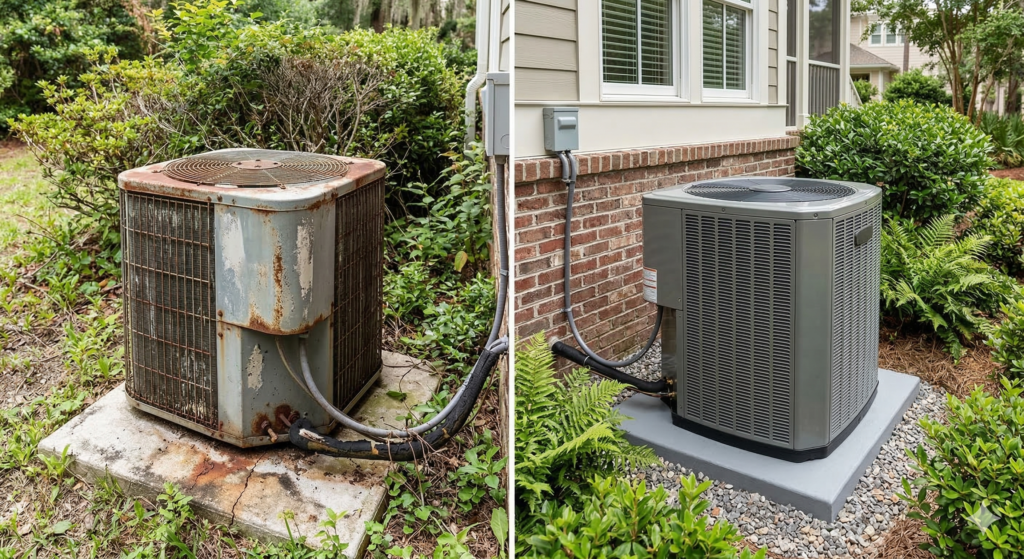
AC Repair vs. AC Replacement: How Lowcountry Homeowners Should Decide Deciding whether to repair or replace your air conditioning system is one of the most consequential financial decisions a homeowner faces, and there is no universal right answer. The smart choice depends on your system’s age, the cost of the current repair, your repair history, the refrigerant your system uses, and the efficiency gap between your current unit and modern equipment. Coastal Carolina Comfort walks every customer through this decision honestly, because we’ve seen firsthand that the wrong call — repairing a system that should be replaced, or replacing one that had years of life left — costs Lowcountry families real money. Here’s the framework we use to help homeowners across Summerville, Charleston, and the surrounding communities make the right decision. The 50% Rule: The Foundational Decision Framework The most widely referenced guideline in the HVAC industry is the 50% rule: if a single repair costs more than 50% of the price of a new system, replacement is typically the better financial move. To apply this rule, you need two numbers: the cost of the proposed repair and the approximate cost of a new system installed. For example, if a new AC system for your home would cost roughly $6,000 installed and the repair estimate is $3,200, that’s 53% — and the math favors replacement. This rule works well as a starting point, but it doesn’t account for system age, efficiency gains, or the cumulative cost of recent repairs. That’s where the rest of this framework comes in. System Age: The Most Important Variable Air conditioning systems in the South Carolina Lowcountry have a typical functional lifespan of 12 to 15 years. Some well-maintained systems last longer; many systems in our climate — where the cooling season runs April through October and humidity accelerates component wear — start declining noticeably after 10 to 12 years. Under 8 Years Old: Almost Always Repair A system less than 8 years old is still in its productive years. Most manufacturers offer 5 to 10 year parts warranties (10 years if properly registered), which means major component replacements may be covered. Unless the system has a fundamental design flaw or has suffered catastrophic damage, repair is almost always the right call for systems in this age range. 8 to 12 Years Old: Evaluate Case by Case This is the gray zone. A well-maintained system at 8 to 10 years old can have significant life remaining. A neglected system at 10 to 12 years old may be approaching end-of-life. In this range, consider the repair cost relative to the system’s remaining value, look at the pattern of recent repairs, and factor in the efficiency gains you’d get from a new system. Over 12 Years Old: Lean Toward Replacement Systems past 12 years are entering the end of their expected lifespan, especially in our climate. If you’re facing a major repair — compressor replacement, evaporator coil replacement, or a significant refrigerant leak — on a system this age, the numbers almost always favor investing in new equipment. The repair might fix today’s problem, but another major component failure is likely within the next few years. Over 15 Years Old: Replacement Is Usually the Right Call At this age, even a relatively minor repair should trigger a replacement conversation. The system is well past its expected lifespan, it’s operating at a fraction of the efficiency of modern equipment, and parts may become increasingly difficult to source. The money you spend on repairs at this stage would be better applied toward a new system that will run more efficiently and reliably for the next 15 years. The R-22 Factor: A Unique Financial Pressure If your air conditioning system was manufactured before 2010, it almost certainly uses R-22 refrigerant, commonly known as Freon. R-22 was phased out under the EPA’s Clean Air Act due to its ozone-depleting properties, and U.S. production ended in 2020. The practical impact for homeowners is significant: the remaining R-22 supply is limited and expensive. An R-22 recharge can cost several hundred dollars more than the equivalent service on a system using R-410A, the current industry standard. And if your system has a substantial refrigerant leak, you face a compounding problem — the repair cost is high, the refrigerant cost is high, and the system is old enough that another component failure is likely. For Lowcountry homeowners with R-22 systems, the refrigerant situation alone often tips the repair-vs-replacement analysis toward replacement, especially when combined with the energy efficiency gains available in modern equipment. Repair Frequency: The Pattern Matters A single repair on an otherwise healthy system is not cause for concern. A pattern of increasing repair frequency — two or more service calls in the past 12 months, or three or more in the past 24 months — tells a different story. It suggests that multiple components are aging simultaneously, and today’s fix will likely be followed by another within months. Think of it like a car with 200,000 miles: you can keep replacing individual parts, but at some point the cumulative repair cost exceeds what a newer, more reliable vehicle would cost. The same economics apply to AC systems. When we see a pattern of escalating repairs at Coastal Carolina Comfort, we tell our customers honestly. We’d rather have a straightforward conversation now than have you pay for three more repairs over the next year before reaching the same conclusion. Energy Efficiency: The Hidden Cost of Keeping an Old System This is the factor homeowners most often overlook, and it can be the most financially significant over time. Air conditioning efficiency is measured by the SEER (Seasonal Energy Efficiency Ratio) rating. Higher SEER means less electricity consumed per unit of cooling. The minimum SEER rating for new systems sold in the Southeast United States (including South Carolina) is now SEER2 15, with many mid-range and high-efficiency systems rated at SEER2 16 to 20+. By comparison, a system installed 12 to 15 years ago
How Much Does AC Repair Cost in South Carolina?
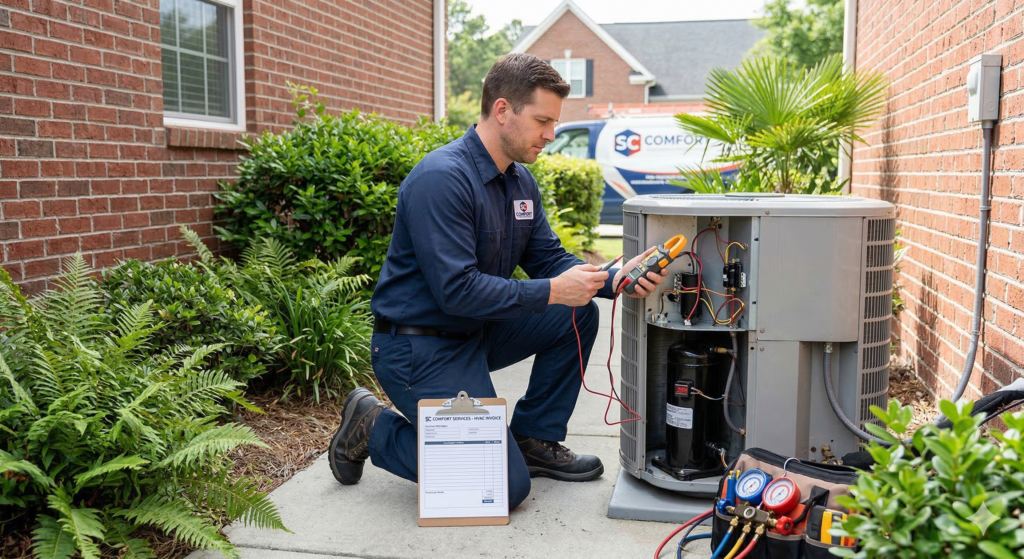
How Much Does AC Repair Cost in South Carolina? The average cost of AC repair in South Carolina ranges from $150 to $650 for common fixes like capacitor replacements, refrigerant recharges, and contactor swaps. Major component repairs — including compressor replacement, evaporator coil replacement, and condenser fan motor swaps — typically cost between $1,000 and $3,500 or more, depending on the system type, the part required, and labor. Coastal Carolina Comfort provides transparent, upfront pricing on every AC repair we perform across Summerville, Charleston, and the Lowcountry, so you know exactly what you’re paying before we start any work. We believe honest pricing builds trust, and trust is the foundation of every relationship we have with our neighbors. Understanding what drives AC repair costs helps you make informed decisions, avoid overpaying, and know when repair makes sense versus when it’s time to consider replacement. AC Repair Cost Breakdown by Repair Type Every AC repair is different, but the pricing below reflects what South Carolina homeowners can typically expect in 2026 for the most common repairs. These ranges account for the diagnostic fee, parts, and labor. Minor Repairs ($150–$400) Capacitor replacement: $150–$300. The run capacitor is one of the most frequently replaced components in residential AC systems. It stores the electrical charge needed to start and run the compressor and fan motors. Capacitors are relatively inexpensive parts, and a skilled technician can replace one in under an hour. Contactor replacement: $150–$350. The contactor is an electrical switch that controls power flow to the compressor and condenser fan motor. Like capacitors, contactors wear out from the constant on-off cycling that South Carolina’s long cooling season demands. Condensate drain clearing: $100–$250. When the condensate drain line clogs — extremely common in the Lowcountry’s humid climate — water backs up and can trigger a system shutdown via the float switch. Clearing the line is a straightforward service call. Thermostat replacement or recalibration: $150–$400. Depending on whether you’re replacing a basic thermostat or upgrading to a programmable or smart thermostat, costs vary. The diagnosis and wiring work contribute more to cost than the thermostat itself in most cases. Moderate Repairs ($400–$1,000) Refrigerant recharge (with leak detection): $250–$800. The cost depends on the type and amount of refrigerant needed. Systems using R-410A are less expensive to recharge than older systems that originally used R-22, which has been phased out under EPA regulations and is now extremely expensive when available. The leak detection component adds cost but is essential — simply adding refrigerant without finding the leak means the charge will drop again. Blower motor replacement: $400–$900. The blower motor circulates conditioned air through your ductwork. When it fails, you’ll notice weak or absent airflow from your vents. Variable-speed blower motors cost more than single-speed models. Condensate pump replacement: $250–$500. Some installations require a condensate pump to move water from the drain pan to an exterior drain. When the pump fails, water accumulates and can cause damage. Major Repairs ($1,000–$3,500+) Compressor replacement: $1,500–$3,500. The compressor is the most expensive component in your AC system. Replacing a compressor involves recovering the existing refrigerant, removing the old compressor, installing the new one, pulling a vacuum on the system, and recharging with the correct amount of refrigerant. Labor is intensive, and the part itself is expensive. When a compressor fails on an older system, this is often the point where AC repair versus replacement becomes the central question. Evaporator coil replacement: $1,000–$2,500. The evaporator coil sits inside the indoor air handler and absorbs heat from your indoor air. Coil replacements require significant labor because accessing the coil often means partially dismantling the air handler. Leaking evaporator coils are a common source of refrigerant loss. Condenser coil replacement: $1,000–$2,800. The condenser coil sits in the outdoor unit and releases the heat your system absorbs from indoors. In coastal South Carolina, condenser coils are particularly susceptible to salt air corrosion, which accelerates degradation — especially for homes in Charleston, James Island, Sullivan’s Island, and other properties close to the coast. What Factors Affect Your AC Repair Cost? The ranges above are guidelines, not guarantees. Several factors influence where your specific repair falls within those ranges. System Type and Size Central air conditioners, heat pumps, ductless mini-splits, and package units have different component configurations and varying parts costs. A 2-ton system serving a smaller home typically costs less to repair than a 5-ton system serving a larger property, simply because the components are sized differently and the larger parts cost more. Refrigerant Type This is a significant cost factor that many homeowners don’t anticipate. If your system was manufactured before 2010, it likely uses R-22 refrigerant (commonly called Freon). R-22 was phased out under the EPA’s Clean Air Act, and production ceased in 2020. The remaining supply is limited and expensive — an R-22 recharge can cost several hundred dollars more than an equivalent R-410A recharge. If your system requires R-22 and has a significant leak, this is often a strong financial argument for system replacement rather than repair. Part Availability Standard components for common residential systems from manufacturers like Daikin, Goodman, Trane, Carrier, Lennox, and Rheem are generally readily available. Specialty parts, discontinued components, or parts for older systems may require ordering and add wait time and potentially cost. Diagnostic Complexity Some issues are immediately apparent — a visibly damaged capacitor, an obviously clogged drain line. Others require more involved testing — checking refrigerant pressures, performing a leak search, testing electrical components with specialized meters, or evaluating ductwork. The complexity of the diagnostic process affects labor time. Warranty Coverage If your system is still under the manufacturer’s parts warranty (typically 5 to 10 years depending on the manufacturer and whether the system was registered), the parts cost may be covered, and you’d only be responsible for labor. Always check your warranty status before authorizing a major repair. Our team can help you determine warranty coverage during the diagnostic visit. Time of Year and Demand Emergency repairs during peak summer demand (June
Emergency AC Repair: What to Do When Your AC Breaks Down in the Lowcountry Heat
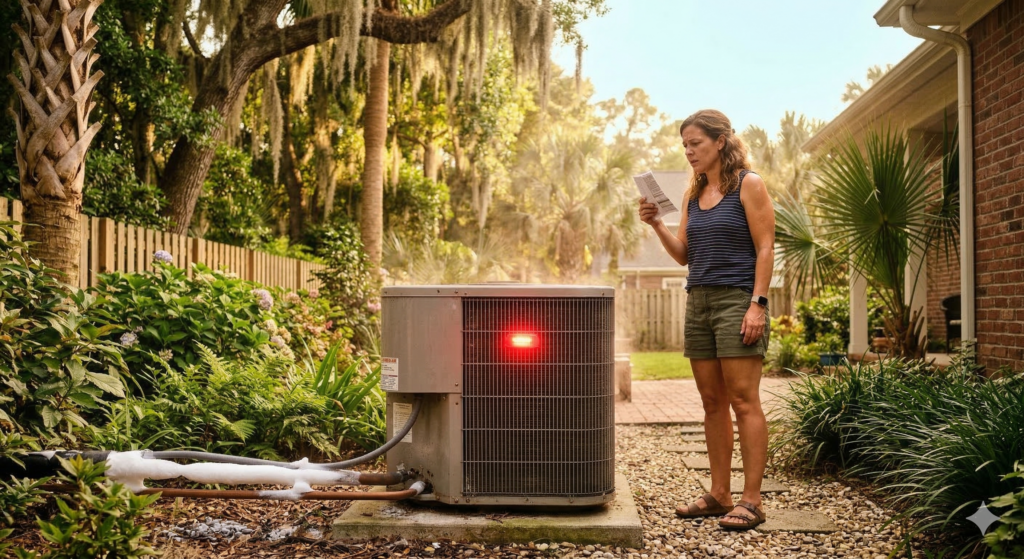
Emergency AC Repair: What to Do When Your AC Breaks Down in the Lowcountry Heat A complete AC failure in the South Carolina Lowcountry during summer is not just an inconvenience — it can become a genuine health and safety concern within hours. When outdoor temperatures reach 95°F or higher and relative humidity pushes past 80%, indoor temperatures in an uncooled home can exceed 90°F in as little as two to three hours. For households with elderly family members, young children, or anyone with respiratory or cardiovascular conditions, this creates real risk. Coastal Carolina Comfort provides same-day emergency AC repair across Summerville, Charleston, and the entire Lowcountry, with NATE-certified technicians who carry the most common replacement parts on their trucks so we can resolve the majority of emergency calls in a single visit. This guide covers exactly what to do when your AC fails unexpectedly, what steps to take immediately to protect your family and your home, and how to get professional help quickly. What Qualifies as an AC Emergency? Not every AC issue is an emergency, and knowing the difference helps you make smart decisions about urgency and cost. An AC emergency is any situation where the loss of cooling creates a safety risk or where continued operation could cause significant damage to the system or your home. True emergencies — call immediately: Your system has completely stopped working during a heat advisory or when outdoor temperatures exceed 90°F. The indoor temperature is climbing and you have vulnerable household members. You smell burning or see smoke coming from your indoor air handler or outdoor condenser unit. Your system is actively leaking water into living spaces, ceilings, or near electrical panels. You hear loud banging, grinding, or popping sounds that suddenly started during operation. Urgent but not emergency — call within 24 hours: Your AC is running but only producing lukewarm air. You notice ice forming on the refrigerant lines or evaporator coil. Short cycling has started but the system is still providing some cooling. A gradual decline in cooling performance over the past few days. If you’re unsure whether your situation is an emergency, it’s always better to call and describe what’s happening. Our team can help you assess the urgency over the phone and advise on immediate steps while we dispatch a technician. Immediate Steps When Your AC Fails When your AC stops working, taking the right steps in the first 30 minutes can protect your family, prevent secondary damage, and give your technician a head start on diagnosis. Step 1: Check the Thermostat and Breaker Before assuming the worst, rule out the simplest causes. Verify your thermostat is set to “cool” mode, the temperature is set below the current room temperature, and the fan is set to “auto.” Then check your electrical panel — AC systems use dedicated breakers, and a tripped breaker is one of the most common reasons for a sudden shutdown. Reset it once. If it trips again immediately, do not reset it a second time — a repeatedly tripping breaker indicates an electrical fault that requires professional attention. Step 2: Check Your Air Filter A severely clogged air filter can cause the evaporator coil to freeze, which eventually triggers a system shutdown. If your filter is visibly dirty or clogged, replace it and then set your thermostat to “fan only” for 30 to 60 minutes. This circulates air across the frozen coil to help it thaw. After thawing, try running the system in cooling mode again. Step 3: Inspect the Outdoor Unit Go outside and look at your condenser unit. Make sure it’s running — you should hear the fan and compressor. Check for obvious issues like vegetation growing against the unit (maintain at least two feet of clearance), a visibly damaged fan blade, or standing water around the base from a recent storm. If the outdoor unit isn’t running at all but the indoor fan is blowing, the issue is likely in the condenser, the compressor, or the electrical connection between the two units. Step 4: Protect Your Home Close blinds and curtains on sun-facing windows to reduce solar heat gain. Close doors to unused rooms to concentrate whatever cool air remains in the spaces you’re actively using. Avoid using the oven, dishwasher, dryer, or any heat-generating appliance. If you have ceiling fans, run them counterclockwise to create a wind-chill effect. Step 5: Protect Vulnerable Household Members Move elderly family members, infants, and pets to the coolest room in the house — usually a ground-floor room on the north-facing side. Provide plenty of water. If indoor temperatures exceed 85°F and you have high-risk individuals in the home, consider relocating to a cooled space — a neighbor’s home, a community center, or even a public library — until the repair is completed. Why Lowcountry AC Emergencies Are Different An AC breakdown in South Carolina’s Lowcountry presents challenges that homeowners in other regions simply don’t face, and understanding these factors helps explain why fast response matters here more than in most places. Extreme Heat and Humidity Combination It’s not just the temperature — it’s the combination. A 95°F day with 85% relative humidity produces a heat index well above 100°F. When your indoor environment mirrors these conditions, the risk of heat exhaustion and heat stroke rises significantly, especially for vulnerable populations. The Lowcountry’s cooling season runs from April through October, which means your AC system bears a heavier workload than systems in most other U.S. markets. Moisture and Mold Risk When your AC stops running, it also stops dehumidifying your indoor air. In a region where outdoor humidity routinely exceeds 80%, your indoor humidity can climb above 60% within hours of an AC shutdown. Elevated indoor humidity creates ideal conditions for mold and mildew growth — especially in ductwork, on evaporator coils, and in crawl spaces. The longer the system stays down, the greater the moisture damage risk. System Stress During Peak Season Lowcountry AC systems work harder and run longer than systems
Signs Your AC Needs Repair (And When to Call a Pro)
Signs Your AC Needs Repair (And When to Call a Pro) An air conditioner rarely fails without warning. In most cases, your cooling system will show clear signs that something is wrong — warm air from the vents, unusual sounds, higher-than-normal electric bills, or moisture where it shouldn’t be — days or even weeks before a complete breakdown occurs. Recognizing these AC repair warning signs early gives you time to schedule a professional diagnosis and fix the problem before it escalates into an expensive emergency. Here in the Lowcountry, where our cooling systems run six to seven months straight, catching problems early is especially important. Coastal Carolina Comfort’s NATE-certified technicians see these issues every day across Summerville, Charleston, and the surrounding communities, and we can tell you from experience: the homeowners who call at the first sign of trouble almost always pay less and stay more comfortable than those who wait. Below are the eight most common signs that your air conditioner needs professional repair — and guidance on when each situation warrants a call. 1. Your AC Is Blowing Warm or Lukewarm Air This is the most obvious symptom and the one that sends most Lowcountry homeowners reaching for the phone. If your system is running but the air coming from your vents feels warm or barely cool, several things could be happening. A refrigerant leak is one of the most common causes. Your AC system relies on a precise charge of refrigerant — typically R-410A in newer systems — to absorb heat from indoor air and transfer it outside. When the refrigerant level drops due to a leak in the evaporator coil, condenser coil, or refrigerant lines, the system simply cannot cool effectively. Other potential causes include a failing compressor, a malfunctioning expansion valve, or restricted airflow from a severely clogged air filter. Before calling a technician, check your thermostat settings and replace your air filter if it’s been more than 30 days. If neither fixes the issue, it’s time for a professional diagnosis. When to call: If warm air persists after checking your thermostat and filter, call for AC repair in Summerville, SC or AC repair in Charleston, SC — a refrigerant leak will only get worse and can damage the compressor if left unaddressed. 2. Strange or Unusual Noises Your air conditioner should produce a consistent, low hum when running. When you start hearing sounds that are new, loud, or rhythmic, your system is telling you something specific is going wrong. Grinding or metal-on-metal screeching typically indicates a problem with the blower motor bearings or the fan motor inside the condenser unit. When bearings wear out, the motor has to work harder, generating heat and friction that can eventually burn out the motor entirely. Banging or clanking often points to a loose or broken component inside the compressor, the blower assembly, or a disconnected fan blade hitting other parts. This is a sound you should never ignore — loose parts cause cascading damage. Buzzing can indicate electrical issues such as a failing contactor, loose wiring, or a capacitor that’s starting to fail. Electrical components are some of the most common failure points in South Carolina AC systems because our high humidity accelerates corrosion on connections and terminals. Hissing or bubbling sounds frequently point to a refrigerant leak, especially if the sound comes from the area near the indoor evaporator coil. When to call: Any new or unusual sound warrants a diagnostic call. Some of these — especially grinding and banging — can turn a $200 repair into a $2,000 compressor replacement if ignored for even a few weeks. 3. Short Cycling — Your AC Turns On and Off Rapidly Short cycling happens when your AC compressor kicks on, runs for a few minutes (or less), shuts off, and then restarts the cycle almost immediately. This is not how a healthy cooling system operates. A properly functioning air conditioner should run in cycles of roughly 15 to 20 minutes before reaching the thermostat set point and shutting off. Short cycling puts enormous stress on the compressor — the most expensive component in your AC system. Each startup draws a surge of electrical current, and frequent cycling causes premature wear on the compressor motor, the capacitor, and the contactor. Common causes include an oversized AC unit, a failing run capacitor, a dirty evaporator coil that’s causing the system to overheat and trigger a safety shutdown, or a refrigerant issue that’s causing the low-pressure safety switch to trip. In the Lowcountry, we also see short cycling caused by thermostat placement issues. If your thermostat is near a window receiving direct afternoon sun or positioned above a heat-generating appliance, it can create false temperature readings that confuse the system. When to call: Short cycling should be addressed within a week. Every cycle puts unnecessary wear on your compressor, and a new compressor can cost $1,500 to $3,000 installed. 4. Your Energy Bills Have Spiked Unexpectedly A gradual increase in your electric bill during peak cooling season is normal — we expect higher bills from May through September here in South Carolina. What isn’t normal is a sudden, unexplained spike when your usage habits haven’t changed. When an AC system is struggling — whether from low refrigerant, a dirty coil, a failing motor, or aging components — it compensates by running longer and harder to maintain the same temperature. That extra runtime translates directly into higher electricity consumption. We recommend comparing your current bill to the same month in the previous year. If you see a 20% or greater increase without a corresponding change in usage or rate, your cooling system is likely working harder than it should be. When to call: A spike of 20% or more over the same billing period last year is a strong indicator that your system needs professional AC repair. The longer you wait, the more you pay in both energy costs and accumulated system wear. 5. Weak Airflow From Your Vents If you
The Summerville HVAC Maintenance Checklist

The Summerville HVAC Maintenance Checklist That Prevents 90% of Repairs Regular HVAC maintenance prevents up to 90% of common repairs and extends system lifespan by 5-7 years. Summerville homeowners should perform monthly tasks (filter checks, vent clearing, thermostat monitoring), seasonal tasks (condensate drain treatment, outdoor unit cleaning, refrigerant line inspection), and schedule professional tune-ups twice yearly—in spring before cooling season and fall before heating season. The Lowcountry’s extreme humidity, extended cooling season, and airborne particulates demand more frequent maintenance than national guidelines suggest. A well-maintained system runs more efficiently, breaks down less often, and keeps your home comfortable year-round. Introduction: The Cheapest Repair Is the One You Never Need Here’s a number that should get your attention: 90%. That’s the percentage of HVAC repairs that could have been prevented with proper maintenance. Nine out of ten service calls we make in Summerville are for problems that didn’t have to happen. Clogged filters that caused compressors to overheat. Condensate drains that backed up and flooded ceilings. Capacitors that failed because coils were too dirty to dissipate heat. Refrigerant leaks that started as minor corrosion nobody caught. Every one of these repairs cost the homeowner hundreds—sometimes thousands—of dollars. And every one of them was preventable. At Coastal Carolina Comfort, we’ve maintained HVAC systems across the Lowcountry for over a decade. We’ve seen what neglect does to equipment in our climate. We’ve also seen homeowners who follow a simple maintenance routine go 10+ years without a single major repair. This guide gives you that routine. It’s specifically designed for Summerville’s climate—not generic advice written for somewhere with mild summers and low humidity. Follow this checklist, and you’ll dramatically reduce your repair bills, extend your system’s life, and stay comfortable no matter what the Lowcountry weather throws at you. Why Summerville Systems Need More Maintenance Before we dive into the checklist, let’s talk about why maintenance matters more here than almost anywhere else. The Extended Cooling Season In Minneapolis, an AC might run 4 months per year. In Summerville, we’re cooling 8-9 months—sometimes longer. That’s twice the operating hours, twice the wear, and twice the opportunity for problems to develop. A system that runs from April through November accumulates wear equivalent to nearly two years of operation in a milder climate. Maintenance intervals need to reflect that reality. The Humidity Factor Summerville’s average humidity hovers around 70-80% year-round. During summer mornings, it regularly exceeds 90%. This humidity: Forces your system to work harder (dehumidification uses significant energy) Creates ideal conditions for biological growth in drain lines and on coils Accelerates corrosion on electrical components and refrigerant lines Causes condensate drain clogs—one of the most common service calls we see Related: Learn how Summerville’s humidity damages HVAC systems Airborne Particulates Between pollen season (which feels like it lasts 8 months here), coastal salt air, and general Lowcountry dust, your system filters more particulates than systems in cleaner environments. Filters clog faster, coils get dirtier, and airflow restrictions develop more quickly. The Bottom Line National maintenance guidelines assume average conditions. Summerville doesn’t have average conditions—we have extreme conditions. Your maintenance routine needs to account for that. Monthly Maintenance Tasks These quick tasks take 10-15 minutes and should become habit. Do them on the same day each month—the first Saturday, the day you pay your mortgage, whatever helps you remember. 1. Check and Replace Your Air Filter This is the single most important thing you can do for your HVAC system. A clogged filter: Restricts airflow, forcing your system to work harder Causes evaporator coils to freeze Leads to compressor overheating and failure Increases energy consumption by 5-15% Reduces indoor air quality How to check: Locate your filter (return air grille, air handler, or dedicated filter slot) Remove the filter and hold it up to light If you can’t see light through it clearly, replace it If it’s visibly gray or caked with debris, replace it immediately Summerville-specific guidance: During peak cooling season (May-September), check weekly and replace every 30-45 days During shoulder seasons, check monthly and replace every 45-60 days During pollen season (spring), you may need to replace every 2-3 weeks After storms or high-wind events, check immediately Filter recommendations: Use pleated filters rated MERV 8-11 for best balance of filtration and airflow Avoid fiberglass filters (minimal filtration) and ultra-high MERV ratings (can restrict airflow) Buy filters in bulk—you’ll use 8-12 per year in Summerville 2. Clear Supply and Return Vents Blocked vents disrupt airflow balance and force your system to work harder. Monthly walkthrough: Check all supply vents (where air blows out) for obstructions Check all return vents (where air is pulled in) for blockages Move furniture, curtains, rugs, or stored items that block airflow Vacuum vent covers to remove dust buildup Ensure all vents are open (closing vents doesn’t save energy—it creates pressure imbalances) 3. Monitor Thermostat Performance Your thermostat is the brain of your HVAC system. Small issues here cause big problems. Monthly checks: Verify the display is clear and responsive Confirm the temperature reading seems accurate (compare to a separate thermometer) Check that the system responds when you adjust settings Replace batteries annually (or when the low battery indicator appears) For smart thermostats, ensure WiFi connection is stable Warning signs: Temperature swings greater than 2-3 degrees from setpoint System not responding to setting changes Blank or flickering display “Auxiliary heat” running frequently (for heat pump systems) 4. Listen and Observe Your system tells you when something’s wrong—if you’re paying attention. Monthly awareness check: Listen for unusual noises (grinding, squealing, banging, clicking) Notice any unusual odors from vents Feel for weak airflow or temperature inconsistencies Watch for water around the indoor unit Check for ice on refrigerant lines (visible at the outdoor unit) Related: Know the 5 warning signs your AC is about to break down Seasonal Maintenance Tasks These tasks should be performed quarterly or at the start of each season. They’re more involved than monthly tasks but still manageable for most homeowners. Spring: Prepare for Cooling Season Complete these tasks in
HVAC Repair vs. Replacement
HVAC Repair vs. Replacement: A Summerville Homeowner’s Decision Guide Deciding between HVAC repair and replacement comes down to four key factors: the cost of repair relative to replacement (use the 50% rule—if repairs exceed half the cost of a new system, replace), the age of your equipment (systems over 15 years old are usually better replaced), refrigerant type (R-22 systems should be replaced due to phase-out costs), and repair frequency (multiple repairs per year signal it’s time). Summerville homeowners should also factor in energy efficiency gains, available rebates, and the demanding Lowcountry climate that shortens system lifespans compared to national averages. The Question Every Homeowner Dreads Your HVAC technician just delivered the news: your system needs a major repair. Maybe it’s a compressor. Maybe it’s a coil leak. Whatever it is, the number has four digits, and now you’re facing the question every Summerville homeowner eventually confronts. Do I fix it, or do I replace the whole thing? It’s not an easy decision. Repair feels like the cheaper option—until you’re repairing again six months later. Replacement feels like the responsible choice—until you see the price tag. And everyone from your neighbor to your brother-in-law has an opinion. At Coastal Carolina Comfort, we’ve guided thousands of Lowcountry homeowners through this exact decision. We’ve seen people waste money repairing systems that should have been replaced years ago. We’ve also seen people replace perfectly good equipment because someone talked them into it. This guide will give you the framework to make the right decision for your situation—not based on sales pressure, but on facts, math, and what actually makes sense for your home and budget. The 50% Rule: Your Starting Point The most reliable rule of thumb in the HVAC industry is simple: If the repair costs more than 50% of what a new system would cost, replace instead of repair. Here’s why this works: The Math Behind the Rule Let’s say a new HVAC system for your Summerville home costs $8,000 installed. Using the 50% rule: Repair cost under $4,000: Repair is likely the better value Repair cost over $4,000: Replacement makes more financial sense But this isn’t just about today’s repair. It’s about what comes next. A system that needs a $3,500 repair today is likely to need another significant repair within 1-2 years. That’s the nature of aging equipment—when major components fail, others are usually close behind. So that $3,500 repair might actually cost you $3,500 + $1,200 + $800 over the next two years. Suddenly you’ve spent $5,500 and still have an old, inefficient system. When to Adjust the Rule The 50% rule is a starting point, not an absolute. Adjust based on: System age: For systems under 8 years old, you might stretch to 60-70% before replacing—they likely have more good years ahead. For systems over 12 years old, consider replacing at 30-40% of replacement cost. Repair history: If this is the first major repair on a well-maintained system, lean toward repair. If it’s the third repair this year, lean toward replacement regardless of cost. Component involved: Some repairs (capacitor, contactor, fan motor) are normal wear items that don’t indicate broader system failure. Others (compressor, evaporator coil) often signal the beginning of the end. The Age Factor: How Old Is Too Old? System age is the second most important factor in your decision. Average HVAC Lifespan National average: 15-20 years with proper maintenance Summerville reality: 12-16 years is more typical Why the difference? Our systems work harder. A Summerville AC runs 8-9 months per year, often 12+ hours per day during summer. Compare that to a system in Minneapolis that might run 4 months per year. More operating hours means faster wear. Age-Based Decision Framework Under 8 years old: Almost always repair unless the cost exceeds 50% of replacement. These systems have significant life remaining. 8-12 years old: Evaluate carefully. Major repairs may be worthwhile, but start planning for eventual replacement. This is a good time to begin saving. 12-15 years old: Lean toward replacement for major repairs. The system is in its final years, and repair money is often better invested in new equipment. Over 15 years old: Replace for any significant repair. Even if the repair is relatively affordable, you’re likely facing additional failures soon. The efficiency gains alone often justify replacement. The Warranty Consideration Most HVAC systems come with: 5-10 year compressor warranty 5-10 year parts warranty 1 year labor warranty (sometimes extended by the installer) If your system is still under warranty, repair almost always makes sense—your out-of-pocket cost is limited to labor and any non-covered parts. Check your paperwork or call your installer to verify warranty status before making any decisions. The R-22 Refrigerant Problem If your system uses R-22 refrigerant (also called Freon or HCFC-22), this single factor may make your decision for you. What Happened to R-22 R-22 was the standard air conditioning refrigerant for decades. However, due to its ozone-depleting properties, the EPA phased it out: 2010: No new R-22 systems could be manufactured 2020: Production and import of R-22 banned entirely This means all R-22 available today is either recycled or reclaimed from decommissioned systems. Supply is limited and shrinking every year. The Cost Impact R-22 prices have skyrocketed: 2010: Approximately $10-15 per pound 2020: Approximately $50-75 per pound 2026: $100-200+ per pound depending on availability A typical residential AC system holds 6-12 pounds of refrigerant. If your R-22 system develops a leak, you’re looking at: Leak repair: $200-$1,000+ depending on location Refrigerant recharge: $600-$2,400+ for a full charge Total cost: Often $1,000-$3,000+ for a single repair And here’s the kicker—if it leaks once, it will likely leak again. You could face these costs repeatedly. How to Know If You Have R-22 Check the data plate on your outdoor unit. Look for: “R-22” or “HCFC-22” = R-22 system (consider replacement) “R-410A” or “Puron” = Modern refrigerant (repair may make sense) If your system was installed before 2010, it almost certainly uses R-22. Systems installed 2010-2015 could be either. Systems installed after 2015 are virtually all R-410A. Our Recommendation If you have an R-22 system that needs any refrigerant-related repair, replace
Emergency HVAC Repair in Summerville

Emergency HVAC Repair in Summerville: What to Do When Your AC Dies at 2 AM When your AC fails unexpectedly in Summerville, stay calm and follow these steps: First, check your thermostat settings and batteries, then inspect your circuit breaker for tripped switches, and finally examine your air filter for severe clogs. If these quick fixes don’t restore cooling, turn off the system to prevent further damage and call for emergency HVAC service. While waiting, close blinds, open interior doors, and use fans to circulate air. True HVAC emergencies include complete system failure during extreme heat, burning smells, gas odors, or water actively flooding your home. 2 AM, 85 Degrees, and Dead Silence You wake up sweating. The house feels wrong—heavy, still, suffocating. You check the thermostat: 85°F and climbing. The AC isn’t running. It’s 2 AM on a July night in Summerville, and your air conditioner has officially quit. First things first: take a breath. We know that moment of panic. After more than a decade of emergency calls across the Lowcountry, we’ve talked hundreds of homeowners through this exact situation. And here’s what we’ve learned—most people don’t know what to do, what to check, or when a situation truly requires emergency service. This guide will walk you through exactly what to do when your AC dies unexpectedly, how to stay safe and relatively comfortable while you wait for help, and how to know whether you’re dealing with a true emergency or something that can wait until morning. Let’s get you through this. Step 1: Don’t Panic—Troubleshoot First Before you pick up the phone, run through these quick checks. You’d be surprised how often a “dead” AC is actually a simple fix. Check Your Thermostat It sounds obvious, but start here: Verify the settings: Is it set to “cool”? Is the temperature set below the current room temperature? We’ve seen thermostats accidentally bumped to “heat” or “off” more times than we can count. Check the batteries: Many thermostats run on batteries, and when they die, so does communication with your system. If your thermostat screen is blank or dim, swap in fresh batteries. Look for error codes: Smart thermostats and some programmable models display error codes when something’s wrong. Check your manual or do a quick phone search for what the code means. Try a reset: Turn the thermostat off completely, wait 30 seconds, then turn it back on. Sometimes that’s all it takes. Inspect Your Circuit Breaker Your HVAC system typically uses two breakers—one for the indoor air handler and one for the outdoor condenser. Head to your electrical panel and look for: Tripped breakers: A tripped breaker sits in the middle position between “on” and “off,” or may show a red indicator. If you find one, flip it fully to “off,” then back to “on.” Multiple trips: If the breaker trips again immediately or within a few minutes, stop. Repeated tripping indicates an electrical problem that needs professional diagnosis. Don’t keep resetting it. Labeled breakers: Look for labels like “AC,” “HVAC,” “Air Handler,” or “Condenser.” If your panel isn’t labeled, the HVAC breakers are typically 20-40 amp double breakers. Check Your Air Filter A severely clogged filter can cause your system to overheat and shut down as a safety measure. Locate your filter: Usually found in the return air grille, at the air handler, or in a filter slot in your ductwork. Assess the condition: If you can’t see light through it, or if it’s visibly caked with dust and debris, it’s overdue for replacement. Replace if necessary: Put in a fresh filter and give your system 15-20 minutes to reset before trying to restart. Inspect the Outdoor Unit If it’s safe to go outside (and you have a flashlight), take a quick look at your condenser: Is it running? If the indoor fan runs but the outdoor unit is silent, the problem is likely outside—possibly a capacitor, contactor, or compressor issue. Is it blocked? Check for debris, overgrown vegetation, or anything restricting airflow around the unit. Is ice present? Ice on the refrigerant lines or the unit itself indicates a problem—usually low refrigerant or airflow restriction. If you see ice, turn the system off and call for service. Is the disconnect pulled? There’s an electrical disconnect box near your outdoor unit. Make sure it hasn’t been accidentally switched off. Step 2: Determine If It’s a True Emergency Not every AC failure at night requires emergency service. Here’s how to assess your situation: True HVAC Emergencies—Call Now Burning smell or visible smoke: Turn off your system immediately at the thermostat AND the breaker. This could indicate an electrical fire. If you see smoke or the smell is strong, evacuate and call 911 first, then your HVAC company. Gas smell (rotten eggs/sulfur): If you have a gas furnace and smell gas, leave your home immediately. Don’t flip any switches or use your phone inside. Call your gas company’s emergency line from outside, then call 911 if needed. Water actively flooding: If your condensate drain has backed up and water is pouring into your home, you need to stop the damage. Turn off the system and call for emergency service to prevent ceiling collapse, floor damage, or electrical hazards. Extreme heat with vulnerable occupants: If temperatures are dangerous (90°F+) and you have infants, elderly family members, people with medical conditions, or pets that can’t be relocated, this becomes a health emergency. Complete failure during heat advisory: When the National Weather Service issues a heat advisory for the Summerville area and your AC is completely non-functional, waiting until morning could be dangerous. Urgent But Can Wait Until Morning System not cooling efficiently: If the AC runs but doesn’t cool well, you can likely make it through the night with fans and open windows (if outdoor temps allow). Intermittent operation: A system that cycles on and off or works sometimes is frustrating but not dangerous. Document what’s happening to help your technician diagnose faster. Strange noises without other symptoms: Grinding, squealing, or banging sounds warrant prompt attention but don’t require a 3 AM service call unless accompanied by burning smells or system
How Summerville’s Humidity Destroys HVAC Systems

How Summerville’s Humidity Destroys HVAC Systems (And How to Fight Back) Summerville’s high humidity—averaging 70-80% year-round—forces HVAC systems to work significantly harder than in drier climates. Excess moisture causes evaporator coil corrosion, refrigerant line damage, condensate drain clogs, and accelerated wear on compressors and fan motors. Lowcountry homeowners can protect their systems by maintaining proper airflow, scheduling regular maintenance, ensuring adequate drainage, and considering whole-home dehumidification solutions. Without proactive care, humidity cuts years off your system’s lifespan and drives up energy costs. The Invisible Enemy in Your Home If you’ve lived in Summerville for more than one summer, you know the humidity isn’t just uncomfortable—it’s oppressive. Step outside in July and the air wraps around you like a warm, wet blanket. Your glasses fog up walking from the car to the front door. Your hair does things you didn’t ask it to do. But here’s what most homeowners don’t realize: that same humidity is waging a slow war on your HVAC system every single day. At Coastal Carolina Comfort, we’ve spent over a decade repairing and replacing systems across the Lowcountry. And we can tell you this with certainty—humidity is the silent killer of HVAC equipment in our region. Systems that should last 18-20 years are giving out at 12. Units that ran efficiently for years suddenly can’t keep up. The good news? Once you understand how humidity attacks your system, you can fight back. Let’s break down exactly what’s happening inside your HVAC—and what you can do about it. Why Summerville’s Humidity Is So Hard on HVAC Systems The Numbers Don’t Lie Summerville averages 70-80% relative humidity throughout the year. During summer months, it’s not uncommon to see 90%+ humidity in the early morning hours. Compare that to Phoenix at 20-30% or Denver at 40-50%, and you start to understand the challenge. Your air conditioner wasn’t just designed to cool air—it’s designed to remove moisture. In fact, dehumidification accounts for roughly 30% of your AC’s workload in a humid climate. In Summerville, that number climbs even higher. The Double Duty Problem Every time your AC runs, it’s doing two jobs simultaneously: Cooling the air by absorbing heat through the evaporator coil Dehumidifying by condensing moisture out of the air onto that same coil In drier climates, the cooling job dominates. In Summerville, your system spends enormous energy just wringing water out of the air. This means longer run times, higher energy bills, and accelerated wear on every component. What “Feels Like” Temperature Really Means When the weather app says it’s 88°F but “feels like” 102°F, that’s humidity at work. Your body cools itself through sweat evaporation—but when the air is already saturated with moisture, that sweat can’t evaporate efficiently. The same principle applies to your home. High humidity makes 74°F feel stuffy and uncomfortable, so you crank the thermostat down to 70°F. Now your system runs even longer, works even harder, and wears out even faster. 5 Ways Humidity Damages Your HVAC System 1. Evaporator Coil Corrosion and Buildup Your evaporator coil is ground zero for humidity removal. As warm, moist air passes over the cold coil, water vapor condenses into liquid—just like condensation on a cold glass of sweet tea. In Summerville’s humidity, your coil handles gallons of water daily. This constant moisture exposure causes: Corrosion: The coil’s aluminum or copper fins gradually corrode, reducing heat transfer efficiency and eventually causing refrigerant leaks. Biological buildup: The perpetually damp environment creates ideal conditions for organic growth on and around the coil. This buildup insulates the coil, forcing your system to work harder. It also restricts airflow and can cause unpleasant odors. Note: If you suspect biological contamination in your HVAC system, we recommend consulting with a qualified specialist who can properly assess and remediate the situation. Dirt accumulation: Moisture makes the coil sticky, trapping dust, pollen, and debris that would otherwise pass through. This layer of gunk further reduces efficiency. 2. Condensate Drain Line Clogs All that moisture your AC removes has to go somewhere. It drips into a drain pan and flows out through a condensate drain line—typically a PVC pipe that exits near your outdoor unit or into a floor drain. In humid Summerville, this drain line handles far more water than systems in drier climates. The constant moisture flow creates a perfect environment for: Algae growth inside the line Organic slime buildup Debris accumulation at connection points When the drain clogs, water backs up into the drain pan. If the pan overflows, you’re looking at water damage to ceilings, walls, and floors. Many systems have a safety float switch that shuts down the AC when water backs up—which means you come home to a hot house and no idea why. Pro tip: We see more condensate drain clogs in Summerville between May and September than any other issue. A $15 preventive treatment can save you a $150+ service call. 3. Compressor Strain and Premature Failure Your compressor is the heart of your AC system—and the most expensive component to replace. It’s responsible for pressurizing refrigerant and circulating it through the system. Humidity increases compressor workload in several ways: Extended run times: When your system runs longer to handle moisture removal, the compressor runs longer too. More operating hours means more wear. Higher head pressure: Humid conditions can increase the pressure your compressor works against, generating more heat and stress on internal components. Short-cycling risk: If humidity causes coil icing or other issues, the system may short-cycle—turning on and off frequently. Each startup is the hardest moment for a compressor, so frequent cycling dramatically accelerates wear. A compressor replacement typically costs $1,500-$3,000 including labor. In many cases, it makes more sense to replace the entire system at that point. 4. Ductwork Deterioration Your ductwork is often the forgotten component of your HVAC system—out of sight in attics, crawl spaces, and wall cavities. In Summerville’s humidity, those hidden spaces become problem zones. Condensation on ducts: When cold air flows through ducts in a hot, humid attic or crawl space, condensation forms on the outside of the ducts.